


Get Ready for Hot Weather
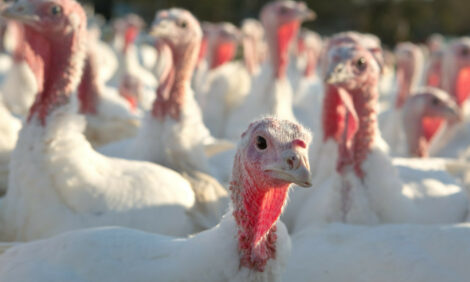
Possibly offering an indication of the likely impacts of climate change ahead, there have been unusual weather patterns around the world in recent months, including abnormally high temperatures and low rainfall across much of the US. Jim Donald, Jess Campbell, Dennis Brothers and Gene Simpson of the National Poultry Technology Center (NPTC) at Auburn University offer tips on keeping broiler house ventilation systems working effectively. 29 July 2012
 13 minute read
 By:
By: Hot weather devastated the poultry industry in most parts of the US last year. From Texas to Maryland and Kentucky to South Alabama, no one escaped triple-digit temperatures for days on end. At the NPTC, the phone rang off the hook with questions from growers and managers looking for the magic bullet to stop rising mortalities and decreasing performance. In too many cases, after asking questions about the particular situation, the authors report that there was no simple solution, and most of the steps they could recommend to cope with this problem were
things that should have been done in April or May, not put off until July or August.
After last summer, we all know how bad hot weather can get. We can hope that this summer will not be so bad – but it would be foolish not to do everything we can reasonably do to be ready for another long, hot summer. Most of these steps are not hard to do and are not expensive. However, they must be done in advance. In other words, preventive maintenance is a must!
Checklists are a great way to keep on track and set priorities on servicing equipment and houses. This newsletter provides checklists for preventive maintenance on the most critical parts of a poultry house environmental control system: fans, evaporative cooling, electrical systems and the back-up generator. Click here to print and carry these checklists with you (or give to helpers), as well as post in convenient places in your office or your houses as both reminders and records to make sure your houses and equipment keep running smoothly.
Keys to Understanding the Challenge of Hot Weather
Modern poultry house ventilation and evaporative cooling systems are designed to allow growing the maximum number of birds in a given house floor area. Extreme heat is a challenge to individual bird performance and survival, and extremely hot weather challenges our goal of maximising live weight production.
To maintain comfort, birds must be able to dissipate about 12 BTU of heat per hour per pound of body weight. If the air temperature surrounding the birds is close to the desired temperature for comfort, they will lose up to about five BTU per pound per hour from their body surface and lose about seven BTU per pound per hour through respiration or breathing. Under these conditions, the heat balance of the bird is at equilibrium. They eat, drink, behave and grow normally.
Problems arise if the surrounding air temperature increases above that normal level. Warmer air will not allow the transfer of the five BTU per pound per hour from the bird’s body. When the bird’s ability to dissipate heat from its body surface is diminished due to warmer surrounding air, the bird must compensate by increasing its respiration rate through panting. Then, if surrounding air is so warm that the bird cannot adequately compensate by panting, its internal body temperature will rise, causing severe heat stress, and eventually mortality.
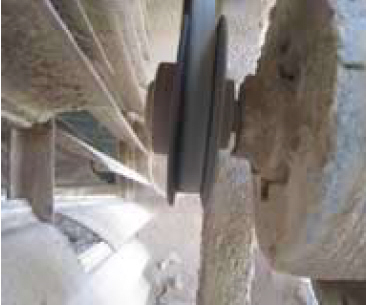
The poorly maintained and dirty shutter will restrict airflow, and the severely worn fan belt riding low in the pulley will result in lower fan rpms and thus lower wind-speed in the house.
Conditions like these are not difficult or costly to remedy. Maintenance to correct ventilation and cooling system problems must not be put off until hot weather arrives.
Fan Maintenance Check-List
- Drives (Pulleys and belts) – The drives transmit power and provide the gear ratio between the motor speed and propeller speed. Anything that goes wrong with the drive system causes lost fan performance. Check belt tension – loose belts reduce the gear ratio, causing loss of airflow, and reduce belt life. Check belts for wear. Worn belts ride lower in the pulleys, changing the gear ratio and lowering fan performance. Check pulley alignment. Misaligned pulleys cause excessive belt wear and more drive losses. Check pulleys for wear: cupped out pulleys allow belt (even a new belt) to ride lower in the pulley, which changes gear ratio and lowers air flow.
- Shutters and guards – Anything that obstructs the airflow causes lost fan performance. Clean shutters once per week during tunnel ventilation. Dirty shutters require more energy from the airflow to open and reduce airflow and efficiency. Clean guards once a week because dirty guards present more surface area to obstruct airflow.
- Motors – Most electric circuits and electrical devices run more efficiently and last longer at cooler temperatures. Clean motors once per flock. Dirty motors run hotter, lose efficiency and have reduced motor life.
- Bearings – Lubricate bearings twice per year where applicable in spring and fall. Dry bearings require more power to turn, causing you to lose fan efficiency and shorten bearing life.
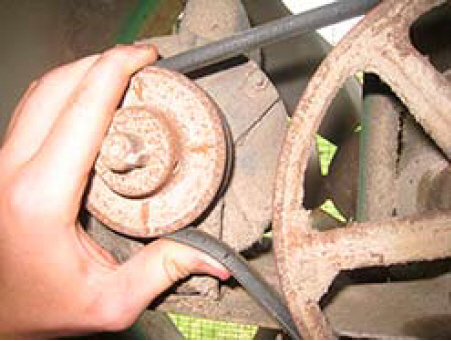
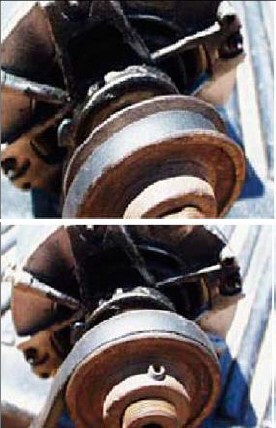
Note: The same effect is caused by a worn pulley, even if belt is new. Re-tensioning the belt will not cure either problem, worn belt or worn pulley.
Evaporative Cooling Checklist
- Pads – Blow debris from outside of pad system to dog house with backpack blower with pads dry. This will push all debris and cobwebs into dog house to be removed later. If pads are damaged, they must be replaced.
- Dog house – Sweep all cobwebs and other debris off of the back of the pads with a broom. Once everything is on the floor, remove it from the dog house.
- Pad rinse – Close inlet curtain or tunnel doors. Wash excess debris from pads with water hose and spray nozzle carefully. High-pressure washer rinsing is not recommended. Wash anything left inside dog house out. (If pads require a chemical cleaning, use only recommended chemicals and cleaning procedures.)
- Drain system – Drain the evaporative cooling system recirculation trough and sump tanks and clear all dirt/debris from the system. Leaving trash in the system causes premature fouling of filters, pads and pumps.
- Flush system – Flush the top header system and the trough to the best of your ability.
- Filters – Remove and clean or replace filters. Replacement filters must be stored on site and be readily available when needed. Filters must be checked once a week at times of high use. Do not operate system without filters and screens in place.
- Pumps, floats and tanks – Make sure pump intake screens are cleaned, floats are in place and adjusted and tanks are clean and free from debris. Pump screens must be checked at least once a week during periods of high use of cooling system or as often as system is drained and flushed.
- Water supply – Test run recirculation system to make sure the fill levels are adjusted properly and adequate water is available to fill system. Make sure the supply system fully wets the entire pad system and no dry streaks are left on pads. If supply water quality is a problem, additional filtration or treatment may be necessary.
- Distribution header – Flush distribution header. Loosen union at distribution header and carefully clean all distribution holes in header with screwdriver or soft bristle brush. Do not change the size of the hole in the header. Run water in system to ensure all holes are free from debris or clogs.
- Inlet opening – Inlet curtain opening must be at least a minimum of 80 per cent of the area of the cooling pad system area. 600 square feet of six-inch recirculating pad requires at least 480 square feet of free air unobstructed inlet opening minimum. Bunched up curtains or partially opened tunnel doors must not restrict the tunnel inlet opening.
- Dog house tightness – The dog house on each side must be as air tight as possible. A little spray foam and carpentry work will go a very long way. All cracks, holes, and leaks must be sealed. Air that bypasses the recirculating pads is not cooled and works against the system.
Electrical Systems Checklist
- Main panel – Main panel breaker must be checked on a weekly basis during the summertime to make sure it is not overheating. Breaker spots can be installed on both sides of each main breaker to help spot early warning signs of trouble. At least one exact replacement main breaker should be stored on site preferably in a common location on the farm site.
- Controller back-up – Check that controller back-up system is set to turn on automatically if controller fails. Make sure that if controller fails, siren and dialer operate properly. Make sure back–up batteries have been installed in dialer or backup controller box.
- Back-up thermostats – Test back-up thermostats for proper operation and temperature setting. Placing backup thermostats near cooling systems is not recommended.
- Circuit breakers – Check to make sure breakers are not overheating or tripping. Problem may be in the electrical system or the breaker itself. Make sure exact replacement circuit breakers are readily available. If replacing the breaker does not solve the problem, get a qualified electrician to troubleshoot the system.
- Electrical connections – Electrical connections in transfer switches, generators, service disconnects and main panels/subpanels should be checked and tightened every year. This should only be done by a qualified and/or licensed electrician. Damaged fan outlets, equipment outlets, light fixtures and junction boxes are fire hazards and must be repaired.
- Grounding lug – Grounding lug on ground rod should be checked for tightness at every house and generator shed. This is done by moving wire at lug-to-rod connection. Solid acorn-style grounding lugs are recommended to tie ground wire to ground rods.
- Lightning protection – Check to make sure lighting protection is in place and properly installed. Lightning protection works best when installed in layers to protect major electrical and electronic components. Protection systems must be sized to protect the equipment it is intended to protect. One-size fits-all is not the best way to go. Lightning protection must only be installed by a qualified or licensed electrician.
Generator Service Checklist
- Fuel level – Check the fuel level in the tank to make sure that you have at least 20 gallons of fuel on reserve in case of an emergency power outage. Maintaining a fresh fuel supply is a must. Fuel filters should be changed each year. Newer fuel mixtures may not have the same ‘shelf life’ as previous fuels so more frequent fuel changes might be necessary.
- Battery – Batteries should be replaced every three years, regardless of condition. Check all battery connections to ensure that there is no corrosion build-up and all connections are tight. Check the battery charge level to make sure there is a full charge on the battery. Many growers have installed inexpensive trickle chargers on batteries to ensure a full charge when needed.
- Fluid levels and air filters – All vital fluids must be kept at proper levels. Engine oil must be changed and fluids must be checked at least once per year. Oil, water/coolant and fuel gauges should be double checked. Air filters must be inspected and replaced as needed.
- Generator settings – Make sure back-up switch is set to turn the generator on automatically or switch to ON when the power fails. Back-up ‘key’ switches may be installed so that if electronic or analogue generator control board malfunctions occur, the generator can still be manually started.
- Transfer switch – Check transfer switching to make sure it is set to automatically transfer power when the grid power fails. Transfer switch testing must be done at least once a week when the generator cycles on. Most transfer switches have a backup means for transferring power installed in case electronic controls fail. Make sure all farm hands know how to manually transfer power in case of emergency.
- Feeder disconnects – Breakers or fuses must be inspected to ensure proper operation. Exact replacement breakers or fuses must be stored in generator shed in case of emergency.
|
* "Whatever the weather, a well-maintained Class A tunnel house will always get you closer to the goal of maximum live weight production." |
The goal in hot weather is to keep the bird dissipating body heat so that panting does not result. The first and most important tool we have to keep the bird from panting is air velocity or wind speed. As we increase the velocity of the air over and around a bird, the wind-chill effect greatly helps the bird’s ability to shed surface body heat.
Every broiler grower has seen this phenomenon over and over again. Birds mildly panting in still air quit panting when the house is put into tunnel ventilation. In extremely hot conditions, especially as birds approach market age, the ventilation system must be operating at 100 per cent capacity, which is why fan and shutter maintenance is so important for achieving the goal of maximum live weight production.
The second tool we have in a modern house is evaporative cooling. Reducing the incoming air temperature further accelerates the bird’s ability to lose heat from the surface of its skin. It is important to realise that the effectiveness of the evaporative cooling system also depends on maintaining adequate airflow with adequate water applied to the pads. Clogged cool cells not only reduce cooling, they reduce the wind-chill effect of tunnel ventilation, which is why evaporative cooling system maintenance is so important.
While first-class and top-functioning ventilation and cooling systems can take us a long way toward meeting the hot weather challenge, a point can be reached when we get into triple-digit temperatures with market age birds, where heat stress reduces performance and increasing mortalities are inevitable. In other words, the heat load of the house is more than the ventilation and cooling system can handle on that day. At that point, we are outside of the design envelope for that particular house on that particular day.
The fact is that it is not only warmer air, but also heat given off by the birds that make up the severe hot weather challenge. This means that stocking density may need to be taken into consideration well in advance of anticipated hot weather. Houses with inferior insulation, hot air leaks and inadequate air speed will especially do better in severe hot weather if we take some of the heat load out of the house by reducing the density.
People do not like to talk about reducing densities because of the effect on cash flow. For example, in a 40-foot × 500-foot house, changing the hot weather density from 0.90 to 1.05 results in 3,175 fewer birds in the house. But at 6.5 pounds market weight, that reduces the total heat load on the poultry house by over 100,000 BTU per hour.
Adjusting stocking density ahead of anticipated severe heat conditions is a business decision, and one that can make good economic sense,
resulting in slightly lower live weight production but better overall flock performance and fewer mortalities. However, it has to be made at the time of placement, often four to six weeks ahead of the time we think the hottest conditions of the summer might prevail. Make no mistake, however, whatever the weather, a well-maintained Class A tunnel house will always get you closer to the goal of maximum live weight production.
August 2012