


A guide for farm preparation, chick quality, placement, behaviour, brooding setup and chick start assessment
Chick Management guide taken from Aviagen's Broiler Breeders' Handbooks 2025 7 August 2025
 8 minute read
 By:
By: *Editors note: The following is an abbreviated version of Aviagen's Broiler Handbooks 2025, Section 2: Chick Management
Download the 2025 Broiler Management Handbooks in full here:
Introduction and principles
To ensure optimal growth, uniformity, welfare, and meat quality in broiler chickens, early chick management must focus on the early adoption of feeding and drinking behaviors. It is important to minimize the time between hatching and placement, providing immediate access to feed and water, and maintaining ideal brooding conditions. Although newly hatched chicks rely initially on their yolk sac for nutrients and immunity, swift transition to external feeding is critical. A well-managed early environment that covers temperature, humidity, air quality, and litter supports healthy physiological development. Successful early management should produce a 7-day body weight that is at least 4.5 times the chick's hatch weight, a benchmark consistently linked to improved flock performance and reduced early mortality.
Download: Aviagen Brief: Broiler Management for Birds Grown to Low Kill Weights
Chick quality and broiler performance
Optimal broiler performance and profitability depend on delivering high-quality chicks and managing them effectively from hatch to placement. Chick quality is influenced by parent stock health, nutrition, and incubation practices, together with sufficient planning to ensure appropriate delivery and readiness of the brooding environment. Ideally, chicks from parent flocks of similar age should be placed together to minimize performance variation; chicks from younger flocks may require higher brooding temperatures and additional support.
Transport of chicks and quality check
The transport system must maintain appropriate temperature, humidity, ventilation, and CO₂ levels to prevent stress and maintain chick quality. A good-quality chick is active, well-formed, and has a healed navel and retracted yolk sac. Proper early nutrition and brooding management enable chicks to reach target weights uniformly. Any deviation in chick quality should prompt immediate feedback to the hatchery, as issues during holding, transport, or placement can exacerbate underlying problems.
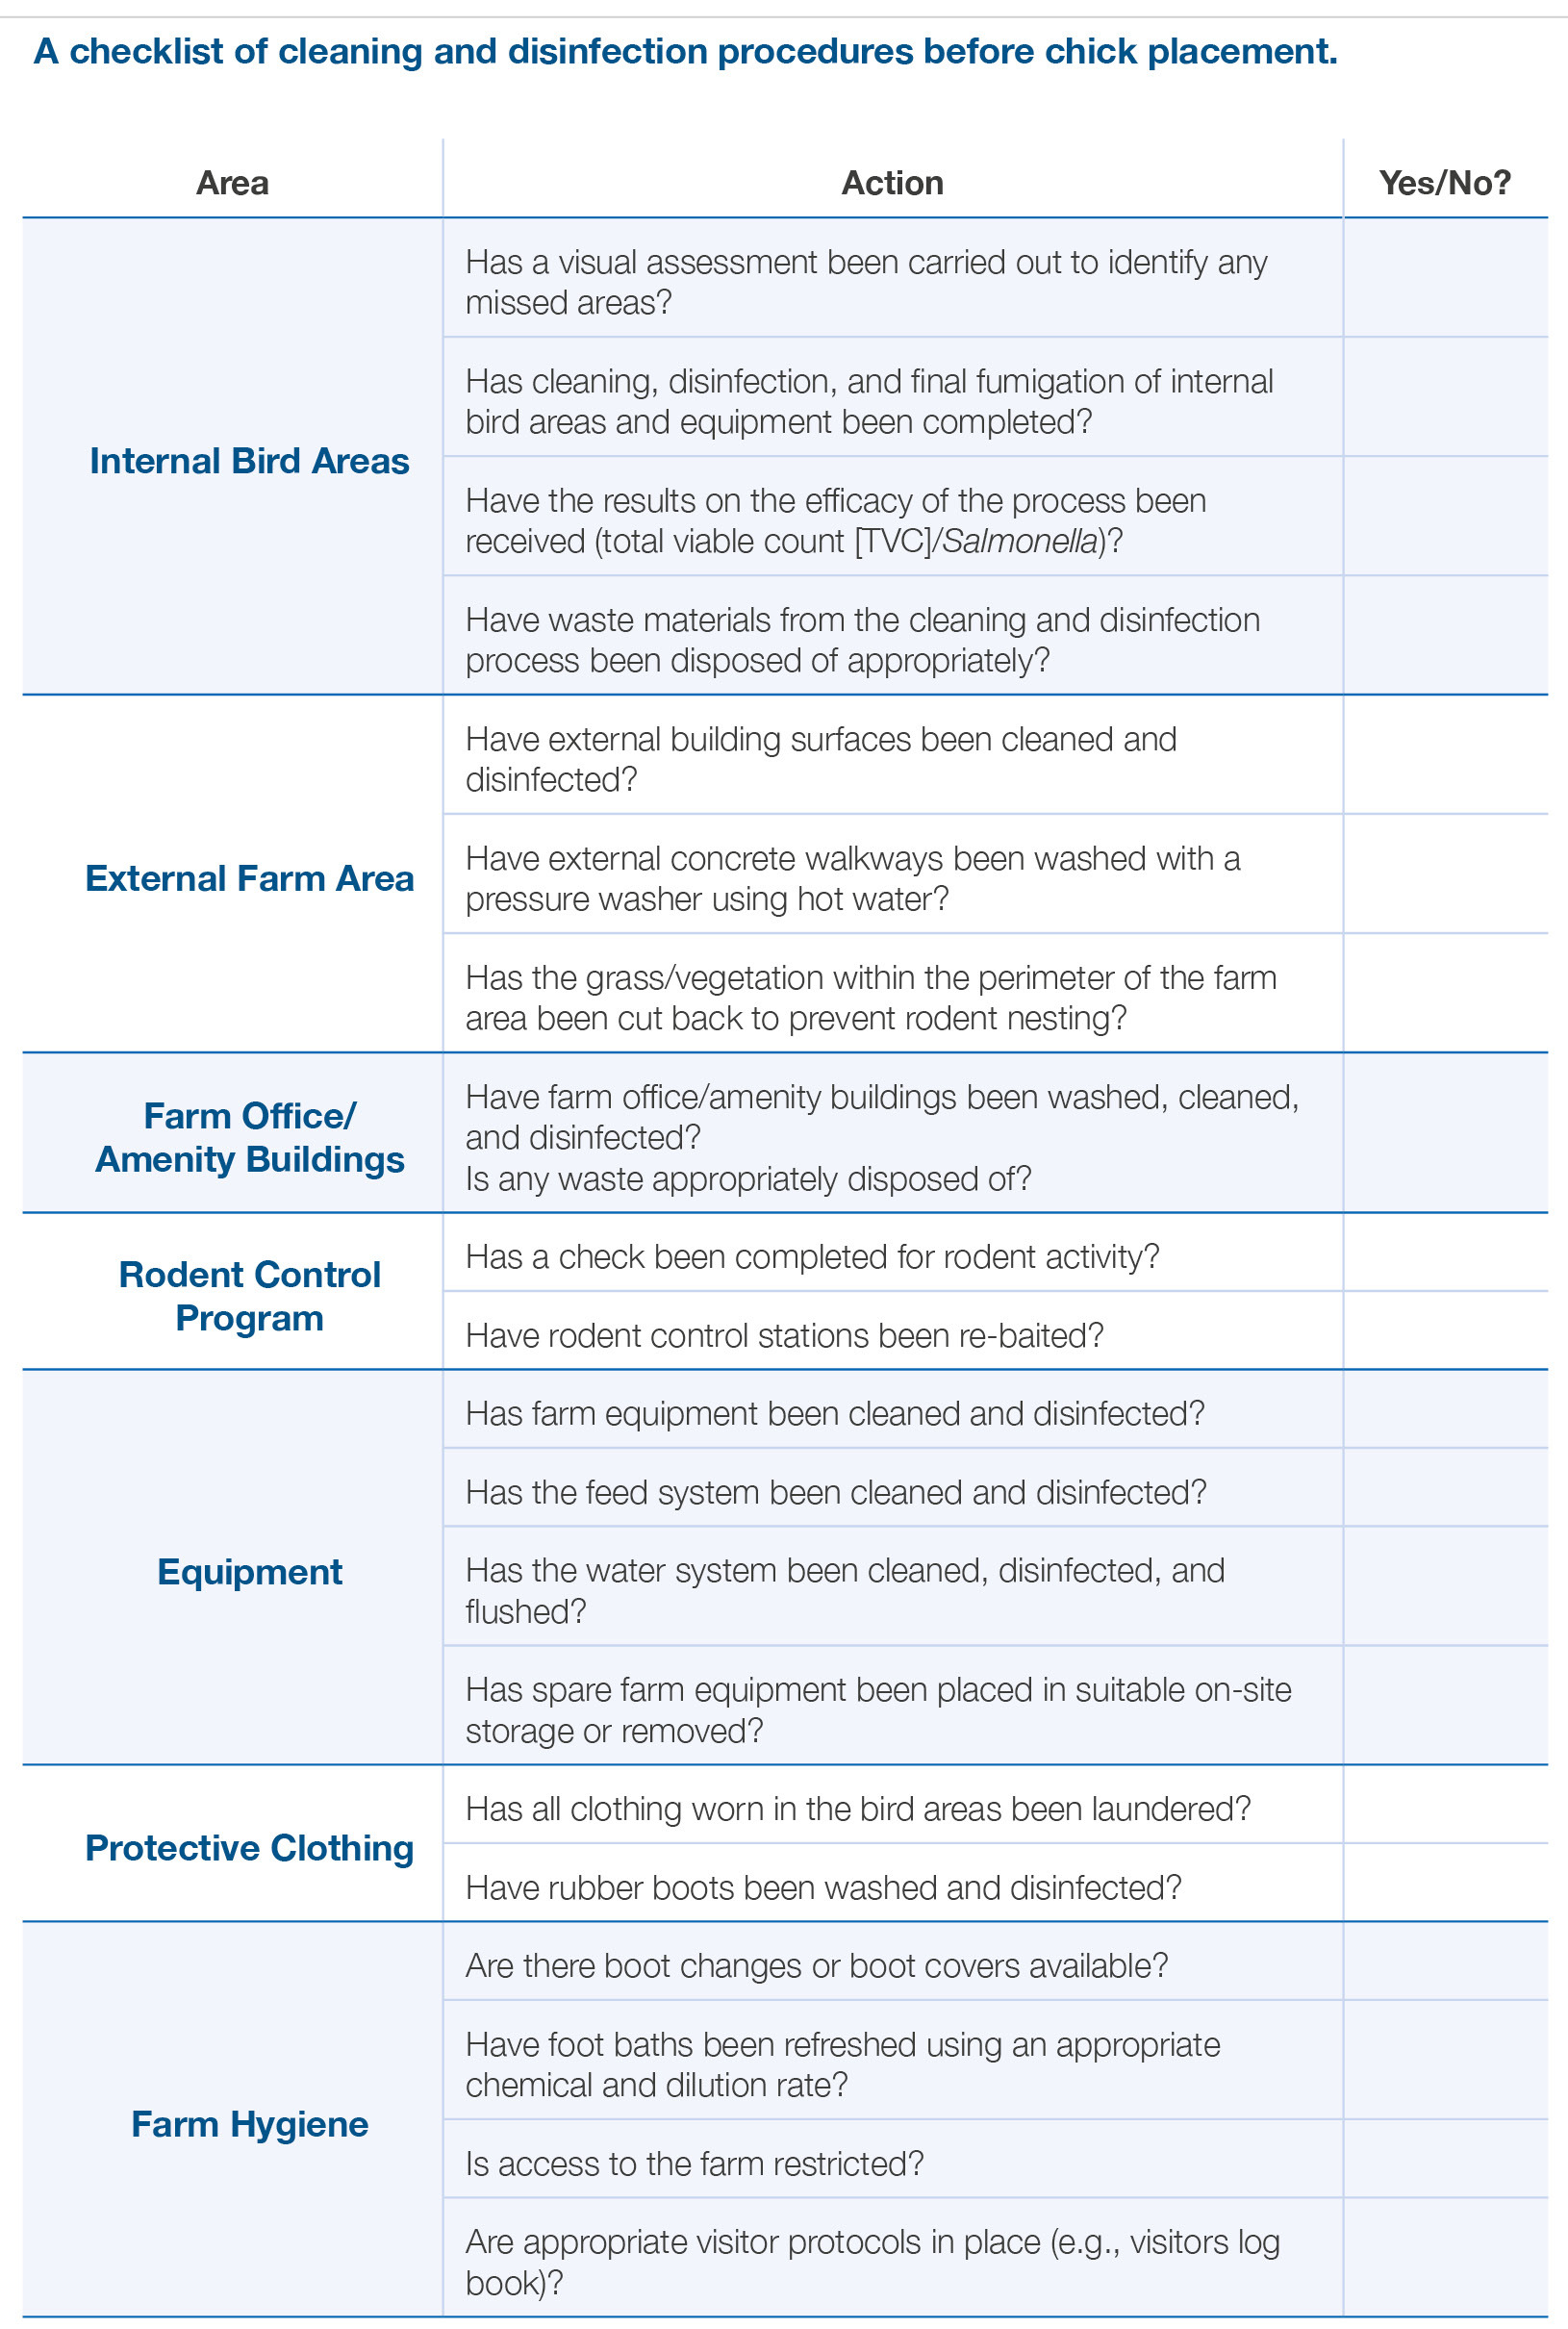
Farm preparation and biosecurity
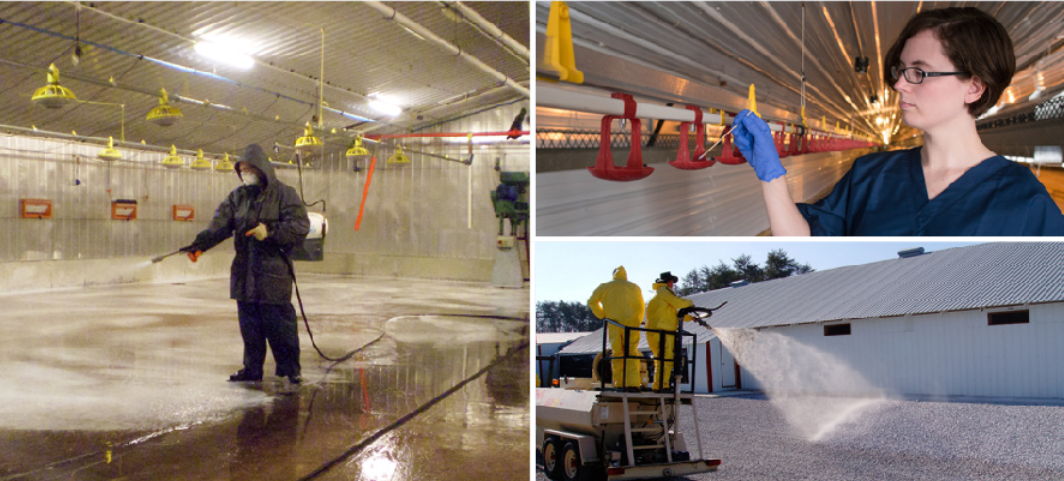
Farm and house preparation is critical for broiler health, welfare, and performance. An “all-in/all-out” system where birds are single age allows for more effective cleaning, vaccination, and disease control. Thorough cleaning and disinfection of housing, equipment, and surrounding areas must be completed and verified at least 24 hours before chick arrival. Entry protocols, such as vehicle and visitor disinfection, are essential to prevent pathogen introduction.
Key Points:
- Control disease by minimizing the spread of broiler ages across the farm. An "all-in/all-out" system is best.
- Provide chicks with biosecure, clean housing throughout the life of the flock.
Download: Best practice in the Broiler House: Biosecurity
House preparation and layout
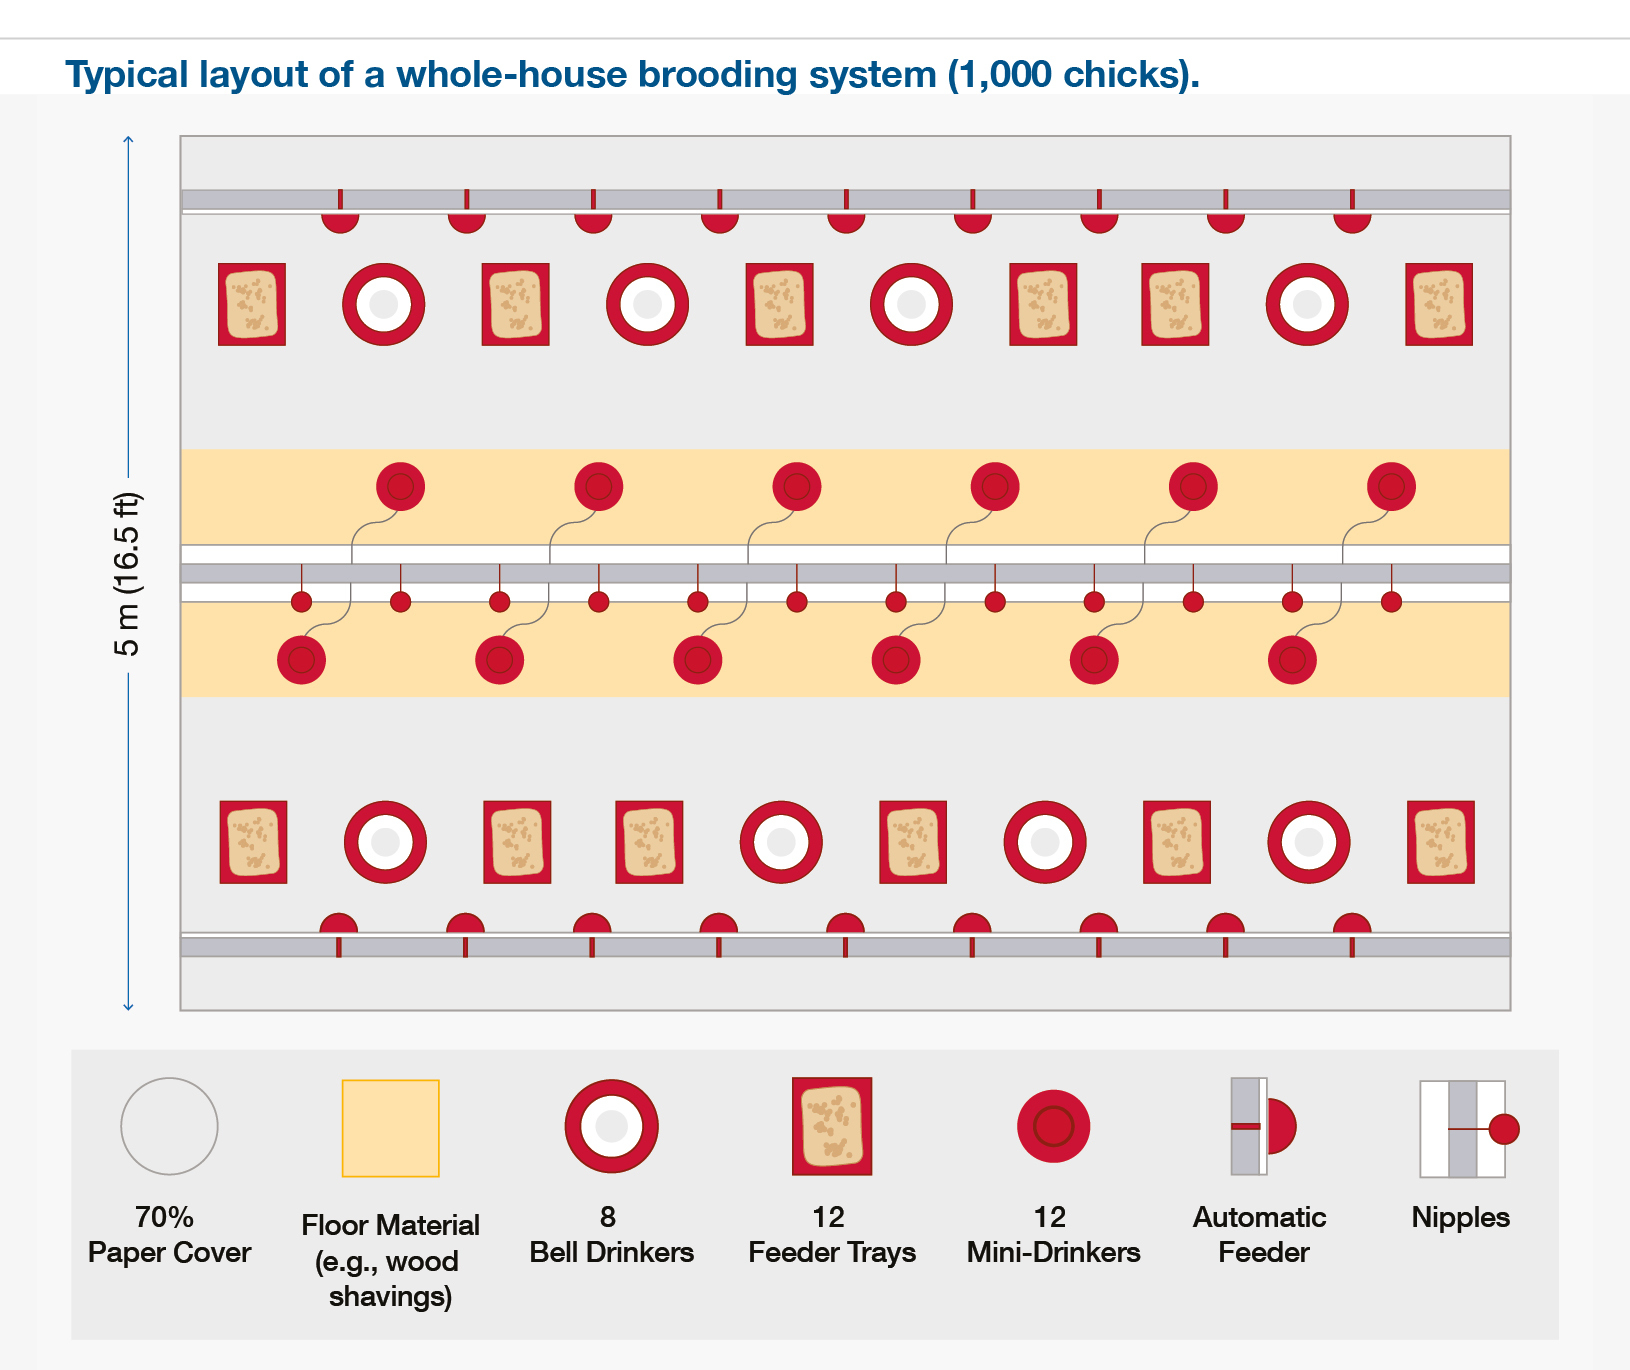
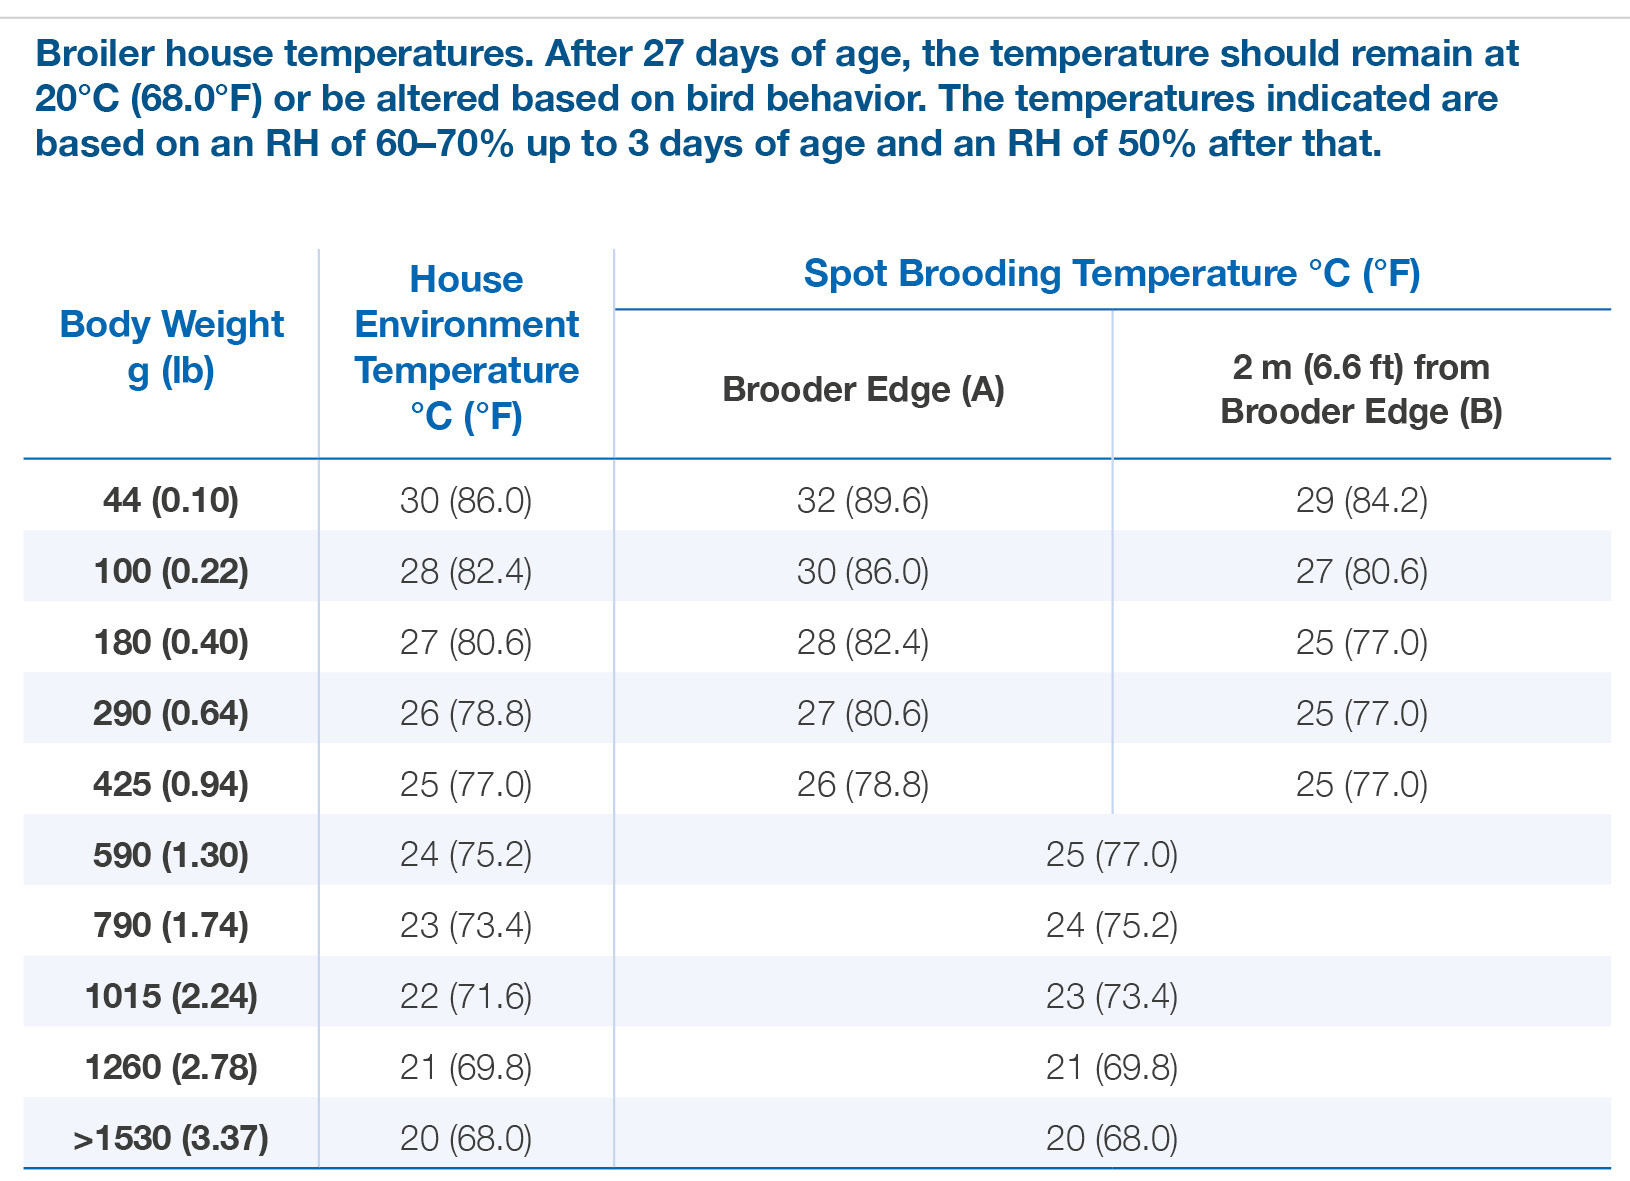
Chicks are unable to regulate body temperature in the first days and therefore require preheated, stable environments with recommended floor (28–30°C), air (30–32°C), and litter (28–32°C) temperatures and 60–70% relative humidity.
Litter should be evenly spread (2–4 cm depth) to ensure easy access to feed and water.
Clean and appropriately warmed water (18–21°C) must be available from well-maintained drinkers, with flushing to maintain flow and hygiene.
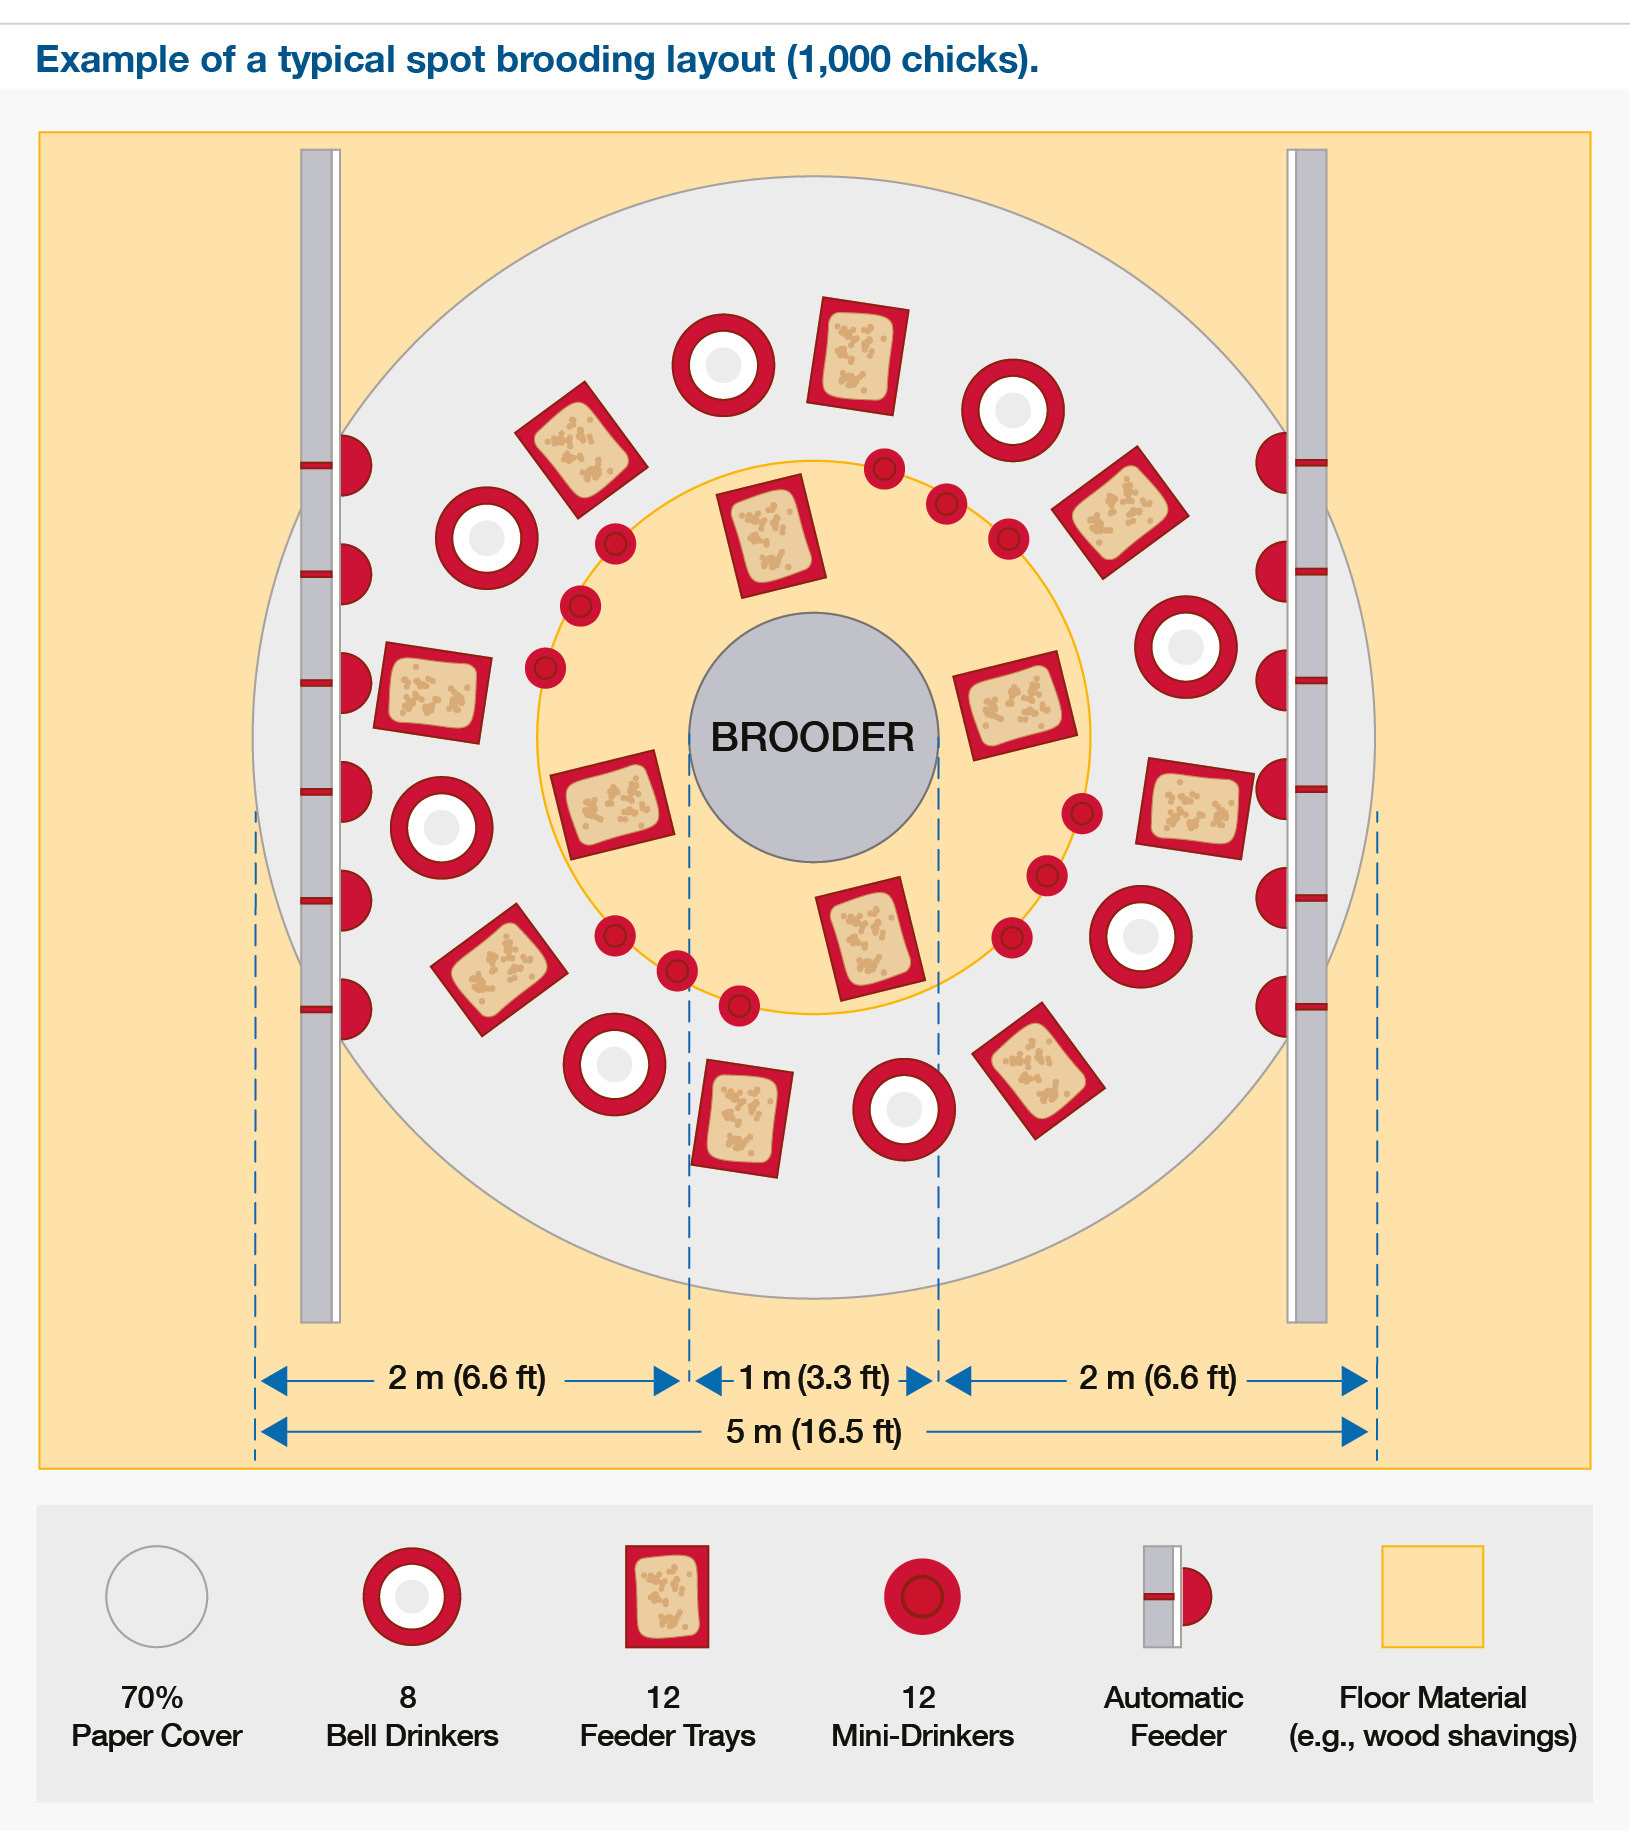
Feed should be offered in crumble form on trays or paper covering 70% of the brooding area to encourage intake, and chicks should not have to travel more than 2 meters to reach it.
Lighting should be maintained for 23 hours after placement with 30–40 lux intensity, gradually transitioning to 4–6 hours of darkness by day 7.
Brooding rings should be expanded gradually and removed based on conditions and housing type. Where partial brooding is used, automated systems in unoccupied areas must be ready before expanding chick access to ensure seamless transition and feed freshness.
Key Points:
- Preheat the house and stabilize temperature and humidity at least 24 hours prior to the arrival of chicks.
- Spread ltter evenly at an appropriate depth (2-4 cm [0.8-1.6inches]).
- Make feed and water available to chicks immediately.
- Provide 23 hours of light for the first 7 days to encourage feed and water intake.
- Chicks should not have to travel more than 2m (6.6ft) to access feed and water.
- Position supplementary feeders and drinkers alongside the main feeding and drinking systems.
Brooding setup
Broiler chick brooding commonly employs two temperature control systems: whole-house and spot brooding.
In whole-house brooding, a large, centralized heat source warms the entire house uniformly, limiting chicks' ability to choose their preferred temperature zone. Although only part of the house may be used initially, full-house heating is necessary to encourage chick movement before full release around day 7. Energy-efficient heat exchangers are increasingly used in this setup.
Spot brooding uses localized heat sources (e.g., radiant or canopy heaters), allowing chicks to move toward or away from heat, enabling self-regulation of body temperature. Brooding rings may be used early on to manage movement. Typical density is 40 chicks/m², with equipment scaled to match chick numbers and heating capacity. Spot brooding creates temperature gradients, requiring careful placement of brooders per manufacturer specifications.
Other methods include underfloor heating, hatch-brooding, and hot water systems, all of which must be managed per manufacturer instructions and chick behavior. Regardless of system, consistent temperature and humidity and early stimulation of feeding and activity are all vital for optimal broiler development.
Key Points:
- Unload chicks and place them quickly, gently and evenly onto paper in the brooding area.
- Arrange equipment to enable the chicks to access feed and water easily.
- Leave the chicks to settle for 1–2 hours with access to feed and water.
- Check feed, water, vent temperature, house temperature and humidity after 1–2 hours and adjust where necessary.
Downloads:
- Poster: Evaluating Brooding Temperature
- Broiler How To 1: Set Up a Spot Brooding Circle
- Broiler How To 2: Set Up Whole House Brooding
Chick placement and environmental control
Before chicks arrive, ensure feed and water are properly distributed. Upon delivery, chicks must be placed promptly and gently onto paper to avoid stress, dehydration, and impaired growth. Allow 1–2 hours for acclimation, followed by checks for feed and water access and appropriate environmental conditions. Adjustments should be guided by chick behavior, crop fill, and vent temperature.
Optimal relative humidity (RH) (ideally 60–70%) for the first three days reduces dehydration risk. Spot brooding systems naturally support higher RH, while whole-house brooding may require active humidity control. Low RH (<50%) can lead to dehydration and respiratory issues; it can be increased with foggers or manual misting. From day 7, RH should decrease to prevent wet litter.
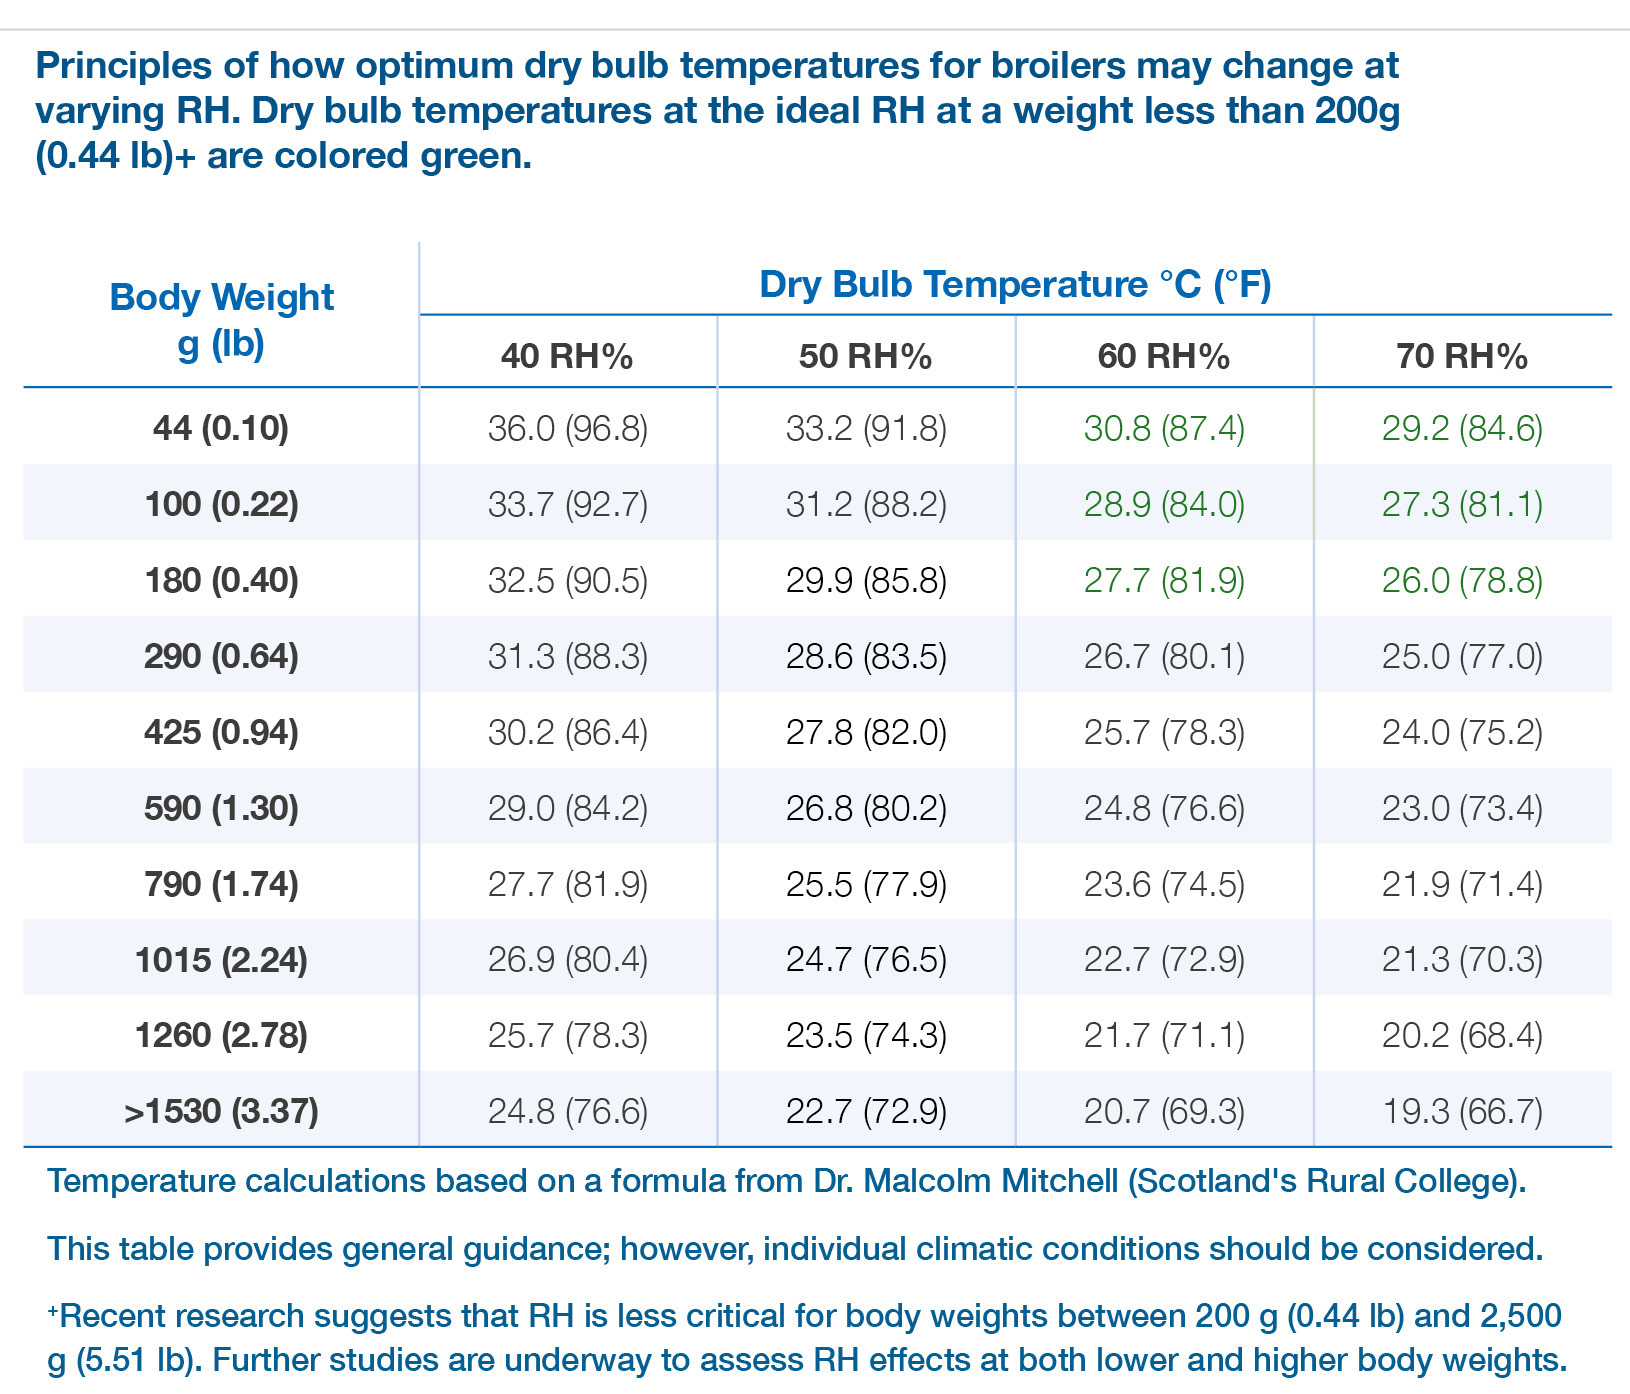
Temperature and RH interact to influence chicks' perceived (apparent) temperature. High RH raises apparent temperature, while low RH lowers it. Therefore, environmental adjustments must consider both RH and dry bulb temperature, always ensuring proper minimum ventilation to maintain air quality and moisture balance.
Ventilation is essential during brooding to manage temperature, RH, and air quality. It must avoid drafts, especially for young chicks with high surface area-to-volume ratios, which are more vulnerable to heat loss. Air speeds at chick level should not exceed 0.15 m/s.
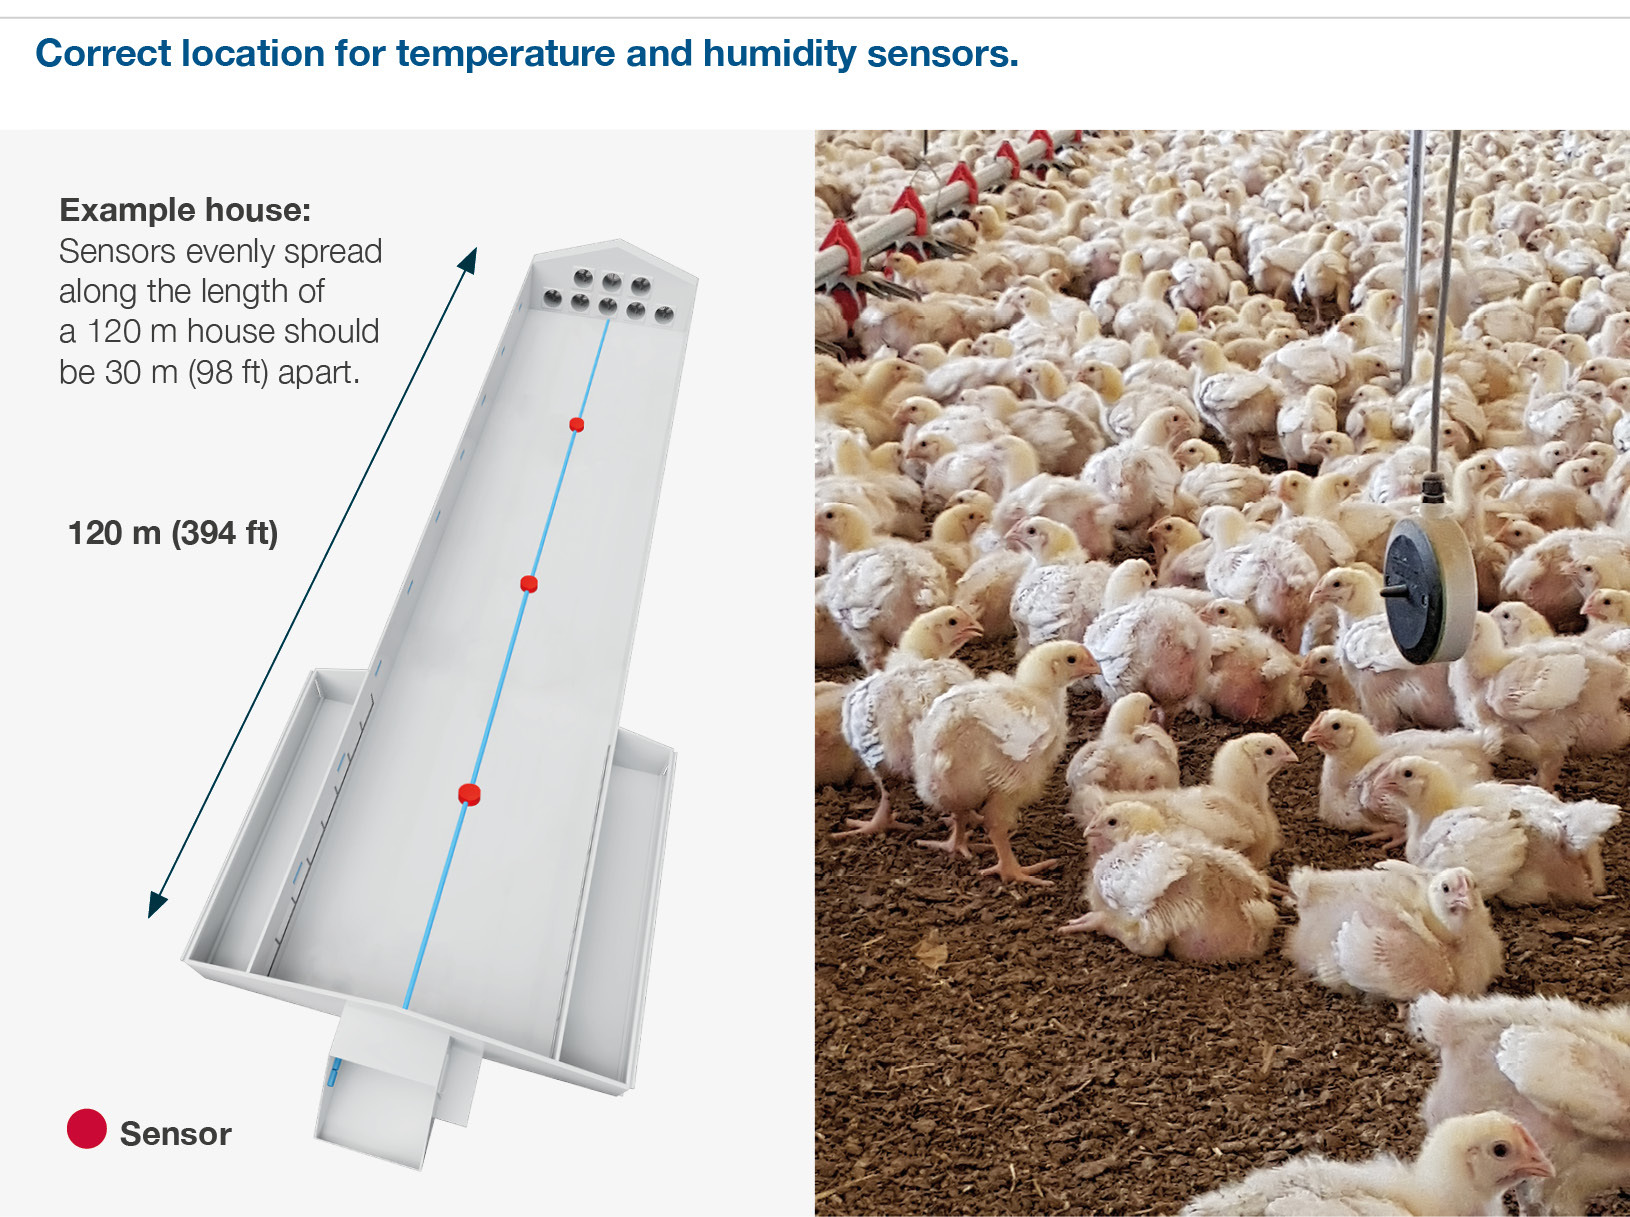
Monitoring is critical: temperature and RH should be recorded at least twice daily during the first five days. Sensors must be placed at chick level, evenly distributed, and positioned away from heat sources and airflow inlets. Their accuracy should be regularly cross-checked with conventional thermometers and recalibrated each flock. Proper environmental control supports welfare, uniformity, and performance.
Downloads:
Monitoring chick behaviour
While temperature and humidity should be monitored daily, chick behavior remains the most reliable indicator of proper brooding conditions.
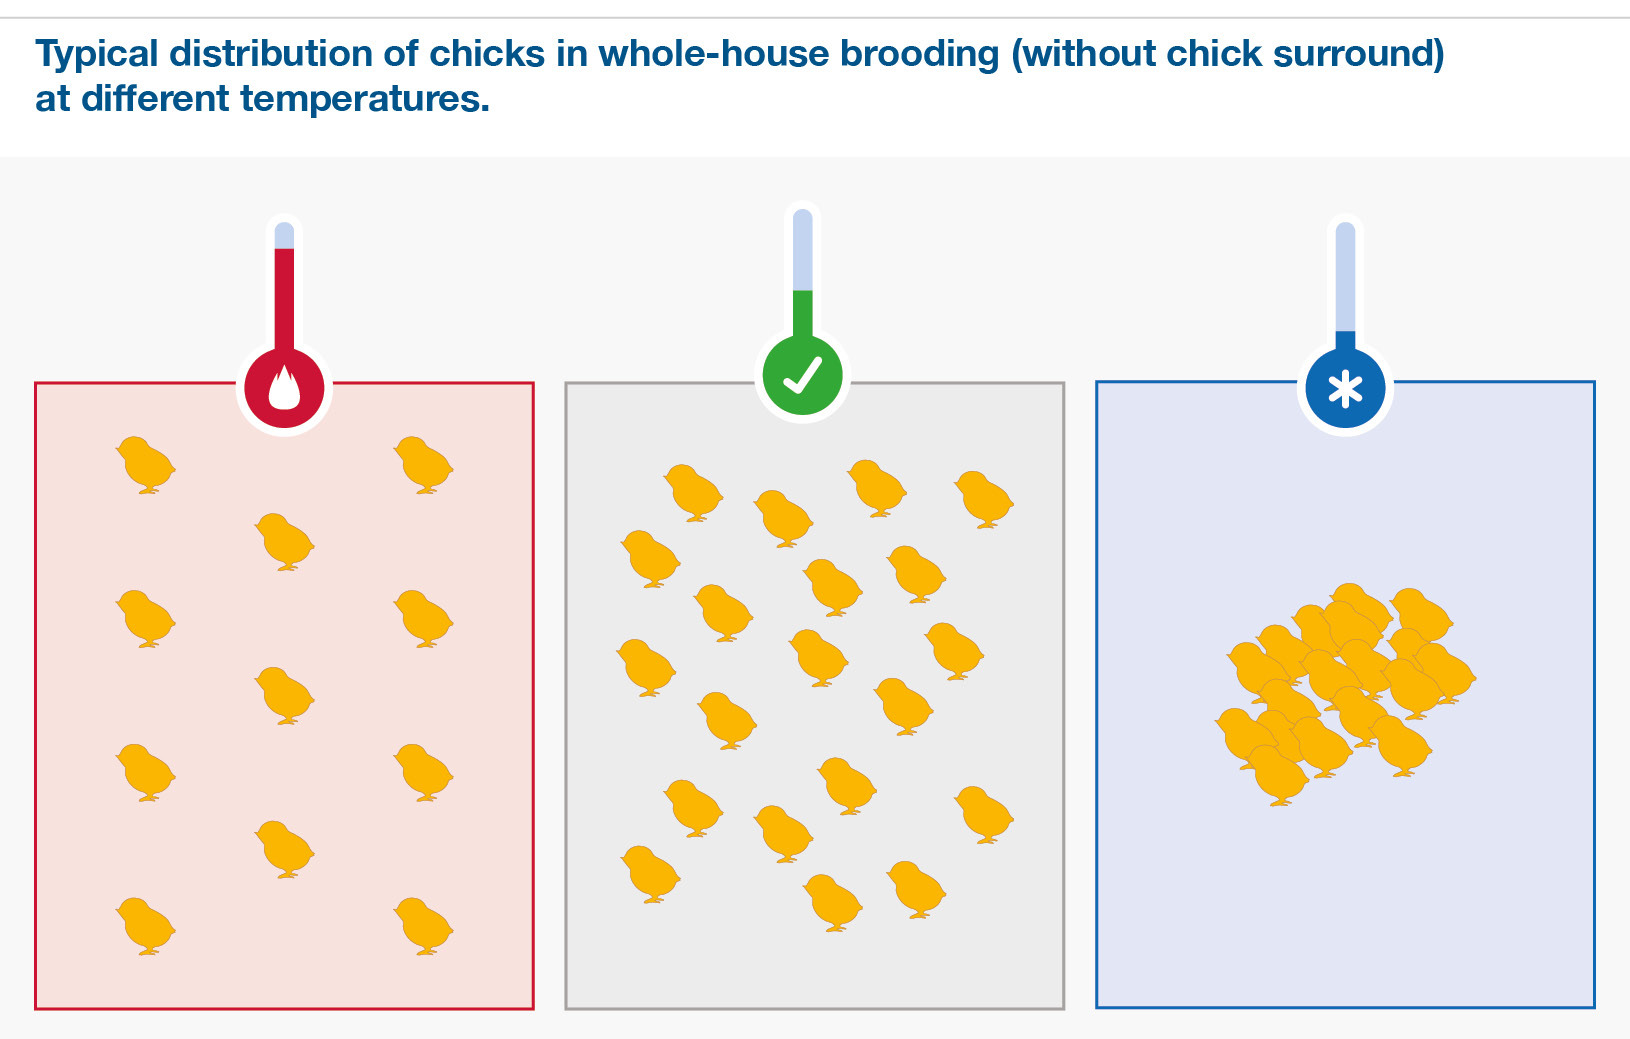
In spot brooding, evenly distributed chicks indicate an appropriate temperature. Clustering or avoidance signals discomfort due to cold, heat, drafts, or poor air quality.
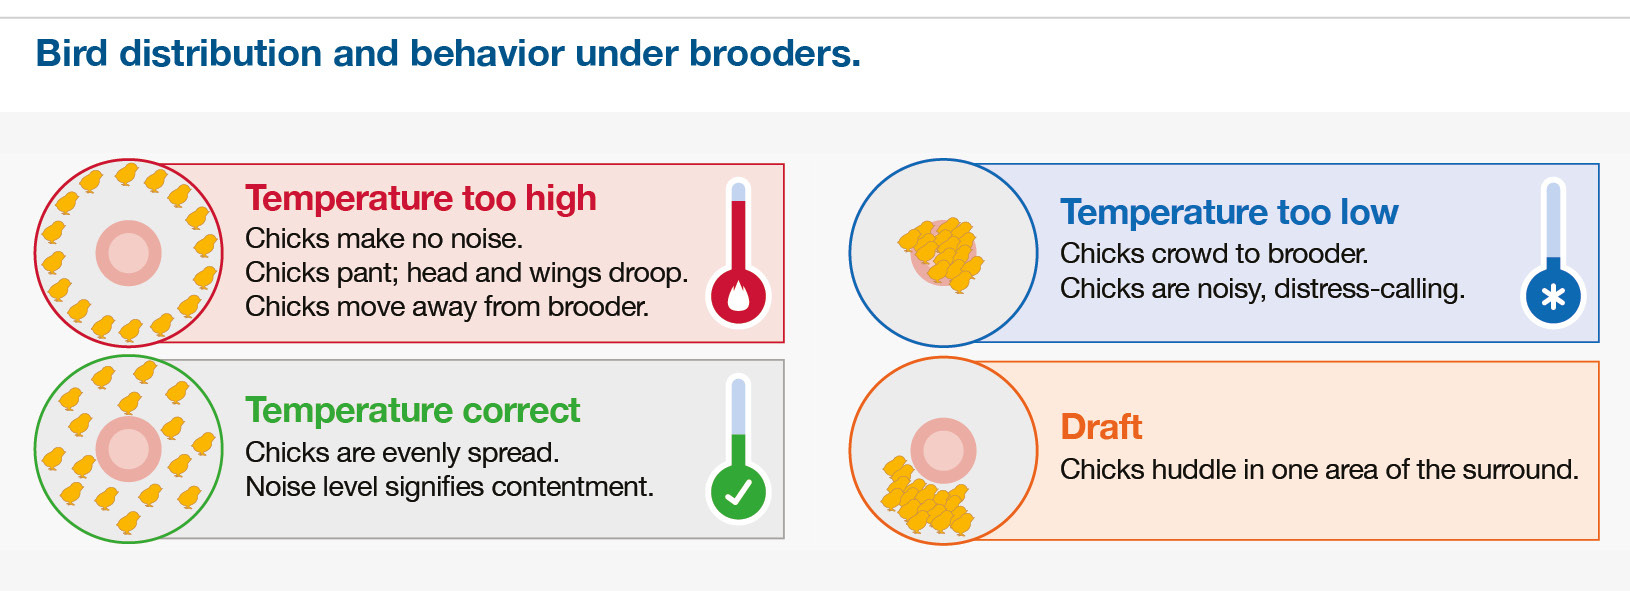
In whole-house brooding, behavioral cues are subtler, as heat sources are not localized. Vocalizations and social patterns such as small, active groups of 20–30 chicks moving between feeding and drinking indicate well-being.
Air quality also influences behavior: elevated levels of CO₂ (>3,000 ppm) or CO (>10 ppm) can cause lethargy and reduced feeding. Regular air quality checks and observation of chick behavior are essential for timely environmental adjustments.
Key Points:
- Establish a minimum ventilation rate prior to placement to provide fresh air and remove waste gases.
- Achieve an RH level of 60-70% for the first 3 days and above 50% for the remainder of the brooding period (until 10 days of age).
- Where an RH is high, check air quality and minimum ventilation rate before reducing the temperature.
- Adjust temperature settings if RH increases above or falls below recommendations while responding to changes in chick behaviour.
- Monitor the temperature and RH regularly and check automatic equipment with manual measurements at chick level.
- Drafts create wind-chill effects and must be avoided during brooding.
- Use chick behaviour to determine if environmental conditions are correct.
Chick start assessement
Effective chick start assessment relies on early monitoring of crop fill, vent temperature, and body weight.
Crop fill evaluations during the first 24–48 hours post-placement are critical to confirm that chicks have accessed both feed and water. A full, soft, rounded crop indicates proper intake; an empty crop suggests insufficient water. Assessments should be made at 2, 4, 8, 12, and 24 hours using samples from various locations in the house.

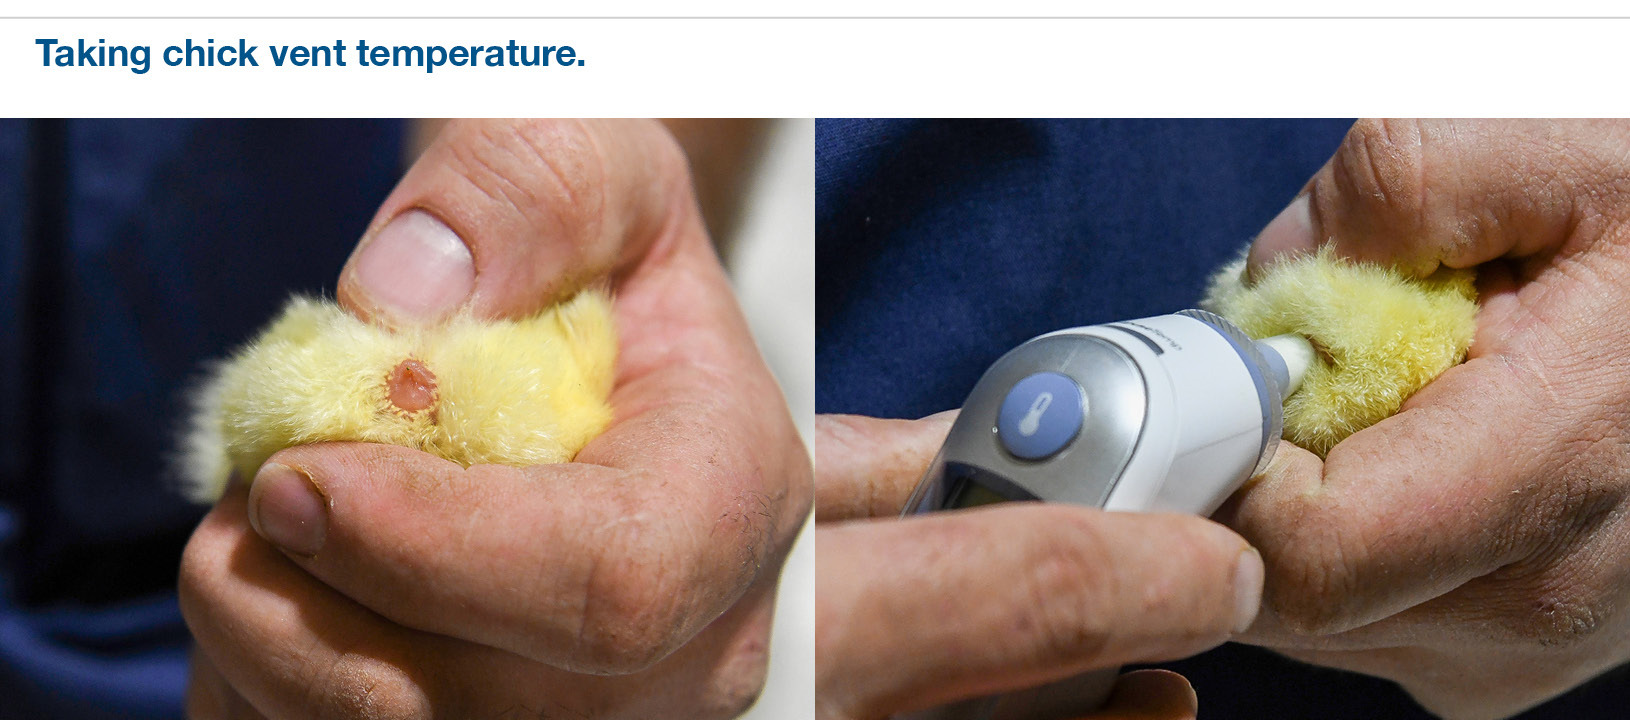
Vent temperature, ideally 39.4–40.5°C (103–105°F), is a reliable indicator of whether environmental conditions support optimal chick thermoregulation. Measurements should be made using a calibrated thermometer, in conjunction with behavioral observations, and may also reveal transportation issues.
Body weight and uniformity (CV%) should be recorded at placement and again at 7 days to assess early growth and the effectiveness of brooding practices. Declines in CV% over this period reflect improved uniformity and successful early management.
Downloads:
Key Points:
- Crop fill assessments should be conducted at key times after placement to ensure that all chicks have found feed and water.
- Failure to achieve crop fill targets should be investigated immediately.
- Chick vent temperatures should be maintained between 39.4–40.5°C (103–105°F) during the first 2 days of brooding.
- Body weight and CV% at placement and at 7 days should be recorded to check the quality of the brooding period.
Downloads: