


Raising Japanese Quail
By Maurice Randall, Former Livestock Officer (Poultry) and Gerry Bolla, Livestock Officer (Poultry) - Japanese quail are hardy birds that thrive in small cages and are inexpensive to keep. They are affected by common poultry diseases but are fairly disease resistant. 17 February 2006
 13 minute read
Raising japanese quail - By Maurice Randall, Former Livestock Officer (Poultry) and Gerry Bolla, Livestock Officer (Poultry) - Japanese quail are hardy birds that thrive in small cages and are inexpensive to keep. They are affected by common poultry diseases but are fairly disease resistant.
Introduction
Japanese quail are hardy birds that thrive in small cages and are inexpensive to keep. They are affected by common poultry diseases but are fairly disease resistant. Japanese quail mature in about 6 weeks and are usually in full egg production by 50 days of age. With proper care, hens should lay 200 eggs in their first year of lay. Life expectancy is only 2 to 2½ years.
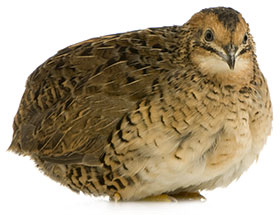
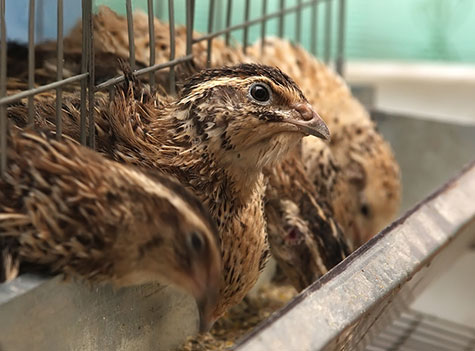
If the birds have not been subjected to genetic selection for bodyweight, the adult male quail will weigh about 100–140 g, while the females are slightly heavier, weighing from 120–160 g.
The females are characterised by light tan feathers with black speckling on the throat and upper breast. The males have rusty brown throat and breast feathers. Males also have a cloacal gland, a bulbous structure on the upper edge of the vent that secretes a white, foamy material. This unique gland can be used to assess the reproductive fitness of the males.
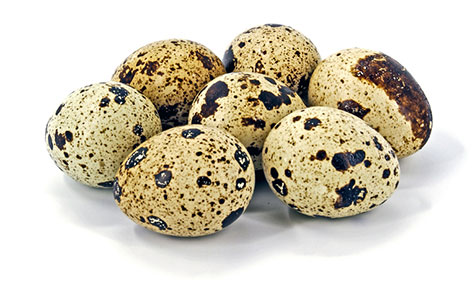
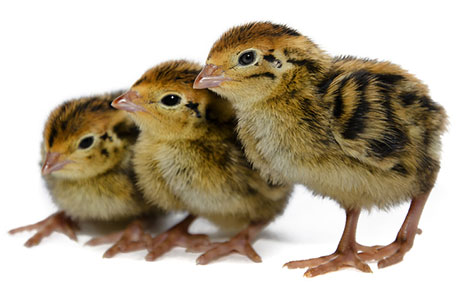
Japanese quail eggs are a mottled brown colour and are often covered with a light blue, chalky material. Each hen appears to lay eggs with a characteristic shell pattern or colour. Some strains lay only white eggs. The average egg weighs about 10 g, about 8% of the bodyweight of the quail hen. Young chicks weigh 6–7 g when hatched and are brownish with yellow stripes. The shells are fragile, so handle with care.
Breeding
Research indicates that grouping a single male with two or three females will generally give high fertility. When quail are kept in colony pens, one male to three females is sufficient and reduces fighting among males. Pair matings in individual cages also give good fertility. Fertility decreases markedly in older birds. Avoid mating closely related individuals, because inbreeding increases the incidence of abnormalities and can greatly reduce reproductive performance. For this reason, it is desirable to record hen numbers on the eggs, incubate them in groups, and permanently mark the chicks at hatch time.
Pedigree records can be kept by using commercially available wing bands or leg bands to identify quail of all ages. Quails can be identified temporarily by a little oil paint on the back feathers (not on the skin) or fingernail polish on the toes.
Pre-incubation egg care
Successful quail propagation begins in the pre-incubation period. Eggs should be collected several times a day and stored at a temperature of 15°C; a household refrigerator is not satisfactory because it is too cold. Cracked eggs hatch very poorly, if at all. Best results are obtained when eggs are held no longer than 1 week before setting.
Quail eggs should be handled with great care as they are very susceptible to shell damage. The coloured egg shells of quail make candling difficult.
A dirty incubator or hatchery area is a major source of contamination and disease. Thoroughly wash and disinfect the hatching unit after each use with a quaternary ammonium compound or commercial disinfectant. Set only clean eggs, as dirty eggs are a source of disease or infection. Soiled eggs can best be cleaned with fine sandpaper or other abrasives — eggs to be incubated should not be washed.
Eggs should be fumigated after they are collected, but alternatively they can be fumigated within 12 hours after being placed in the incubator. Do not fumigate embryos that are between 2 and 5 days old. Fumigation procedures are as follows:
- Use 25 g of potassium permanganate and 35 mL of formalin (40%) for each cubic metre of incubator space.
- Put the permanganate in an earthenware or enamelware dish (volume ten times that of the ingredients), and add the formalin last. Avoid inhaling the fumes, or wear a suitable respirator.
- In forced-draft incubators, leave the fan running and the vents closed during fumigation; open the vents after 20 minutes.
- In still-air incubators, open the incubator and vent after 20 minutes.
- During fumigation the humidity should be high, and the temperature must be between 20°C and 30°C.
Incubation and hatching
The incubation period for quail is 17–18 days, depending on the strain and the incubation procedures. Successful hatches depend upon a good understanding of incubator controls; study the manufacturer’s recommendations carefully, and save them for further reference. The two types of incubators generally available are fan-ventilated (forced-draft) and still-air machines.
A forced-draft incubator is preferable, but a still-air machine works well if carefully operated. Some models are designed especially for quail. Japanese quail eggs can be incubated in any chicken-egg type of incubator, although the egg trays in some machines may need modifying. Eggs should be placed large end up in the setting tray.
Fan-ventilated (forced-draught) incubators
Forced-draft incubators should maintain an incubating temperature of 37.5° ± 0.3°C (99.5° ± 0.5°F) and a relative humidity of 60% wet bulb reading of 30° ± 0.5°C (86° ± 1.0°F) until the 14th day of incubation. Eggs should be turned every 2–4 hours to prevent embryos from sticking to the shell. On the 14th day, candle and remove any cracked eggs, infertiles and dead embryos. Transfer the eggs to hatching trays and stop turning. A separate hatcher should be operated at 37.2°C (99°F) and a relative humidity of 70% wet bulb 32.2°C (90°F).
If the incubator is a combined setter and hatcher, it should be operated at a temperature of 37.5°C (99.5°F), but the relative humidity should be increased to 70% wet bulb 32.2°C (90°F) during hatching.
The hatcher should not be opened during the hatching process. If all recommended incubation procedures have been followed, the chicks may be removed on the 17th or 18th day of incubation.
Still-air incubators
If a still-air incubator is used, normal incubating temperature is 38.3°C (101°F) for the first week, 38.8°C (102°F) for the second week and not exceeding 39.5°C (103°F) until hatching is completed. Temperature should be measured at the top of the eggs. Humidity should be less than 70% wet bulb 29.4°–30.5°C (85°–87°F) until the 14th day of incubation; it should then be increased to 70% wet bulb 32.2°C (90°F) until hatch is completed in 17 or 18 days. Maintaining proper humidity in small still-air incubators can be a problem; do not open the incubator more frequently than is needed to turn the eggs, and do not leave it open for long periods of time.
The eggs must be turned by hand at least three, and preferably five, times a day. A pencil mark on the side of each egg may help to ensure proper turning. It may be desirable to move eggs to different locations in the incubator in case the temperature is not uniform throughout. Newly hatched chicks often tend to sprawl in hatching trays. To prevent this, crowd the eggs into a small area or fasten cheesecloth to the bottom of the hatching tray before the chicks begin to hatch.
Natural incubation
It is also possible to set japanese quail eggs under a broody hen. Bantams are ideal. A group of eggs should be saved and then placed under her so they will hatch together. Any chicken eggs should be removed from the nest. Japanese quail hens rarely go broody.
Brooding and care of young birds
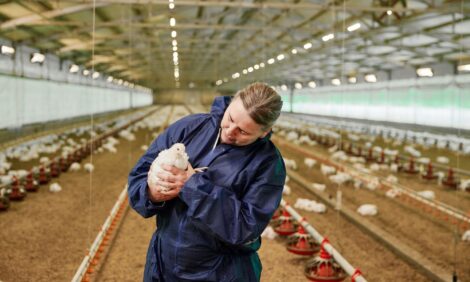
Newly hatched quail chicks are small, and proper brooding temperatures for young quail are very important. They need supplementary heat for about 3–4 weeks after hatching. A commercial brooder or any other heat source that provides sufficient heat can be used successfully, and should be placed 30–46 cm above the floor of the pen. The photo at right shows a gas brooder providing supplementary heat for quail chicks housed on deep litter. Measure the temperature at the level of the chicks. Maintain it at about 35°C during the first week of brooding. This temperature may be decreased by about 3.5°C a week until the chicks are fully feathered at about 3–4 weeks.
The best guide for adjusting the temperature is chick behaviour. Chicks that crowd near the heat source and seem cold indicate the temperature is too low. When the chicks tend to settle a just outside the hottest area, the temperature is about right. Failure to provide adequate heat during the early days of the brooding period invariably results in increased mortality. Chicks should be protected from draughts of cold air, especially at night.
Care must be taken with small quail to prevent drowning in water troughs. A canning jar with a glass or plastic base, or automatic chick mini-drinkers, work well provided the drinking trough is filled with pebbles or marbles to stop the baby quail getting into the water.
When the chicks reach 1 week, the pebbles can be removed with safety. It is important to provide clean water at all times; water containers or troughs should be cleaned daily.
Litter is used to dilute the droppings and absorb moisture. Wood shavings, sawdust and sand are good litter materials. Litter should be 5–10 cm deep on the floor and covered with paper for the first week for chicks. Use soft, rough types of paper, as chicks tend to spraddle on hard, smooth paper. Old newspapers are satisfactory but not ideal. Paper towelling is better. Food should be sprinkled on the paper to encourage young chicks to eat. If chicks are raised in wire cages or on a wire floor, the floor surface must be covered with coarse paper for the first week or so to prevent leg injuries.
Feather picking or other forms of cannibalism may occur when japanese quail are kept on wire. Beak trimming may be necessary as early as 2 weeks of age and is usually done with a hot-blade-type commercial beak trimmer. The tip of the upper beak can be temporarily removed with nail clippers. After birds are beak trimmed, the level of feed and water in the troughs may need to be increased. Other generally effective preventive measures are to reduce the number of birds per pen to avoid crowding, reduce the light intensity and increase the dietary fibre and grit.
Japanese quail are territorial and will defend their home against intruders. If two groups of quail are to be combined, put them together in an unfamiliar cage or pen.
Housing and equipment
Quail are frequently housed in rooms similar to garages. However, such rooms need to be well insulated, well ventilated and free from draughts, and must provide protection from cats, rodents and predatory birds.
Housing should be designed to ensure comfort for the birds, to make food and water readily accessible and to permit easy and effective sanitation. The adult facilities should reflect the purpose of the project. For example, if the birds are to be raised for commercial egg or meat production, then small pair-cages are suitable. Hobbyists may prefer aviaries or small deep-litter pens that do not require regular removal of droppings.
For cage or pen construction, 7 mm square welded wire mesh is recommended to provide secure footing, prevent leg injuries and prevent chicks escaping through side walls.
Adult quail will live and produce successfully if they are allowed 145 cm2 of floor space per bird (125 cm2 per bird on wire floors). Often, in community pens, they will not build a nest but will hide their eggs in the litter. For this reason quail egg producers usually prefer to house their birds in cages. A cage 13 × 20 cm is large enough for two birds. The cage should have a solid metal or plywood roof to minimise head injuries if the birds take fright.
Adult quail need 1.25–2.5 cm of feeder space per bird. Ample feed should be present, but if the trough is too full, excessive wastage will occur.
Clean, fresh water should be provided at all times with a minimum of 0.6 cm of trough space per quail. Nipple drinkers and cups are suitable for adult quail. One nipple or cup should be provided for every 5 birds.
Light requirements
Japanese quail require 14–18 hours of light per day to maintain maximum egg production and fertility. This means that supplementary lighting must be provided in the autumn, winter and spring months to maintain production.
Males not required for breeding, or any quail being grown for meat production, can be given only about 8 hours of low-intensity light per day. This is not enough to initiate sexual maturity; therefore, the birds do not expend energy on fighting and mating and will tend to fatten more quickly.
Nutrition
A standard ration for either growing or breeding quail may not be available commercially. If this is the case, good quality, fresh, commercial turkey or game bird diets are recommended, preferably fed as crumbles to minimise feed wastage. For the first 6 weeks quails should be fed a diet containing approximately 25% protein, about 12.6 megajoules (MJ) of metabolisable energy (ME) per kilogram, and 1.0% calcium. A good quality commercial starter ration for game birds or turkeys contains about 25%–28% protein. If this is not available, a chicken starter ration (20%–22% protein) can be used, but the birds will grow more slowly.
The dietary requirements for birds nearing maturity are similar except that calcium and phosphorus levels must be increased. Shell grit or ground limestone can be added to the diets after 5 weeks of age, or it may be provided separately as free choice. Laying diets should contain about 24% protein, 11.7 MJ of metabolisable energy per kilogram, and 2.5%–3.0% calcium. The latter may need to be increased to 3.5% in hot weather when the birds eat less food but still require calcium to maintain egg production.
Adult japanese quail eat between 14 g and 18 g of food per day. It is important to obtain fresh feed, and it should be stored in covered containers with tightly fitting lids in a clean, dry, cool area free from animals and vermin. Feed stored longer than 8 weeks is subject to vitamin deterioration and rancidity, especially in summer months.
Before the chicks are placed under the brooder, the papered floor should be covered with feed and the troughs filled to overflowing. After about a week, when the paper is removed and the chicks have learned to eat, the level of feed in the trough can be lowered to reduce wastage.
Husbandry
Quail, like other species of poultry kept for commercial purposes, must be given proper care and attention. Environmental conditions should be adjusted according to the climatic conditions and the needs of stock of different ages. Dry food should be available at all times, and drinking water must be cool, clean and readily accessible.
Take care when working with quail, as the birds are easily startled and will struggle vigorously when caught. Excessive or rough handling may kill them. Sudden noises and disturbances should be avoided. Protection from cats, dogs, rats and predatory birds is essential. If laying hens are moved to new quarters, a pause in production of 2–3 weeks is likely. Avoid introducing new birds into the territory of an established group.
Disease prevention and control
Sanitary management practices are the best guarantee against disease. Equipment, such as cages, feeders, waterers and tools should be cleaned and sanitised frequently. A commercial disinfectant is recommended. Japanese quail suffer from some of the same diseases that affect domestic chickens. However, if housing, nutrition, husbandry and hygiene are of a high standard, mortality should not be a problem.
Birds that appear sick should be isolated from healthy birds. Dead birds should be removed immediately. A veterinary diagnosis is desirable before initiating treatment.
Commercial processing and marketing
There is a limited but expanding market for specialist products such as fresh or pickled quail eggs and fresh or frozen quail carcases. However, commercial success requires thorough market research and the ability to maintain supplies of top quality produce.
Quail producers who plan to slaughter and market their own quail are advised to contact the NSW Food Authority for information on regulations concerning construction of processing premises, processing and packaging. Source: Published by NSW Department of Primary Industries - February 2006
© State of New South Wales 2006