


Poultry Necropsy Basics
By Meredith F. Davis, D.V.M. and Teresa Y. Morishita, D.V.M., Ph.D. Veterinary Extension, College of Veterinary Medicine - The necropsy (post-mortem dissection) of poultry is a procedure that can be utilized by the veterinarian, the manager, or the grower to find reasons for the bird’s death. 6 September 2006
 5 minute read

Why Would You Perform a Necropsy?
Using a knife or scissors, a person can perform a basic necropsy to obtain diagnostic information, samples for further laboratory testing, or to ensure quality control of a flock. If you see a rise in mortality (death rates) or a rise in morbidity (number of ill birds), the necropsy can provide you with more information about the disease, perhaps even a diagnosis. Your veterinarian and diagnostic lab can supply you with additional information on sampling techniques and shipping methods for diagnostic testing.
Getting Started
While walking through a house, a recently dead or currently ill bird can be chosen for a necropsy. Birds that have been dead for more than a few hours are not recommended for diagnostic specimens since the natural decomposition process will create changes that may be confused with true pathological lesions. If a specimen cannot be necropsied immediately, it should be refrigerated until a later time. If you choose to euthanize and necropsy a sick bird, first observe it for abnormal breathing patterns, abnormal posture, ruffling of feathers, and/or nasal or ocular discharge before euthanizing.
Euthanasia
The bird can be humanely euthanized by several approved methods including cervical dislocation (breaking the neck), using a carbon dioxide chamber, or injecting a euthanasia solution such as potassium chloride or high dose barbiturates into a vein or directly into the heart.
Basic Necropsy Needs
- A flat hard surface in a well-lighted area.
- Access to water and towels.
- Knife or scissors.
Performing a Necropsy
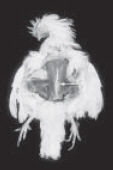 Figure A. The skin overlying the breast and abdomen is removed. The arrowhead is pointing to an abnormally crooked keel. |
- Wet down the feathers with a disinfectant solution to limit the distribution of feathers during the dissection.
- Place the bird on its back with its feet towards you.
- Grasp both legs and push down and away from the pelvis to loosen the joints.
- Tent the skin over the abdomen and cut with scissors or knife.
- Remove the skin overlying the abdomen and breast (from neck to cloaca).
- Examine the breast muscle for decreased muscle mass, paleness (anemia), or bruising.
- Incise the abdominal muscle and cut through the ribs on the sides of the keel bone.
- Grasp the keel near the abdomen and pull upwards to expose the internal organs and chest cavity.
- Examine the liver for changes in size or discoloration, white or yellow spots, abscesses, and/or tumors.
- Examine the air sacs for increased thickness and increased cloudiness. The normal air sac surfaces look like soap bubbles or clear cellophane wrap.
- Cut the gastrointestinal (GI) tract between the esophagus and proventriculus.
- Remove the proventriculus, ventriculus (gizzard), small intestines, large intestine, ceca, and cut off at the level of the cloaca. The pancreas will also be removed. It is the pinkish tan organ cradled within the loop of duodenum (a section of the small intestine).
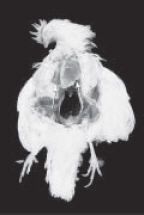
Fig. B. The keel is lifted and the liver is visualized. The normal liver should not extend beyond the tip of the keel. - Cut all attachments close to the intestines and set the GI tract aside. At the end of the necropsy, these organs can be opened up and examined for internal parasites.
- Next, remove the liver and spleen. A green discoloration of the liver near the gall bladder is a normal finding. The spleen is the reddish, round organ located at the junction of the proventriculus and gizzard.
- Now you can observe the organs located near the backbone of the carcass.
- Examine the kidneys, which are elongated, lobulated organs that are embedded in the backbone of the bird, and the left ovary/oviduct (or paired testes), which are positioned on top of the kidneys.
- The lungs, which are attached to the ribs, can be gently teased out of the ribcage for further examination.
- The outer surface of the heart should be examined for a cloudy, thickened appearance, suggesting pericarditis. Also, note if excessive fluid is located between the heart and the pericardium (membranous covering of the heart).
- Next, turn the bird around to face you and cut through the corner of the beak.
- Extend the cut through the throat and down towards the heart.

Figure C. The GI tract has been excised and positioned for further examination of the digestive organs. A = spleen. B = proventriculus. C = ventriculus. D = duodenum. E = pancreas. F = jejunum. - Examine the interior surface of the esophagus and crop. Look for the presence of food and/or parasites (worms) in the crop. If the inside surface appears to resemble a towel, it may be an indication of a fungal infection called “crop mycosis.”
- Next, cut through the larynx, trachea, and syrinx. The inside surface should be free of excess mucus.
- Turn the bird back to the previous positioning — feet in front of you.
- The sciatic nerve located on the interior upper thigh (located under muscle) should be exposed on both legs. The nerves should be the same size bilaterally with no swellings. Enlargement of this nerve can be an indication of Marek’s disease.
- With a sharp knife, cut through the stifle and hock joints, looking for yellow or white pus-like material, blood, or excess fluid. Joints should appear shiny and white with just a small amount of clear, sticky fluid inside.
- To find the bursa of Fabricius, cut through the cloaca and look for a grape-like structure towards the rear of the bird. The older the bird—the smaller the bursa. The bursa diminishes in size as the bird reaches sexual maturity.
- Cut the bursa in half. It should have wrinkles running parallel to each other on the surface and be cream colored in appearance. Note any discoloration or swelling.
- Now return to the GI tract and starting with the proventriculus, cut lengthwise. The inside wall is bumpy and this is normal as these are digestive glands.
- Cut through the ventriculus, intestines, and ceca. Note the appearance of the inside walls (mucosa) and the presence of parasites (worms), blood, and/or a thickened or discolored surfaces.
- Dispose of the carcass properly and disinfect surfaces and tools.
Further Information
Contact your veterinarian for information on any other body parts (e.g., the brain or sinuses) you would like to examine or for information on sampling of organs for additional bacterial and viral testing.
Acknowledgements
The authors would like to thank Dr. Kent Hoblet, Dr. Gary Bowman, and Dr. Mo Saif for reviewing this information. Special thanks to Heather Caprette for the photography and graphic editing, and to Eric Alvarado for assistance with design,layout, and technical support.
December 2001