


The Incubation of Ratite Eggs
By Joan S. Jeffrey, Gregory P. Martin,Roy C. Fanguy, Texas A&M University System. 7 May 2007
 17 minute read
The incubation of Ratite eggs is the first step to the beginning of the growing period. Care must be exercised throughout the incubation process to insure the best possible hatch, considering the environment that the developing embryo is placed in.
The key environmental factors that are needed for artificial incubation are: temperature, humidity, airflow, position (turning), and sanitation. Each factor, either singularly or in combination can be the cause of many problems seen in poor hatches. Through proper hatchery design and management, good hatches can be realized.
The Egg
The egg is the common unit that we think of when we think of operating a hatchery. Made mostly of water and nutrients, it is a self-contained unit that ensures that all the physiological needs of the developing embryo are met during and after the incubation period. Although ratite eggs of the same species are very similar in appearance, there are differences in shell porosity and size depending on the age, genetic background and nutritional plane of the breeder hen. This plays an important role in how the eggs need to be handled and incubated.
Eggs should be kept dry and as clean as possible. The shell of the egg is covered by the cuticle, a natural barrier to microbial invasion. In addition to the cuticle, the shell membranes and albumen of the egg are natural barriers to bacteria. Any egg that happens to have a large accumulation of soil or fecal material should not be set in the incubator. Eggs that are seeping or giving "off" smells should be pulled from the incubator. Very dirty eggs could be washed, but care must be taken to prevent the invasion of the wash water into the egg. Eggs should be washed in water that is 10° F higher than the temperature of the egg.
Egg shells are very porous, and water loss can be as much as several grams of water per day, depending on how many pores that an egg has and how the egg is handled. Water has to be lost from an egg in order to make room for water created via the metabolism of materials found in the egg. Egg washing will change the rate of water loss from the eggs and incubator conditions may need to be changed in order to compensate for this loss.
Eggs can be stored in a cooler prior to incubation, provided that the cooler is regulated to 56-60°F and 75% relative humidity to prevent desiccation of the eggs. Cooling eggs serve two major purposes: 1) To synchronize eggs into batches, to allow for budgeting of time and incubator space, and 2) To allow for the formation of an air cell in fresh eggs, which is very important to the proper orientation of ratite eggs.
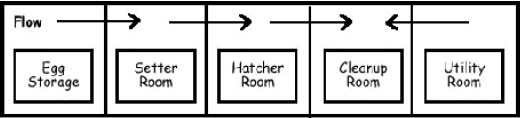
The Hatchery
The hatchery room is much more than a shelter for your incubator. The room acts as a "plenum" chamber, that helps pre-condition air prior to movement of the air into the incubator. Most incubators depend on proper room temperature and humidity to make the work of maintaining incubator conditions easier. Typically the temperature of the hatchery will be approximately 10-15°F cooler than the temperature set on the incubation cabinet. This temperature difference is needed for cooling the eggs as the embryo develops, and to ensure proper heating of the cabinet early in the incubation period.
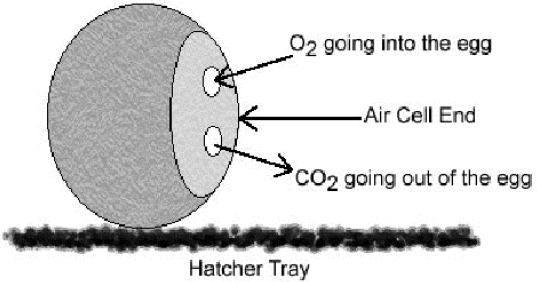
As the embryo grows in the shell, the consumption of oxygen (as well as the release of CO2) increases with egg age. This is most apparent with the eggs in the hatcher. The birds will "pip" through the inner shell membrane, and breath air that is conducted through the shell. The air in the cabinet has to have a level of oxygen high enough to ensure proper levels of oxygen in the egg for growth and the strenuous job of hatching out of the egg. Because of this high demand, the most frequently overlooked consideration in ratite hatchery design and construction is the placement of air handling devices and windows to help move air efficiently throughout the hatchery. A one-way flow of air is the optimal situation that will ensure that fresh air is flowing through the hatchery. A general rule is to have as much fresh air moving through the hatchery room as possible without changing the room temperature / humidity requirements. Drafty conditions can create cold spots in the room that could be detrimental to proper air mixing. Because cold air drops to the floor as it enters a room, baffles or circulation fans should be in place to ensure proper air mixing.
The quality of the air is an important consideration as well. The location of the hatchery should be as far away from the other pens as possible, to avoid dust and other particulates from being pulled into the hatchery. Air Filters should be monitored and changed frequently to maintain good air quality.
Humidity levels can be controlled to a certain degree by ventilation, if external conditions permit. By increasing air flow, humidity levels will drop. As the temperature drops the percentage of relative humidity (%RH) will increase. This is the basis of most of the room dehumidifiers that are available for ratite hatcheries that need to reduce %RH to assure proper water loss. Adjust humidity for the average eggs that you are incubating, as some eggs may fall outside this range. Some producers will have several cabinets set for different humidity climates to ensure proper weight loss for all eggs being incubated.
The Hatchery needs to be designed for one-way traffic of personnel and eggs to reduce the possibility of contamination. Both air flow and personal traffic should move from the incubation (setter) end and exit at the hatcher end. All surfaces within the hatchery should be washable with cleaners and disinfectants commonly available.
Temperature
Temperature is the most important factor in the incubation of any avian egg. An egg can, to a certain degree, compensate for various insults to its well-being except for temperature extremes. A 0.5° F change in incubator temperature can have a profound effect in overall performance of a group of eggs that incubate for forty or more days. Extremes in temperature (high or low) can cause problems with embryo growth, or in many cases death.
Set your incubator for the average sized egg in your flock. A survey of the ratite industry finds a variety of settings that are used for ratite eggs. Most range between 97.5-99.0° F, and there are a variety of explanations as to the choice of a particular setting. The key is to match the temperature setting with the performance of your particular incubator and eggs. The temperature of the incubator controls the rate at which the embryo develops and hatches. Eggs that were stored should be allowed to come to room temperature for a few hours prior to setting in the incubator. This helps reduce temperature fluctuations,, cold spots in a cabinet, or stress fractures in the eggshell. The temperature in the hatcher has traditionally been set 0.5-1°F lower than the incubator (setter) temperature in chickens and turkeys. Although this practice could be followed for use in ratite eggs, it has been shown that hatch will take place satisfactorily at incubation temperature.
Eggs that are hatching early or very small chicks at hatch (more than the norm for the farm) are an indication of incubator temperatures being too high. Eggs that take 2 or more days to hatch a live bird could be associated with too low of an incubator temperature. The first few fertile eggs in the season are a good indication of what steps need to be taken (if any) to adjust the temperature of the incubator to promote proper growth.
Problems do occur when the cabinet temperature is too high, as early embryonic death (within the first two weeks) can be detected. These deaths can be caused by other factors but are easily found through candling. Candle all eggs by the 14th day of incubation to determine that the embryos are progressing in growth. Pull eggs that appear clear and break these eggs out to determine if indeed that they are infertile, or as in the case of high incubator temperatures, a small embryo could be present, that could not be determined on candling. As the embryo grows, the growing blood vessels inside the egg will become more prominent and may make the egg appear dark. This should not be confused with sporadically appearing dark blotches in an egg that may signify contamination. In an incubator that has had a series of late hatches, a 0.5 degree increase in incubation temperature could produce favorable results by pushing the embryo towards accelerated growth and earlier hatch. Care must be taken to adjust for proper humidity and ventilation rates to compensate for the changes in incubator temperature. The incubator room should be held at a constant temperature, to keep the incubation environment as stable as possible. Wide temperature variances in the incubator room could cause overheating of the eggs.
Never set the entire capacity of the incubator at the same time, unless the incubator is specifically designed for single-stage incubation. Care must be taken in single stage incubation to accommodate the high rise in egg temperature towards the end of the incubation cycle. Set (space) eggs throughout the cabinet to reduce hot and cold spots in the incubator as well.
Temperature must be constantly monitored to be sure that the optimal environment is maintained. Check the incubator periodically throughout the day, and record the temperature of the hatchery room and the incubator. Always place a mercury thermometer in the incubator to serve as a standard to check the other incubator sensors against. Be sure to check this mercury thermometer against a standard, such as an ice water slurry (32° F) to determine the accuracy of the instrument and recheck it periodically, or when the accuracy of any of the instruments is in question. At the beginning of the incubation season, or when installing a new machine, be sure to set the temperature of the incubator higher than the safety level (deadman) switch to test its accuracy and to ensure that the circuit is operating correctly. As the temperature exceeds the safety temperature the heater circuit should be interrupted and the cooling system (if so equipped) should be at its maximal exertion. At no time should a heating and cooling circuit be running on an incubator at the same time. On double-wafer safety units, the safety set point should be no more than 1-1.5°F higher than the incubator set temperature.
Humidity
Humidity (% RH) must be adjusted to accommodate the needed moisture loss from the egg during incubation. Most ratite eggs will perform well when a moisture loss of 12-16% is achieved. This loss, as measured as a percentage of the set weight over 42 days incubation (see below), will be adjusted somewhat by the embryo as it creates water as the by-product of digestion of foods found in the egg. By weighing the egg at set time, and monitoring egg weight periodically through incubation, you can ensure the best humidity profile for optimal hatch. Water loss can be calculated several ways. One method is to calculate the percent water loss relative to the egg's set weight for a given period of time.
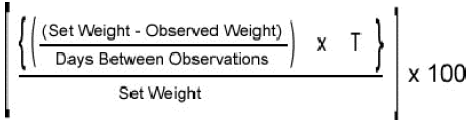
T is the time interval you wish to predict weight loss for. Chart weight loss for the eggs over a period of a week and a half to determine the rate of water loss. Wait to weigh eggs after setting for three to four days after setting, to allow the eggs to stabilize in the environment and to allow the air cell to fully form in the egg.
Be sure to weight eggs on the most accurate scales possible. Scales that weigh in grams are favored over those in lbs., if accuracy is given in tenths (or more) of a measure. When choosing a scale or balance, choose one that has a measuring weight range that places the average egg in the middle of that range. 600 gram eggs for example, should not be weighed on scales that have a 625 gram capacity, unless the scales accuracy can be determined. A standard weight can be made that can be used to check the scales accuracy. A painted piece of metal, a large clean stone or anything of inert material that will remain unchanged can be used. Lead bird shot in a sealed mason jar is a perfect system for use as a standard weight. Most post offices can check your standard for accuracy, or call the department of agriculture bureau of weights and measures for a location near you. Standard weights are also available from most dealers of balances and scales.
If the eggs are losing too much water you may wish to increase the humidity in the incubator cabinet by adding water trays or increasing the misting frequency. If only one or more eggs are showing this rise in water loss, you can slow water movement by either placing the egg in another incubator set for a higher level of humidity, or by taping the egg near the equator of the egg (just below the air cell) with electrical (pvc) tape. Taping the egg (up to 10% surface area) reduces the number of pores that are conducting water to the outside air.
Increasing the loss of water, especially in humid climates, can be a challenge. Room desiccators, dehumidifiers and air conditioners coupled with dehumidifiers have been used to drop humidity within the incubator room. Increasing air velocity / air exchange within the cabinet also aids in the removal of water vapor from the incubator environment.
Hatcher environments need to be adjusted to allow enough humidity to prevent shell membranes from sticking to the chick. Running the hatcher at setter humidity until external pipping and then turning the humidity up to 70-75 % RH has been successful in preventing "sticky" chicks from occurring.
Positioning & Turning
Egg positioning in the incubator and turning will ensure that the embryo is fully developed and in position to hatch. Common practice in the chicken is to set the eggs vertically with the air cell at the top of egg. Studies have shown a 1-2% increase in hatchability over that of eggs placed on their sides. Because of the translucence of the ostrich egg, we are afforded the opportunity to set the eggs vertically as well. Candle the egg to determine the position of the air cell. If the air cell is found on the side of the egg, position the egg so that the air cell is in line with the axis of the turn. This promotes the migration of the air cell towards the top of the egg. Eggs should be turned at least through a 90o angle. Emu eggs and other opaque shelled eggs should be placed on their sides, unless the air cell can be definitively found. A number of infrared viewers are showing some promise of detecting the air cell in opaque eggs. The accuracy of this evolving technology is still being evaluated.
Any eggs that are positioned on their sides should be turned on their long axis. This means that if the pointed ends of an egg were north and south the egg would turn from side to side (east to west) along the equator.
Eggs should never be turned only in one direction, as this will cause malformation of the chorioallantois membrane (CAM) and other structures within the egg. The number of turns by automatic incubators is typically 12 or 24 turns in any given 24 hour period. If turning eggs by hand, an odd number (minimum of 5) should be chosen, and distributed throughout the day. This eliminates the eggs from sitting on the same side overnight.
Assisted Hatching
At times during the incubation season, producers feel the need to assist eggs that are not progressing in hatch. Care must be taken when assisting a hatch to prevent problems arising from the assistance procedure.
Typically in ostrich, a period of 12-18 hours should be allowed from the time the bird breaks through the internal shell membrane into the air cell until it breaks a hole in the egg shell before hatching assistance is offered. If the chick fails to break the shell after the twelve hours duration, a series of 3/8" holes could be drilled into the upper and lower edges of the air cell of the egg to allow enough oxygen to flow to the chick. Increase humidity levels to those used for hatching. Wait a few hours, and notice the condition of the membranes within the egg. The membrane should be somewhat dried and will bleed very little if torn, before assistance can continue. Slowly break larger holes in the egg, starting with the two holes from the air cell end of the egg. Always be sure to check on the condition of the chick and check (if possible) the location of the yolk sac. If a small part of the yolk sac is visible, you may wish to leave the chick in the egg for a period of time to allow for the navel to close fully.
Timing is critical to this operation and assistance of hatch should not continue for more than 1½ days in length. Prolonged assistance usually results in weak chicks that may not be able to stand and eat. Further delays could lead to death. There isn't any guarantee that an assisted chick will survive, and historically assisted chicks have not performed as well as un-assisted chicks.
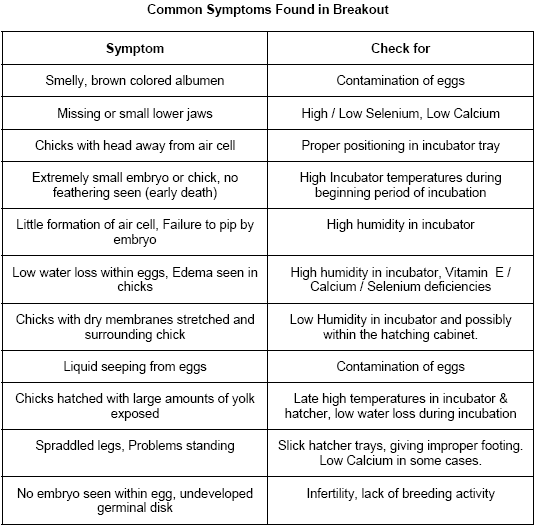
Hatch Waste Breakout
After the hatching process, surveying the hatch waste is very important. Look for signs of stress by noting how much fecal material is left on the hatcher tray. A large amount of material signifies that the chick may have been in the hatcher longer than necessary. Break open all unhatched eggs that may have been pulled during the incubation period, or eggs that failed to hatch that were left in the hatcher.
As you break open the eggs, note the color, odor and appearance of the albumen yolk and membranes within the egg. Note as well the size and position of the embryo (if found) within the egg. Small sized chicks with little feather covering denote early embryonic death. Larger sized chicks covered well with feathers denote late embryonic deaths. To decide what you may be experiencing, try to eliminate any of the common problems seen:
Do you really have a problem?
As seen in any poultry hatchery, hatchability problems will occur even after great preparations are made. The first question before taking drastic actions is to ask "Do I really have a problem, or is this an act of nature". Under the best of circumstances, as seen in other poultry species, the best hatcheries only will get up to about 85 to 95% hatch of all eggs set. Two factors play a part in this phenomena. First, not all eggs will become fertile. Second, not all fertile eggs will develop into embryos. Given this fact of life, the hatcheryman (person) will first need to perform two measures to see how well he is operating the hatchery.
Fertility determination
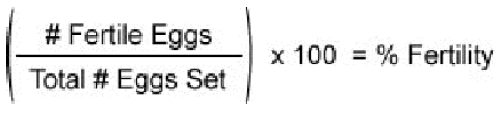
The first measure is the measurement of fertility. It is normally measured by the number of clear eggs pulled from an incubator cabinet, after a normal duration of incubation. True fertility is expressed as those eggs that were exhibiting signs of fertility whether or not they developed embryos. This would involve fertile eggs that did not start development and eggs that failed to hatch with a visible embryo contained in the eggs. The formula for either case is:
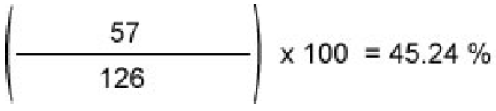
For example 57 eggs out of 126 were declared fertile. The equation would be:
Hatch of Fertile Eggs Determination
The other measure to calculate is the hatch of fertile eggs. This tells you how well the eggs hatched out of the eggs that could possibly hatch. This is the true measure of incubation success. The equation is:

To continue with our sample if 50 of the 57 fertile eggs hatched the % hatch of fertile would be:

It is important to remember that in diagnosing problem within the hatchery, careful estimation of hatchery efficiency will determine where to check first for problems. The case above illustrates that even though only 50 out of 126 eggs (39.7%) hatched, the fault is not with incubation so much as a problem with fertility of the breeding stock.
Final Suggestions:
Documentation is the key to successful incubation management. Be sure to note egg movement through the hatchery and identify parents (if possible) for future reference. Note water losses and chick hatch weights. Note any unusual events that take place in the hatchery. This would include the purchase of eggs and power outages, etc. This file should also include a visitor log, if visitors are taken (not recommended) into the hatchery.
Maintain an electric analog clock at the hatchery, and check it often. This will reveal power outages and their duration. A high / low recording thermometer will also be useful for historical data about the room condition during the day.
By being alert to conditions in the hatchery, many of the common problems seen can be avoided.
Mention of a trademark, proprietary product, or specific equipment does not constitute a warranty by the Poultry Science Department, Agricultural Experiment Station, or Extension Service, and does not imply its approval to the exclusion of other products that may be suitable.
April 2007