


How the climate can negatively affect broiler health
 5 March 2021
 9 minute read
 By:
By: 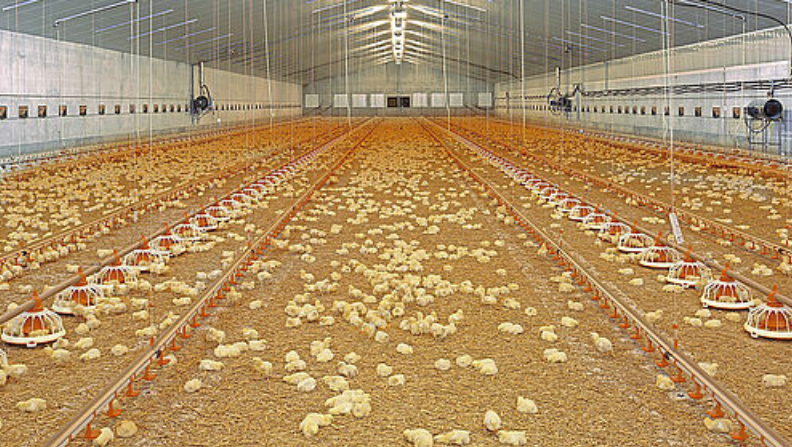
Housing is a crucial cornerstone of healthy broiler development,” says Heinz Südkamp, Product Manager Climate at Big Dutchman, leading supplier of poultry equipment and housing. “Creating the right environment sets chicks up to achieve higher weight gains and overall results. More than that, it helps create a baseline for best practice that will do nothing but benefit your overall operation.”
A comfortable climate in the barn
Broiler well-being is significantly affected by the house climate. Draughts, harmful gases and incorrect temperatures can all compromise the birds’ immune systems. As a result, inconsistencies when creating the right climate can leave the birds susceptible to viral and bacterial infections, thus leading to losses. Although this is the worst-case scenario, smaller and less noticeable losses are also possible, including reduced daily weight gains and a low feed conversion rate.
“Broilers need a comfortable climate in every phase of their life,” says Südkamp, referring to an everyday challenge for farmers. The best way to win this challenge is by using the “apparent temperature”, which indicates the subjectively perceived climatic situation and is influenced by the correct relationship between
- temperature
- humidity
- movement
Where ventilation systems are exclusively temperature-controlled, the birds will chill very quickly, because humidity and air speed are not taken into account. Instead, a system should be implemented along enthalpy lines – a holistic approach that always considers how much energy is present within the system at any time. Doing so will lead to a well-balanced relationship between the three factors mentioned above.
How would this look in practice? An enthalpy ventilation system will work according to target values set for the ideal temperature and humidity, e.g. 20 °C at a relative humidity of 65 %. If the humidity increases (thus deviating from the target), the temperature is reduced simultaneously. This also applies in reverse; if the humidity is lower, the temperature can be increased, since the air has the same heat content. Modern climate controllers can also automatically compensate for air speeds created by the current ventilation level.
The result is varying actual temperatures between 32 °C and 34 °C when the chicks are moved in, depending on bird weight and humidity. “Modern technology is able to detect the apparent temperature,” says Heinz Südkamp. “Older systems often overlook how these different variables can affect and undermine each other. Optimising your climate should always take a rounded approach.”
Target temperature | Temperature in °C at ... % relative humidity | ||||
at 65 % RH | 40 % | 50 % | 60 % | 70 % | 80 % |
20 °C | 25 | 23 | 21 | 20 | 18 |
21 °C | 26 | 24 | 22 | 20 | 19 |
22 °C | 27 | 25 | 23 | 21 | 20 |
23 °C | 28 | 26 | 24 | 22 | 21 |
24 °C | 29 | 27 | 25 | 23 | 22 |
Table 1: Target temperatures as a function of relative humidity (RH). Values applicable for windless conditions.
When the climate is an issue
Different technologies can aid the establishment of an optimal climate, including temperature sensors, humidity sensors and negative pressure gauges. Defective devices or incorrect settings can actually damage the broilers – indirectly, in terms of going outside the target humidity or air rate, or directly in allowing excessive concentrations of dust, ammonia or carbon dioxide to form.
Older systems
Modern technology considers the apparent temperature. But: “Older systems can often be optimised regarding the relationship between temperature, humidity and movement,” states Heinz Südkamp, addressing a common issue with ventilation technology that is past its peak.
Another problem are livestock houses that become “fatigued” over the course of their life, potentially resulting in cracks, leaks, parasite infestations and shorter service intervals. The following are common issues:
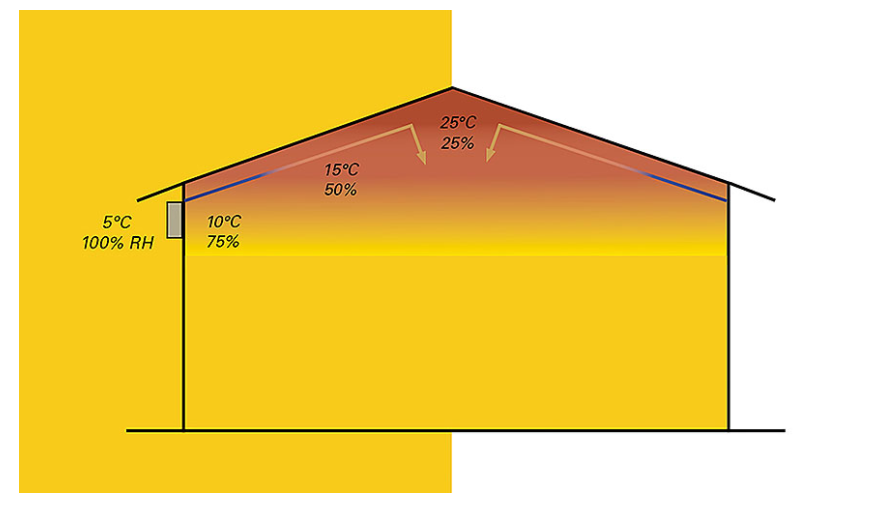
- Leaky old buildings are unable to generate negative pressure, which means that the fresh air drops to the floor and creates wet litter.
- Uneven and cracked floors require more intensive cleaning and disinfection.
- Equipment problems require contracting external service providers to clean the barns. Often workers are unable to perform their duties as quickly and effectively in older buildings, requiring more time and, ultimately, compensation.
- Litter spread incorrectly, often due to uneven floors, is difficult to surmount for young chicks, sapping their energy and hampering growth rates.
- Inconsistent thickness of litter layers creates different temperature zones and low floor temperatures during moving-in.
A comfortable climate for more animal welfare
The following sequence of steps details how to establish best practice with the housing climate:
1. Good technology is installed and the workers know how to use it: intensive monitoring of the birds and adjustments during the first three to four days
↓
2. If there are still problems: Inspection of the ventilation system, adjustment by an expert
↓
3. Maintenance of the system, training of the farm manager
↓
4. Upgrade or replacement of the existing control system
↓
5. If there is no permanent improvement: replacement / acquisition of new technology
Tips and tricks
Step 1 – Install the right technology and ensure workers know how to use it. Intensively monitor the birds and adjustments during the first three to four days.
Having the right system in place is the first-line of defence against any issues that might arise in poultry housing. Take the time to consider your options and choose a solution that promotes strong welfare and works with your business.
Pre-heating:
Depending on the season, pre-heating should start two or three days before the chicks arrive. The concrete floor must be warm to replace the broody hen. The standard temperature is currently valued at 28 °C (+1 °C for very light birds), with little room for deviation. Even a difference of 1 °C can lead to performance losses.
Litter:
After heating, spread an even layer of pellet litter that is free of mould and dust. Drinkers must be easy to reach.
Moving-in:
The chicks are usually moved in on chick paper at the maximum light intensity. Options to determine the ideal temperature:
- measure the temperature of the cloaca (for younger birds);
- touch the chick to the cheek;
- generally increase the temperature by 1 °C for lighter birds.
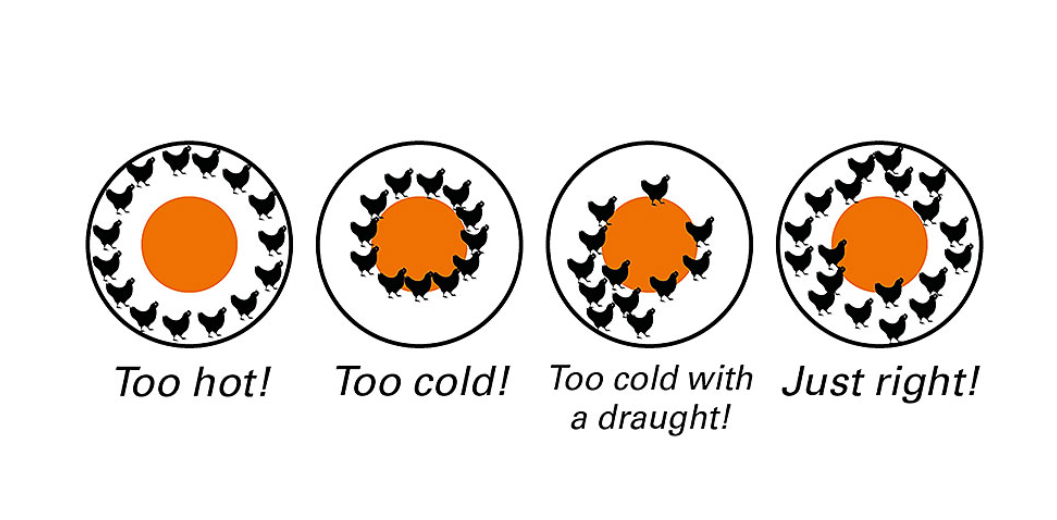
Check the sensors in the barn regularly and at different times of the day, adjusting the climate settings if necessary. The chicks should become active as soon as possible – bright lights and a comfortable temperature will help orientate the chicks and increase activity. Look out for tell-tale signs of chicks being too cold (e.g. huddling) or too warm (e.g. wing and leg spreading or panting). Measure the chicks’ body temperatures to confirm any suspicions and then make adjustments to the house climate.
If there are still problems, move on to the next step.
Step 2 – Inspect the ventilation system and have it adjusted by an expert
Livestock houses should be airtight. Ventilation systems should generate a negative pressure of 20 to 30 Pa. Regular checks by experts are recommended. The goal is to convert wet and cold fresh air into dry and comfortable inside air using heating systems and the birds’ own heat.
Heat can be added to the building as required via systems such as forced air heaters, hot-water convection heaters or a floor heating system.
Step 3 – Service the system, train the farm manager
Almost every farm has the potential to significantly optimise their broiler control system and improve profitability. Many are reluctant due to the perceived expense associated with maintenance and training. These should be considered as investments, however. Regular training and maintenance not only ensure the system is performing to its full capability but helps instil consistent best practice.
If there is still no improvement, move to the next step:
Step 4 – Upgrade or replace the existing control system
Effective housing must be robust in every individual aspect to be successful as a whole. For example, an excellent climate control system installed in an outdated barn will not yield strong results. Having the right technology and environment – combined with best practice when managing those things – is the surest path to achieving optimal outcomes.
Step 5 – If there is no permanent improvement: acquire new technology to replace the old one
Conclusion:
“Intensive monitoring of the birds and constant climate adjustments during the first days after moving-in are the basis for healthy, efficient and stable flocks,” says Heinz Südkamp. Even as modern control systems automate more and more tasks in the barn, the value of the farmer’s dedication during this period cannot be understated. Many farms have the potential to drive positive change in this area. Best practice in housing isn’t a one-off measure, it’s a continued process.