


This month on Jamesway’s Webinar Wednesdays – Those 3 Days No One Talks About – The Hatcher
The hatcher is often the forgotten sister of the incubator. Most presentations focus on getting everything right in the incubator, assuming that if the incubation portion is right, the hatcher will just finish off all that good work. The reality though, is that the hatcher needs to be used to continue the progress in incubation and even compensate for some potential shortcomings, such as temperature gradients, experienced in the incubator. 2 October 2017
 5 minute read
There are 3 major phases involved in the incubator to hatcher process:
- Transfer
- Maintenance
- Hatching
As well there is the option to further customize what is happening through the use of profiling on your Platinum hatchers, or multi-stage hatchers through Hatchcom III.
Transfer is defined as the process which moves the eggs from the incubator to the hatcher; including the movement between egg flat and hatcher basket. This process encompasses more and specific transfer patterns and placement into the hatcher from the incubator can be used to improve the overall hatch. An example for our Single-Stage Platinum would to take those eggs that were in a slightly cooler portion of the incubator, often the outside walls, and move them towards the center and the ECU in the hatcher, thereby moving them to the warmest area. Jamesway has specific transfer pattern guidance available for all combinations of our equipment which can be received by contacting your Jamesway consultant or [email protected].
A key point brought up by Jamesway Hatchery Consultant, Phillip Perry, was that with the push towards automated transfer hatchery managers need to pay close attention to the transfer pattern their equipment provides, and ensure that it meets Jamesway’s recommended transfer guidelines for whatever equipment you have installed.
Other key tips for transfer:
- Handle eggs with care
- Do not remove all incubator racks from one side of a Platinum incubator – this disrupts airflow
- Minimize the time the eggs are out of the incubator; do not allow them to cool excessively
- Do not transfer into wet baskets
- Complete transfer for all the racks in one cabinet without stopping
- Ensure dollies are loaded and positioned properly according to the manufacturer’s recommendations
- Ensure alarms are active once the hatcher has reached operational temperature and humidity set points
Maintenance is simply the process where we keep the eggs in a stable environment until the hatch begins. Generally this involves stepping down the temperature set point in the hatcher, such as from 97.6°F to 97.3°F. This process is important to ensure eggs are kept warm. If there is a need, the temperature can be kept higher to speed up the hatch or the humidity may be dropped to increase the weight loss of the egg.
The hatching process then begins. Jamesway expects a hatch window of 24 hours from first chicks to last finish for Platinum equipment; 30 hours for multi-stage.
In single-stage equipment, we can expect to see a humidity bell curve which tracks the hatch window exactly. In order to view this, Jamesway recommends against the use of humidification in the hatchers (providing a room humidification level is maintained at 45%RH), as it will hide the actual humidity bell curve. As seen below, there is a clear increase in humidity that occurs as the chicks hatch out, due to their natural processes. As the chicks dry out and fewer are hatching, the humidity drops. This is visible both on the Platinum interface graphs as well as in Hatchcom.
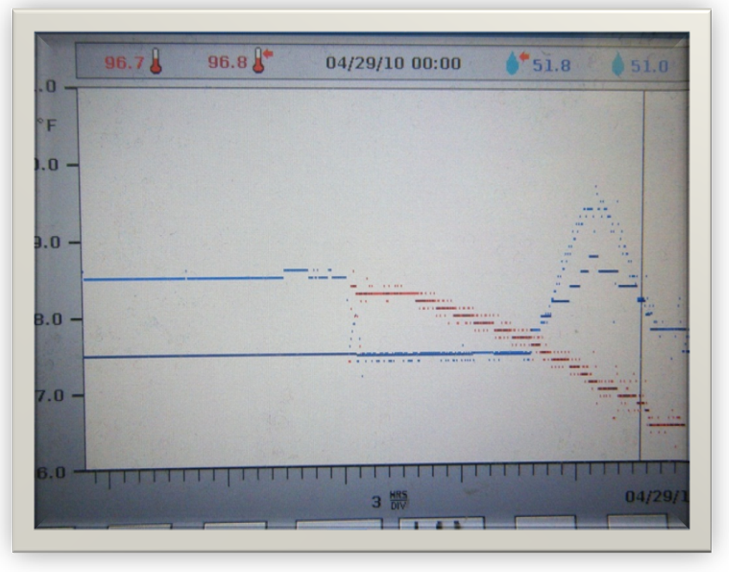
Picture: Platinum display hatch graph
In multi-stage, the hatch is generally monitored by visual inspection. 12 hours prior to pull, 50-60% of chicks should be hatched, with 10% of those chicks wet or just hatched. However, Jamesway has discovered you can also see, in Hatchcom, the effects of the humidity bell curve created by the chicks by monitoring the spray usage. As the hatch progresses to its peak, the sprays will drop to 0 usage, and then as we head to the finish of the hatch, the sprays will begin to come back on. This allows the hatchery manager to check progress without opening the cabinet and disrupting the internal environment.
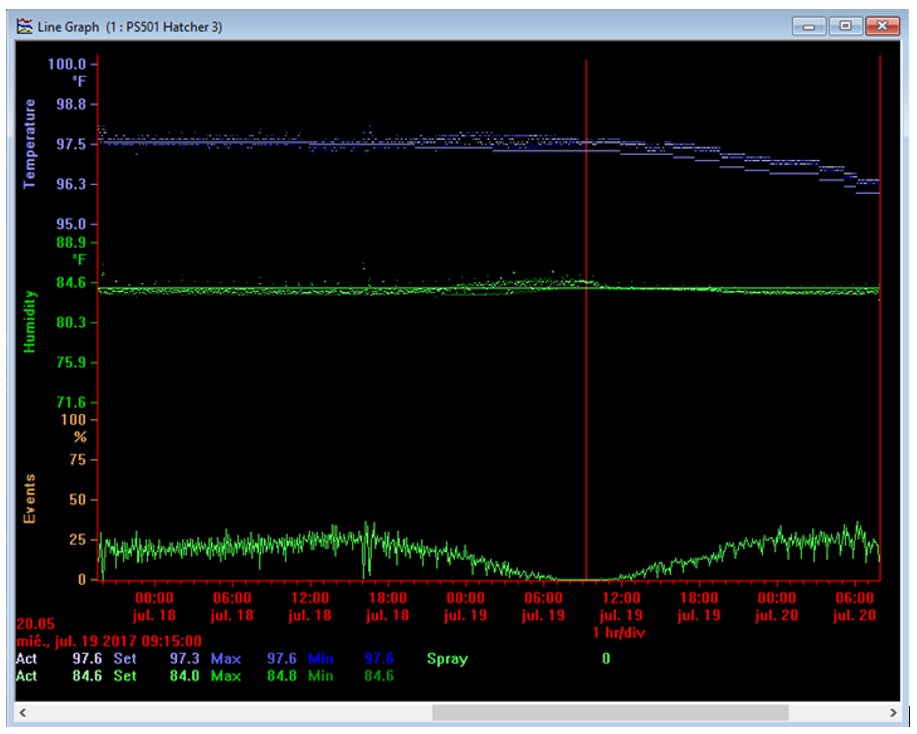
Picture: Hatchcom Multi-Stage Hatcher Graph with Spray (Humidity) Duration
Now that we can identify when the hatch is happening, we can now profile our machines to best suit those chicks as they hatch out. Profiles for single-stage are standard and included by default in your hatcher to suit the needs of the chick. Remember that humidity sprays should be disabled in the single-stage hatcher to allow the clear view of the bell curve. The profile includes a humidity rise and peak as shown below to approximate where the bell curve should be occurring; this also reduces the incidence of high humidity alarms.
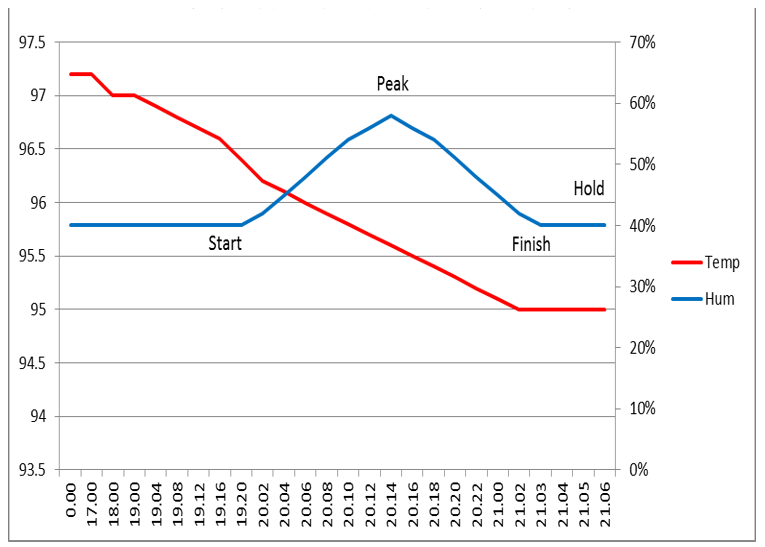
Picture: Typical Platinum Hatcher Profile
It is also possible to profile in the multistage hatcher provided the following equipment is in place:
- PS501 controller or existing PT100 controller
- Hatchcom computer with a stable communication link to the equipment
Hatchcom allows for temperature and humidity profiles in the multistage hatchers. Jamesway recommends that the temperature decrease as the hatch progresses, rather than using a single setpoint or manually changing the set point throughout the duration of the time in the hatcher. Before embarking on profiling your multistage hatchers, please contact Jamesway for advice and guidance. It is essential there is a stable connection as the profile is not stored in the multistage controller but instead only in Hatchcom.
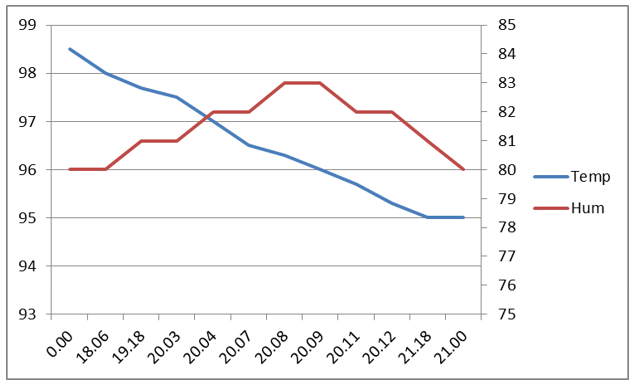
Picture: 2-Door Hatcher Hatchcom Profile
This month, Jamesway’s Webinar Wednesday focused on Those 3 Days No One Talks About – In the Hatcher. You can watch a live replay of the webinar at https://youtu.be/VEblZ4tGGFo and join us next month for two webinars: 5 Things You May Not Know about Hatchcom, and a special edition “Ask Us Anything” open question and answer forum with a panel of Jamesway Hatchery Experts.
 26 April 2025
2
minute read
26 April 2025
2
minute read