


Investigating Hatchery Practice - Routine Quality Control in the Hatchery - 2
In the eighth article in this series, Dr Steve Tullett, consultant for Aviagen specialising in incubation and fertility, describes how to plan, organise and carry out a hatchery investigation. The article forms part of a recently published Ross Tech publication, Investigating Hatchery Practice. 5 February 2010
 8 minute read
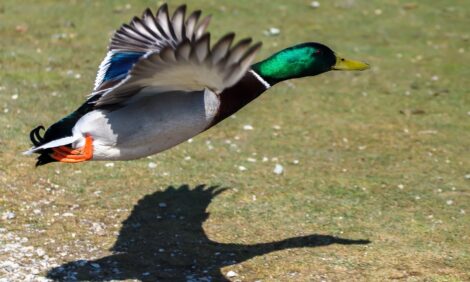
It may become necessary to carry out a detailed investigation if hatchability or chick quality problems arise. Hatchability of fertile eggs, chick quality and post-hatching performance are affected by the conditions experienced by eggs from oviposition until hatching. Therefore, any hatchery investigation should encompass all the events between the time the egg is laid through to the start of brooding on the farm. The performance of the chicks during the first week on the farm, especially mortality levels and seven-day body weights should also be examined. Although chick performance is influenced by farm management, the initial impact of hatchery procedures is often underestimated and should also be considered when problems arise.
Careful planning of any hatchery investigation will ensure that the material examined is representative of the system as a whole. The result of an investigation will be to suggest alternative management practices within the process. Quality control routines must then be adapted to monitor the results of any changes which are made and to prevent recurrence of the same problems.
The following equipment will be required when investigating hatchery problems:
- Scales with which to weigh entire trays of eggs to the nearest 10g (0.4 oz)
- Miniature temperature data loggers capable of measuring temperature to an accuracy of 0.2°C (0.4°F)
- Forceps, knife or scissors to open eggs
- A table placed in good light, away from routine hatchery work
- A plentiful supply of egg trays
- A large waterproof bin to receive waste
- Paper towels
- Recording forms (see examples in Appendix)
- Disinfectant spray
- Gloves
On each farm, place one or more miniature temperature data loggers in a nest box after the last egg collection of the day. During egg collection the following day, treat the data loggers in the same way as the eggs from that collection. Pass the data loggers through any disinfection procedure, protecting them from water or chemical damage by the use of plastic bags and tape as necessary. Place the data loggers in the egg trays with the hatching eggs before placing the trays in the egg store. Mark the trays containing the data loggers, so that they can be found at the hatchery.
At the hatchery, identify eight to 10 setter trays of eggs per farm, i.e. 1,000-1,500 eggs in total). These should be of known and similar egg age and, if possible, they should be representative of the egg age currently in the system. Include the trays containing the temperature data loggers in the sample; leave the loggers in place through the hatching process. Mark the trays clearly and weigh each tray. Record the weights on Form 1. Record the weight of empty trays.
Distribute the sample trays evenly throughout the setter, e.g. one top, one middle and one bottom tray at up to three different locations throughout the setter, so that incubator position effects can be identified.
Three or four days before the due hatch date, set one full tray of eggs from each farm for fertility assessment. These eggs will all be opened and therefore will not be available for hatching.
At candling, do not remove any eggs from the sample trays unless they are rotten or leaking, in which case they should be recorded on Form 4 (Appendix).
Re-weigh the trays at transfer, noting the date.
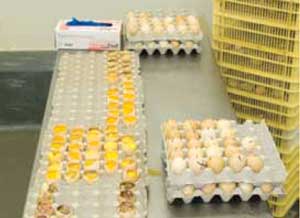
On the day of the hatch, select all the trays required for analysis (Figure 26).
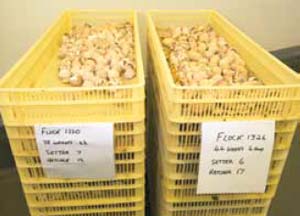
Count the Grade-A chicks and weigh in bulk to hatcher tray. Count the culls and dead chicks on each tray. Record the numbers on Form 1 (Appendix).
Find all the unhatched eggs and transfer them to egg trays labelled with the flock code and hatcher tray number. The hatcher trays can then be released for washing.
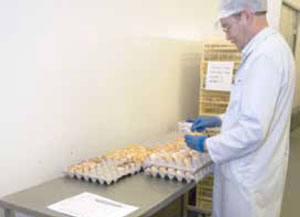
Working through each tray within the sample, open each egg (Figure 27). Classify the contents according to when the embryo died or whether there is bacterial contamination. Record any developmental abnormalities. Descriptions of the different categories are given in Tables 1 and 2.
Sort the eggs by developmental stage on to egg trays (Figure 28), and then record the number of eggs in each category, by tray, on Form 2.
Total the number of eggs in each category for every flock and then calculate as a percentage of the total number of eggs set.
Compare the results with the targets relevant for the particular flock age (Tables 3 and 4). The categories having the greatest deviation from target should indicate where problems are occurring. Health, nutrition and management can all affect patterns of embryonic mortality, so these targets are intended only as a guideline to establishing precise targets for the hatchery.
Occasionally, hatchery investigations cannot be organised and planned as rigorously as outlined above. However, even if an investigation is unplanned and required at short notice and a small number of hatcher trays taken at random on the day of hatch are the only materials available make sure the investigation is organised in such a way that the results can be expressed as a percentage of the eggs set.
Several other observations may have to be interpreted whilst carrying out a hatchery investigation. For example, if the number of unhatched eggs on each tray is very variable (e.g. the worst tray having twice as many unhatched eggs as the best) this may indicate uneven holding or incubation conditions or the presence of trays containing washed/floor eggs in the sample. Washed or floor eggs will usually have a large percentage of 'Black Eye' mortality and 'Early Rots'.
An excessive number of contaminated eggs should trigger further enquiry into egg handling and sanitation procedures. A high incidence of contamination and rots can be due to poor nest hygiene. Implementing a programme of increased egg collections and more frequent changes of nesting material may help. It could also be due to poor or inappropriate sanitation technique. The egg handling procedures should be closely observed also to see if the eggs are subjected to wetting or condensation on the eggshell at any stage. Candling of eggs would show if the contamination is the result of rough handling leading to hairline cracks.
By monitoring egg-weight losses in the setter, it is easy to identify any incubators that are not achieving the suggested egg-weight loss to pipping. The humidity control system should be examined in such incubators, e.g. look for blocked spray nozzles. If the humidity control appears to be working satisfactorily then a change in the humidity setting to achieve the correct egg-weight loss is desirable. In a multi-stage setter, a change of one per cent in weight loss (e.g. from 13 per cent to 12 per cent) is achieved by a change of about five percentage points in relative humidity or a change in wet bulb temperature of 1°C or 2°F. Increasing the relative humidity or wet bulb temperature will decrease the loss in weight from the egg, and vice versa.
In the single-stage incubation programmes where the setter ventilation may be closed for the first eight to 10 days of incubation, the egg-weight loss during this period may be as low as two per cent of the fresh egg weight. This means the eggs then have to lose 10 per cent of their fresh weight during the eight to 10 days remaining to transfer. This may be difficult to achieve without switching off the humidity system for a number of days and may not be achievable when the incoming air humidity is high.
Measuring the average chick weight from trays where egg-weight loss has been monitored is good practice. If the eggs have lost 12 per cent of their fresh weight to transfer, but the chicks at take-off do not weigh 67 per cent of the fresh egg weight, then your egg setting/chick take-off times need to be adjusted. As a rule of thumb, a chick yield which is one percentage point below target can be corrected by setting the eggs three hours later. But, first ensure that your egg-weight loss to pipping really is about 12 per cent of the fresh egg weight, or 11.5 per cent of the egg weight at set (for short-term storage).
Further Reading
| - | You can see other articles in this series Investigating Hatchery Practice by clicking here. |
February 2010