


Essential ventilation management, part 2: types of ventilation
This series has been written with the guidelines for a house in a climate that may experience four seasons. As such the series will cover the three modes of ventilation (minimum, transitional, tunnel). In most countries and climates around the world, these three modes of ventilation are necessary in order to have the best chance of maintaining bird comfort. By:
By: Part of Series:
Types of ventilation
In most climates around the world, poultry houses should have 3 ventilation systems. These are:
Do you need a minimum/transitional ventilation system?
- In many countries, poultry houses do not have inlets for minimum ventilation.
- Because the house is in a 'hot climate' it is thought that side inlets and minimum (and transitional ventilation) are not necessary.
- However, it must be remembered that we ventilate houses for the benefit of the birds.
- Any time (day or night), that the outside temperature goes below the set-point temperature of the house (comfort temperature of the birds), it can be seen as 'cold weather relative to the birds' and minimum and transitional ventilation will be of benefit.
- As a rough guideline, minimum and transitional inlets should be used if:
- Outside temperature £ (set-point temperature + 3oC/5.4oF)
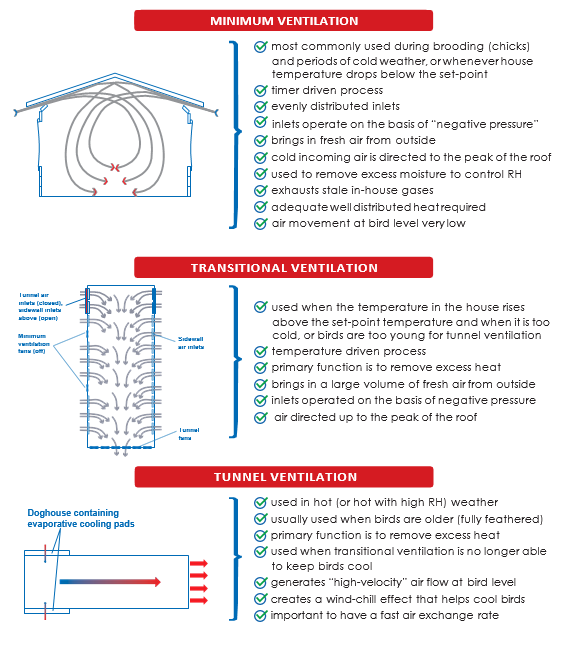
Minimum ventilation
Minimum ventilation is used when the house temperature is at or below the required house set- point temperature (bird comfort temperature). It is most commonly used during brooding (chicks).
Well-sealed, insulated house
- Houses must be well sealed and as air tight as possible.
- The better the house is sealed:
- the easier it is to create a negative pressure
- the more control you have over where and how air will enter the house.
- A well-insulated house will keep valuable heat in the house during cold outside conditions.
- While the fans are operating, a smoke test can be used to locate areas of air leakage by providing a visual indication of air leakage on the outside of the house.
- There must be enough heating capacity in the house to be able to maintain the set-point temperature while providing sufficient ventilation for acceptable air quality for the birds, regardless of the outside temperature. Heat must be evenly distributed through the house.
- Reducing the heating capacity (number of heaters) in a house does not necessarily reduce the total heating cost/consumption:
- Based on the control system and type of heating, the house should be set up to heat in zones
Heating capacity
- having more heating capacity, well distributed throughout the house, will often result in a lower heating cost and a better, more uniform environment for the birds.
- Ventilation should not be reduced below the minimum requirement to maintain air quality (humidity, ammonia, CO2, CO) in order to reduce heating cost.
Setting/managing sidewall inlets
During minimum ventilation, air should enter through sidewall inlets.
- The inlets should be evenly distributed along the length of the house, and on both sidewalls. This helps to create a uniform house environment.
- The inlets must direct the cold incoming air up toward the peak of the ceiling. This is important because:
- it keeps the cold incoming air away from the birds.
- the cold incoming air should mix with warm in-house air which an insulated, well-sealed house accumulates in the peak of the roof.
- as the cold air warms up, the RH of the air will reduce, making it easier for the air to absorb moisture and thereby helping to keep the house and litter dry. As a guide for every 10oC (18oF) the air is heated, the RH will become half of its original value.
- the incoming air flow helps to bring the warm air down to bird level.
- the minimum ventilation air flow helps to mix the air in the house and break up any stratification in temperature and air quality.
During minimum ventilation the air inlets must operate based on negative pressure (pressure differential). The ideal operating negative pressure for an individual house will vary and depends on:
- house width (distance air needs to travel to peak of ceiling)
- angle and shape of internal ceiling
- type of air inlet
- the inlet opening size.
For a given ceiling shape, the pressure requirement will be lower for a smooth ceiling relative to a ceiling with exposed beams/trusses.
Also, for a given pressure, the ‘throw’ (the distance the air moves into the house) of the air into the house will be further the more the inlet is opened.
A useful guide for estimating operating pressure for a given house is that for every increase in negative pressure of 3 - 4 Pa (0.012-0.016 inches of water column) air is thrown approximately 1 m (3.3 ft) further into the house.
- For example, for a 14 m (46.2 ft) wide house the operating pressure should therefore be (14/2)*3-4 = 21-28 Pa [((46.2/(2*3.3))* 0.012-0.016 = 0.08-0.11 inches of water column)]
Inlet management is a crucial part of minimum ventilation. Generally, not all air inlets will need to be opened during minimum ventilation and the inlets that are open must be opened equally to ensure a uniform air flow and distribution.
The recommended minimum inlet opening is approximately 5cm/2 in (but not less than 3 cm/1 in).
- For a given pressure, air flow will vary based on how much the inlet is open.
- If air inlets are not open enough, incoming air will only travel a short distance before falling on to the birds regardless of house pressure.
- If air inlets are open too much or too many are opened, negative pressure within the house will be reduced (the difference between pressure inside the house and outside will become less) and the speed at which the air enters the house will be too slow so that it falls directly on to the birds.
- Having fewer inlets that are open the “correct” amount (3-5 cm/1-2 in minimum) is better than having all the inlets not open enough.
Having, the correct setting of the air direction plate (above the inlet) is important.
- If the house has a smooth ceiling, a general guideline is to set the air direction plate so that the air makes contact with the ceiling surface ±0.5 m to 1 m (1.6 to 3.3 ft) away from the sidewall.
- For ceilings that have obstructions crossing the direction of the air flow, the air direction plate should be set to direct the incoming air below the obstruction(s).
- Using a laser pointer held against the air direction plate can help with setting the angle of the plate.

Inlet management involves finding the best combination of:
- the minimum opening size of the inlets
- the negative pressure in the house
- the setting of the air direction plate.
If any one of the 3 factors above is incorrect, air flow will be compromised.
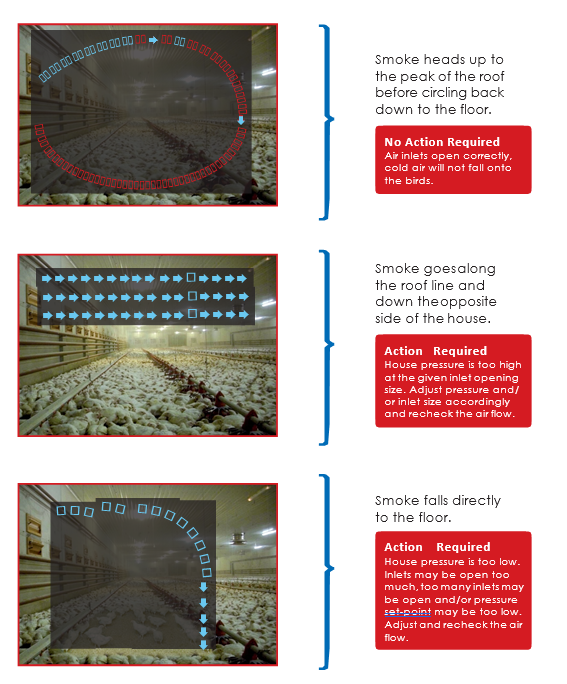
Inlet air flow and operating pressure should be tested, checked and confirmed using a smoke test or the cassette tape method.
- Air should flow to the center of the house (peak of the roof) before slowing and moving down toward the floor.
- When using a smoke test:
- If using the cassette tape method:
- Choose a minimum ventilation inlet, preferably near to the house entrance.
- Hang strips of cassette tape or lightweight plastic (approx. 15 cm (6 in) long) every 1-1.5 m (3-5 ft) in front of the chosen inlet, up to the apex of the ceiling.
- If air movement is correct every strip should move; the one closest to the air inlet should move the most with movement getting less the closer the tape is to the roof apex (or middle of the house).
- These strips can remain in place throughout the production cycle to provide a quick visual check.
Guideline to setting up inlets
How do you decide how many inlets should be used for minimum ventilation? Some people try to calculate this based on the fan capacity. Unfortunately though, this method can be quite
inaccurate because you have no idea how much leakage there is in the house, which is also a form of inlet area.
Assuming your house has sufficient sidewall inlets for transitional ventilation, a practical method to determine the setup is as follows:
- Set the inlets so that only every second inlet will open on each side of the house (that is, “one open, one closed” configuration).
- Depending on the type of inlet, this can be set using the hooks on the inlet door, or by a latch on the inlet that enables you to lock the inlet in the closed position.
- Set each side so that inlets directly opposite each other do not open for minimum ventilation.
- Using the automatic winch in manual mode, open these inlets 3-5 cm (1-2 in).
- Make sure that the air direction plates are set as accurately as possible.
- Operate the minimum ventilation fans.
- Use a smoke test or the cassette tape method to check if the air flow reaches the peak of the roof.
- Fine tune the setting of the air direction plate, inlet opening, and pressure to get the desired air flow.
- If, while trying to increase the house pressure to get the desired air flow, you find that the inlets are open less than 3 cm (1 in), it may be an indication that you need to change the inlet setup to a “one open and two closed” configuration.
- By reducing the number of inlets in use it will assist with increasing the house pressure while allowing a larger inlet opening on those inlets that are open.
- Perform the smoke/cassette test again.
Other inlet types
The above explanations of setting and managing inlets refer to sidewall inlets. However, the basic principles will apply to most inlet types when being used during minimum ventilation.
- Hot air rises and will always accumulate at the highest part of a well-sealed and well-insulated roof.
- Use the inlets to direct the cold incoming air into the warm air and allow it to mix and warm up.
- The speed of the air leaving the inlet must allow for good mixing of the cold air with the warm air in the house.
- If the cold air enters at a slow speed (low negative pressure), then there is no turbulence and the cold air will not mix and get warmer.
- Keep the cold incoming air away from the birds for as long as possible to give it as much time as possible to mix and warm.
- The same 3 criteria will apply to most inlet types to determine air flow and travel distance:
- minimum inlet opening (3-5 cm/1-2 in)
- negative pressure
- air direction plate (depending on the inlet type).
- Getting the right balance of the above 3 factors is necessary for the desired air flow.
- If roof inlets are used where air flows from the middle area of the house towards the sidewalls, then, be careful that the air does not reach the sidewall while still cold, and then flow down the wall onto the birds.
- This can be regulated by adjusting the inlet opening size and/or negative pressure.
- Ideally, roof inlets should not be too close to the sidewalls to avoid this problem.
Minimum ventilation cycle timer
- Minimum ventilation fans operate on a cycle timer (ON/OFF).
- Benefits include:
- a greater fan capacity can be operated for a short period and then switched off
- the greater fan capacity makes it possible to create the required negative pressure with an acceptable minimum inlet opening.
- the above allows for the desired air flow.
- A commonly used cycle time (ON + OFF) is 5 minutes (300 seconds).
- Different cycle times may be used at different bird ages provided:
- the birds are comfortable.
- the air quality in the house is constant and acceptable.
- Especially during brooding and when the birds are still young, be sure that the minimum ON time is enough for the air to reach the peak of the ceiling, and then start to travel down to the floor to ensure cold incoming air does not drop directly onto the birds.
- In a 15 m (49 ft) wide house, this “minimum ON time” could be in the range of 30-45 seconds.
- This setting can be confirmed using a smoke test, or the cassette tape method.
Minimum ventilation rate
- Minimum ventilation programs exist that are based on various factors, such as bird body weight, carbon dioxide, ammonia and RH.
- Most often, minimum ventilation is more about controlling RH than providing fresh air for the birds. An increase in house RH is often the first sign of under-ventilating.
- Good management of the cycle timer (length of time fans operate) is important to make sure that moist/humid air is removed from the house effectively.
- Visit the house at least once every day to evaluate the minimum ventilation rate.
- Try to make an evaluation of the air quality within the first minute of entering the house.
- Using sensors (e.g. CO2, O2, NH3) can help with this evaluation.
Set point temperature
The set-point temperature profile should be used as a guideline only.
- If necessary, the set-point should be adjusted any time the birds appear to be uncomfortable (warm or cold) when the house temperature is at the set-point.
- As discussed earlier, RH plays a role in the effective temperature of the bird.
- The higher the house RH, the warmer the bird will feel.
- Under these conditions the set-point temperature may need to be reduced slightly in order to account for the higher RH.
- Important: If RH is high due to under ventilating, then the first priority is to increase the minimum ventilation rate in order to improve air quality and “minimize” RH.
Evaluating minimum ventilation
What to look for when entering house during minimum ventilation
- Bird behavior and air quality are the best indicators of how well your minimum ventilation system is being managed.
- When visiting the house, make sure that nobody has been in the house for the last 20-30 minutes.
- If there is a viewing window in the service room, use it to observe bird behavior and distribution as far as you can see before entering the house.
- Enter the house quietly.
- Look for activity along the feeder and drinker lines
- How is the “air quality”? Try to form an opinion on this within the first 60 seconds of entering the house, and before you become accustomed to the conditions.
- The following signs would suggest that the minimum ventilation rate should be increased:
- high RH
- air feels “stuffy”
- high ammonia levels
- drops of water (condensation) on the incoming water lines
- “sweating” (condensation) on the walls and/or ceiling
- wet litter.
- The following signs would suggest that the minimum ventilation rate may be too high and could be decreased:
- air quality feels almost as good as outside, but warmer (remember that you are visiting a poultry house and so it should feel that way)
- very dry litter
- dusty conditions in the house
- house was unable to maintain the set-point temperature during the night
- Observe the birds quietly
- Are they properly distributed?
- Are there open patches with no birds?
- If there are, this could be from:
- cold air leakage
- incorrectly set inlet/s
- heater not operating.
- If broilers, how is the activity at the feeders and drinkers?
- When the house is at the set-point temperature, are the birds huddling and showing signs of being cold?
- If so it could be due to the following:
- controller sensor reading is incorrect (out of calibration)
- set-point temperature is too low.
- If so it could be due to the following:
- Increase the set-point temperature by 0.5 – 1oC (1-2 oF).
- If during the brooding period, check the litter temperature.
- Re-evaluate bird comfort after 20-30 minutes.
- When the house is at the set-point temperature, are the birds showing signs of being too warm?
- If so it could be due to the following:
- controller sensor reading is incorrect (out of calibration)
- set-point temperature is too high
- RH is high; making the birds feel warmer than the thermometer is showing.
- If so it could be due to the following:
- Before adjusting the set-point temperature to compensate for the higher RH, be sure that the RH is not high because the house is being under ventilated.
- Is the air quality acceptable?
- If not, then first adjust the cycle timer to improve the air quality.
- This may take a number of hours to improve.
- If/when the air quality is acceptable, then adjust the set temperature to allow for the high RH if the birds still appear too warm
- Decrease the set-point temperature by 0.5oC – 1oC (1-2 oF).
- Re-evaluate bird comfort after 20-30 minutes.
- Walk slowly down both sides of the house about midway between the wall and the center.
- Do you feel any cold air, possibly indicating that the inlets are not correctly set?
- Throughout the flock/cycle, make notes on the minimum ventilation changes you have made.
- Use your notes to update your controller settings, and minimum ventilation program.
Transitional ventilation
- Transitional ventilation begins when the house temperature increases above the set-point temperature (or within 1-2 oC/ 2-4 oF above, depending on bird age) and when it is too cold or birds are too young for tunnel ventilation.
- The emphasis of the ventilation changes from supplying heat and minimal fresh air, to removing heat from the house during transitional ventilation.
- Large volumes of fresh air are brought in from outside.
- Fans run continuously.
- Heaters should be OFF.
- During transitional ventilation (as for minimum ventilation) the inlets operate on the basis of negative pressure.
- The incoming air should be directed upward and away from the birds.
- All air enters the house through the evenly distributed sidewall inlets to give an even and uniform flow and distribution along the length of the house.
- The number of sidewall inlets in use is increased compared to minimum ventilation to allow a higher volume of air to be brought into the house.
- In full transitional ventilation, all of the sidewall or chimney fans will be operating, as well as a large percentage of the tunnel fan capacity.
- During transitional ventilation the tunnel inlet, if fitted, should remain closed.
- Little attention should be paid to thermometer and sensor readings during transitional ventilation; use bird behavior to determine the correct conditions.
- Correct operating pressure and air flow for the house should be checked, tested and confirmed (e.g. using a smoke test).
- To make full and best use of transitional ventilation, it is important that the house has been designed correctly and there are enough sidewall inlets.
Evaluating transitional ventilation
What to look for when entering house during transitional ventilation
- Visible bird comfort and behavior is the best indicator of how well your transitional ventilation system is being operated.
- When visiting the house, make sure that nobody has been in the house for the last 20-30 minutes.
- If there is a viewing window in the service room, use it to observe bird behavior and distribution as far as you can see before entering the house.
- Enter the house quietly.
- Observe the birds quietly.
- Are they evenly distributed?
- Is their behavior as you want it?
- If broilers, how is the activity at the feeders and drinkers?
- During long periods of transitional ventilation, some air movement at bird level is unavoidable.
- This air movement at bird level will result in them feeling some wind-chill effect.
- During transitional ventilation, pay little attention to thermometer and sensor readings.
- If the birds are sitting, huddling, and showing signs of feeling cold, then, regardless of the thermometer reading, they are probably cold and/or uncomfortable.
- Try to improve their comfort level by switching off a fan.
- This will reduce the air movement on them, allow the air temperature to increase slightly, and hopefully the combination of these changes will make them feel comfortable.
- Re-evaluate the change and bird behavior after 20-30 minutes.
- If the birds are showing signs of feeling warm or hot, then, try to improve their comfort level by switching on another fan.
- This will increase the air movement/turbulence on them slightly, the air temperature may decrease slightly, and hopefully the combination of these changes will make them feel comfortable.
- Re-evaluate the change and bird behavior after 20-30 minutes.
- The heater/s should never operate during transitional ventilation.
- If you are using maximum transitional ventilation and the birds are still showing signs of being too warm, then it is time for tunnel ventilation.
- Throughout the flock/cycle, make notes on the transitional ventilation changes you have made.
- Use your notes to update your transitional ventilation settings on the controller
Tunnel ventilation
- Tunnel ventilation should start only when it is clear that transitional ventilation can no longer keep the birds comfortable.
- Use maximum transitional ventilation before switching to tunnel ventilation.
- The primary function of tunnel ventilation is to remove excess heat.
- During tunnel ventilation air is drawn/pulled along the length of the house creating air flow directly on/over the birds.
- This air flow creates a wind-chill or cooling effect on the birds.
- The wind-chill effect alters the temperature that the bird actually feels (effective temperature).
- Wind-chill effect is possibly the most important aspect to be aware of during tunnel ventilation.
- The effective temperature felt by the birds during tunnel ventilation is affected by:
- air speed
- air temperature
- RH
- bird age
- stocking density
- As the temperature felt by the birds will be different to that shown on the thermometer, it is essential to manage tunnel ventilation on visual bird comfort and activity, and NOT on thermometer temperature.
- For a given air speed, the wind-chill effect is greater on younger birds than it is on older birds.
- The number of fans being used at any given time during tunnel ventilation should be based solely on bird comfort.
- Bird comfort should be assessed along the entire length of the house.
- During tunnel ventilation it is not unusual to find 10-20 percent of the birds “panting lightly” (i.e. their beaks are open but their throats are not fluttering quickly).
- It is important that the tunnel ventilation system has been correctly designed.
- Maximum design air speed will be determined based on factors such as:
- ambient climate (temperature and RH)
- number of birds to be housed
- maximum bird weight
- stocking density
- Measure and monitor air speed on a regular basis (preferably weekly), or if ventilation issues occur.
- Ideally, during maximum tunnel ventilation, the temperature difference along the length of the house should not exceed 2.8oC (5oF).
- If the temperature difference is greater, it could be as a result of the following:
- curtain-sided house where the curtains don’t close properly.
- minimum/transitional ventilation inlets Don’t close and/or seal properly.
- other air leakage (through the roof).
- insufficient roof and/or wall/curtain insulation.
- insufficient fan capacity.
- Maintenance of the fans and cooling pads is an essential part of successful tunnel ventilation.
- In tunnel ventilated houses, installing migration fences for broiler flocks will prevent birds from migrating toward the cooler end of the house (cooling pad end). This greatly helps to maintain a uniform bird and heat distribution in hot weather.
- Install fences approximately every 40 m (120 ft).
- If part house brooding is practiced, the migration fences should be installed when the birds are given access to the full house, and before tunnel ventilation is used for the first time.
Evaporative cooling
How does evaporative cooling work?
- Cooling pads and spray cooling systems make use of evaporative cooling.
- During evaporative cooling, hot air comes in contact with water.
- The hot air releases energy (heat) to the water.
- Because the air gives up energy, the air becomes cooler.
- The water uses the energy given up by the air, to change phase from a liquid to a vapor (evaporation).
- The amount of cooling possible depends largely on the actual amount of moisture already in the air (RH of the existing air).
- The less moisture already in the air (low RH), the more moisture the air can absorb/evaporate, and so the more heat the water will be removed from the air, and the greater the potential temperature reduction.
- Evaporative cooling increases the RH of the air.
- Note that the actual amount of cooling will depend on the outside temperature and RH, the type of cooling system (pads or spray), and the efficiency of this system.
If this information is known, then the amount of cooling and resultant RH level
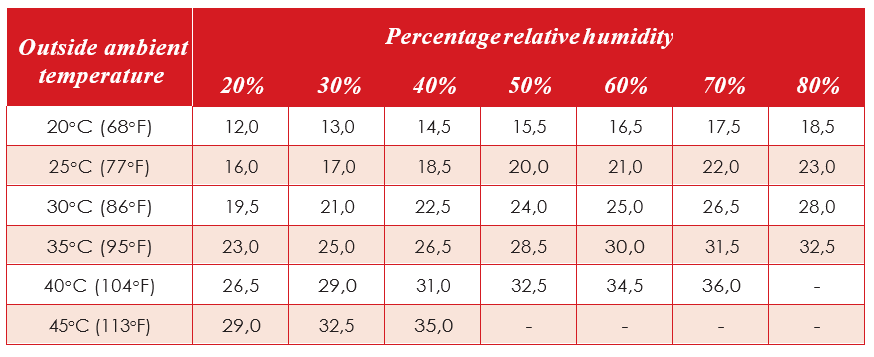
The table above shows the approximate lower air temperature inside the house measured next to the cooling pad, given the outside temperature and %RH. The values are based on a cooling efficiency of approximately 75 percent, which is average for a 15 cm (6 in) thick cooling pad.
- Water temperature has no effect on the amount of evaporative cooling that takes place.
Using evaporative cooling
- Ideally, as the house temperature increases, more tunnel fans should be used to keep the birds comfortable using the wind-chill effect.
- When all the tunnel fans are operating and the birds still show signs of being too hot, it is then time to introduce evaporative cooling.
- The benefits of waiting until all the tunnel fans are operating (particularly with older birds) before using cooling are:
- the house conditions are the most uniform along the length of the house.
- the house RH will be at its lowest (whatever that value may be).
- the outside temperature will be a few degrees higher, which means that the RH will be lower and so the cooling will be more efficient.Ideally, the cooling system should hold the internal house temperature at the same temperature (within ±1oC/2oF) at which cooling was activated.
- This would have been the temperature at which all the fans were running and the birds were comfortable, or just starting to show signs of being warm.
- So, while the cooling system will reduce the air temperature relative to the outside temperature, it’s purpose is to maintain the house at the temperature that it was activated.
- If the cooling system reduces the house temperature too much, then:
- the cooling pump will switch off
- if using cooling pads, they will already be wet, and the house temperature will continue to decrease
- fans will switch off
- air speed will decrease
- conditions (temperature and RH) will not be as uniform along the length of the house
- when the pads eventually dry, house temperature will again increase, and the cycle will start again
- depending on ambient RH, these settings could result in temperature fluctuating by as much as 6-8oC (12-14 oF)every ±15 minutes.
- this is not good for bird comfort.
Note: The above is more relevant to cooling pads.
- To assist with good temperature control during cooling, the cooling pumps should be controlled by the ventilation controller and should ideally operate on a cycle timer.
- With cooling pads, the initial run time of the cooling pumps (as set into the controller) should not wet more than ±10 percent of the pad surface area.
- If the first run of the pump wets too much of the cooling pad, the house temperature may decrease more than necessary causing fluctuations in house temperature.
Managing cooling and RH
- Birds lose heat either directly to the air around them (sensible heat loss), or by panting (latent heat loss).
- When the house temperature increases, the amount of heat that the bird can lose through sensible heat loss, will decrease.
- As house temperature increases and sensible heat loss decreases beyond a certain level, latent heat loss starts, and is evident when the bird starts to pant.
- When panting, the bird loses heat through the evaporation of moisture in its respiratory system.
- The faster the bird pants, the more heat it is trying to release through this method because the heat loss to the air is reducing.
- The efficiency of evaporative cooling, and hence the amount of heat a bird can lose through panting, is influenced by the RH of the air.
- When RH is high, the evaporation efficiency is low.
- As such, if the RH of the air in the house is high, it makes it more difficult for the bird to lose heat through panting; it’s primary method of releasing heat.
- The use of cooling pads increases the RH of the air inside the house.
- Because of this, it is important that the use of colling pads is controlled not only by temperature, but also by RH.
- Most recognized brands of control systems are capable of managing this automatically.
- The level of RH at which the cooling should be switched off is dependent on the design of the house and the maximum air speed.
- Research suggests that the higher the air speed, the higher the RH the bird can tolerate.
- As a rough guideline, when the house reaches 80-85 percent RH, the cooling pump should be switched off. This setting should be fine-tuned by careful observation of the bird’s behavior.
- If the majority of birds are panting, then it is an indication that for those birds, low RH is more important than trying to reduce the temperature by 1-2oC (2-4 oF).
- If cooling is used when the outside RH is above 80 percent, the air temperature will reduce by a maximum of 2oC (4 oF), but the RH will increase in the mid 90’s.
- This will greatly reduce the birds ability to release heat through panting.
- When using tunnel ventilation and cooling in hot weather, visible bird comfort is more than a number on a thermometer or control panel.
- It comes from the combination of air temperature, air speed, and RH.
- Watch the bird behavior!
- If and when house RH reaches a level that the cooling must be switched off, then it is critical to maintain maximum air speed through the house.
- Air speed and air exchange are the best (only) way to keep birds comfortable.
- Water quality can significantly affect cooling pad functionality and life span.
- Analyze water quality and apply treatments to improve water quality if necessary.
- Follow manufacturers recommendations for pad maintenance.
- Remember: The birds benefit more from air speed and air exchange than from evaporative cooling.
Fogging lines
- Fogging lines should be placed near air inlets to maximize the speed of evaporation, with additional lines placed throughout the house.
- The number and layout of fogging nozzles, and total amount of water introduced, should be based on the local environment (temperature and RH), be in accordance with manufacturer’s recommendations and be based on maximum tunnel and / or sidewall fan capacity depending on the type of ventilation system is in place.
- Fogging lines should not be located less than 2.2 m (7.3 ft) above the litter.
- The spray system should operate on a cycle timer and be managed to provide a consistent, uniform house temperature.
There are 3 pressure range categories of fogging systems:
- Low pressure, 7-14 bar; droplet size up to 30 microns
- High pressure, 28-41 bar; droplet size 10-15 microns
- Ultra-high pressure (misting), 48-69 bar; droplet size, 5 microns
- A low pressure system creates larger droplet sizes and provides the least amount of cooling. Due to the large droplet size, there is a greater chance of droplets not evaporating and causing wet litter. Low pressure cooling systems should only be used in very dry climates.
- Poorly maintained fogging nozzles will adversely affect litter quality.
- Refer to the manufacturers recommendations on how to maintain and clean the pumps, pipes, and nozzles.
Evaluating tunnel ventilation
- Bird behavior is the best indicator of how well your tunnel ventilation system is being managed.
- When visiting the house, make sure that nobody has been in the house for the last 20-30 minutes.
- If there is a viewing window in the service room, use it to observe bird behavior and distribution as far as you can see before entering the house.
- Enter the house quietly.
- Observe the birds quietly.
- In broiler houses, look along the feeder and drinker lines to evaluate activity.
- If 50-60 percent of the tunnel fans are running and the birds are showing signs of being cold (sitting, huddling), then you should possibly still be using transitional ventilation.
- Prior to cooling being used, if the birds are sitting, huddling, showing signs of being cold, then, despite the thermometer temperature, they are probably cold.
- Switch off one tunnel fan and re-evaluate the bird behavior 20-30 minutes later.
- Prior to cooling being used, if the birds are showing signs of being too warm, switch on another tunnel fan to increase the air speed.
- Re-evaluate the bird behavior 20-30 minutes later.
- If all the tunnel fans are operating and more than ±20 percent of the birds are panting, then the cooling system should be introduced.
- If all the tunnel fans and cooling are operating and the birds are showing signs of being too cold, then increase the cooling set-point temperature by 0.5-1oC (1-2 oF) and re-evaluate the bird behavior 20-30 minutes later.
- If all the tunnel fans and cooling are operating and the birds are showing signs of being too warm, then decrease the cooling set-point temperature by 0.5-1oC (1-2 oF) and re-evaluate the bird behavior 20-30 minutes later.
- In some cases, due to the ambient climate, it may not be possible to cool the air enough to keep the birds comfortable. Similarly, in some climates, even good air speed may not be able to keep the birds comfortable.
- Throughout the flock/cycle, make notes on the tunnel ventilation changes you have made.
- Use your notes to update your tunnel ventilation and cooling settings on the controller.


More in this series: Essential Ventilation Management
February 2020
 24 February 2020
 1
minute read
1
minute read