


Incubation for the Home Flock
By Earl W. Gleaves, Extension Poultry Specialist, University of Nebraska, Lincoln - This NebGuide covers how to build and operate an incubator to hatch eggs for a home flock. 13 June 2004
 6 minute read
Various makes and models of commercial incubators are available for use by the home flock owner. Companies that sell small incubators and incubator parts include:
Lyon Rural Electric Co.
PO Box 30
2075 Moore Street
San Diego, CA 92112
Montgomery Ward & Co.
Chicago, Illinois 60607
Stromberg's Pets
Unlimited
Pine River,
Minnesota 56474
Fleet Mfg. Co.
PO Box 649
Glendale, CA 91209
Nasco
901 Janesville Avenue
Fort Atkinson, WI 53538
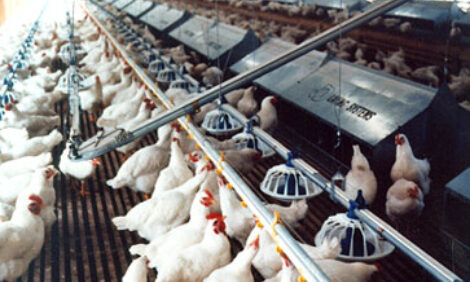
Small still-air incubators suitable for incubating 12 to 24 eggs can be constructed at home with little expense. Don't expect 100 percent success in hatching eggs in any incubator, especially one made at home. You probably should not count on hatching more than 50 percent of the eggs set. You may not even succeed in hatching 50 percent.
Constructing a Plywood Incubator1
The following materials are needed (see Figures 1and 2):
- Three 16" × 1" × 2" boards.
- Two 14 1/2" × 1" × 2" boards.
- Four 9 1/2" × 1" × 2" boards.
- Two 1 1/2" hinges.
- Two screen door hooks and eyes.
- One sheet of 1/2" plywood.
- Plate glass for top.
- Cake pan for water.
- 1/4" mesh welded hardware cloth.
- Heating unit (either a commercial unit or porcelain socket and light bulbs).
- Masking tape or duct tape for protecting the glass edges.
- Scrap tin or other metal for vent covers.
- Wood screws and nails.
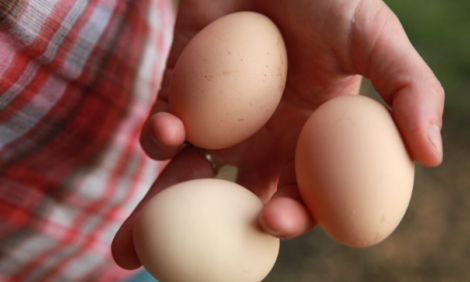
Obtaining Hatching Eggs
Most eggs from the local grocery stores are infertile. However, fertile eggs can usually be obtained from hatcheries or from neighbors who have a small breeding flock. Your county Extension agent may be able to suggest a supplier.
Pick up the eggs yourself rather than having them shipped or mailed. It is difficult for post offices and transportation companies to handle small orders of eggs properly.
Care of Eggs
Eggs should not be over 7 days old when they are set. Eggs held longer will decline in hatchability. If it is necessary to hold eggs, turn them daily and keep them at a temperature of 50 to 55°F. The relative humidity should be 70 to 80 percent. The vegetable section of your refrigerator can be used for holding eggs if the temperature is above 45 °F.
Eggs must be turned while in the incubator. Before you put them in, mark each one with a pencil so that you can tell when they have been properly turned. A good method of marking is to put an "X" on one side of the egg, and an "O" on the opposite side. When the eggs have been turned, either all "O"s or all "X"s are turned up at the same time.
Getting the Incubator Ready
Keep your incubator in a room where the temperature is between 70 and 75°F and which is free from drafts. Do not place it near windows or heater vents, or any location that will have extreme variations in temperature.
Check the working order of the incubator before you set eggs in it. Put warm water in the pan and hang a thermometer one inch above the screen. Close the incubator door and sliding glass window and operate it until the temperature inside holds at 101 to 103°F.
In units with a thermostatic control, adjust the thermostat to regulate the temperature. In those with light bulbs and no thermostat, regulate by adjusting the size of the opening with the sliding glass top. Using bulbs of different sizes may also help to adjust the heat. Forty-watt bulbs are about the right size for most incubators. You may need to make many adjustments to reach a proper setting.
Humidity
The ideal moisture level is about 50 to 55 percent relative humidity (83 to 87°F on a wet bulb thermometer) for the first 18 days of incubation. For the last three days it should be about 65 percent (89 to 90°F wet bulb). Some variation above or below the ideal level will not drastically affect hatchability.
It is important to keep a pan of water inside the incubator at all times. The pan should be about the size of the egg tray and always under the eggs. Always use warm water when you refill the water pan. Hot or cold water will affect the temperature too much.
To increase the humidity the last three days, set an extra pan of water in the incubator. You can also put a wet sponge or wet towels in the incubator to raise humidity. Do not let the eggs come into contact with the water at any time.
Temperature
Temperature in the still-air incubator can vary from 101 to 103°F with no harmful effects. However, the temperature should not stay at either extreme. If it stays at either extreme for several days, the hatch may be reduced somewhat. Overheating is more critical than underheating. If light bulbs are used to supply heat, they should be distributed as evenly as possible in the incubator.
Ventilation
Proper ventilation is very important during the incubation process. As the chicks begin to hatch, it is essential that they receive an increasing supply of oxygen. This means that the air openings need to be opened gradually to increase the flow of air.
Turning
Lay the eggs on their sides in the incubator and turn them at least three times a day. Turning prevents the embryo from sticking to the shell membranes. Fair results can be obtained by turning the eggs early in the morning, at noon, and again late at night. It is better to turn an odd number of times. This allows the side that is up longest (during the night) to be staggered from day-to-day.
As you turn the eggs, move them to a different part of the tray to offset variations in temperature in the different parts of the incubator. Continue to turn them from the first through the 17th day. Do not turn them the last four days of incubation.
Final Stages
During the last four days in incubation, the incubator should not be opened except to add water, replace a bulb or make some necessary adjustment. Chicks will start to pip the shell around the 19th day. All chicks that are going to hatch should be out of their shells by the 21st day. If the eggs were chilled or you ran into operational difficulties, the hatch may be delayed. However, chicks that hatch beyond the 22nd day are usually not healthy ones.
When most of the eggs are hatched, lower the temperature to 95°F. This permits the newly hatched chicks to dry off. At this time, all of the air vents should be opened.
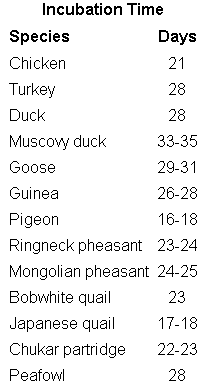
Incubation Time
The approximate periods of incubation required for various species of poultry and game birds are:
Management Tips
It is necessary to open the incubator door to turn the eggs and to replace water in the water pan, but never leave the door open any longer than absolutely necessary to do these chores. Do not open the door when it is not essential. The incubator cools when the door is open and excess cooling can reduce hatchability.
After the chicks have hatched, leave them in the incubator undisturbed until they are dry. This may take as long as 24 hours. After they are thoroughly dry, remove them from the incubator and give them food and water in a warm location.
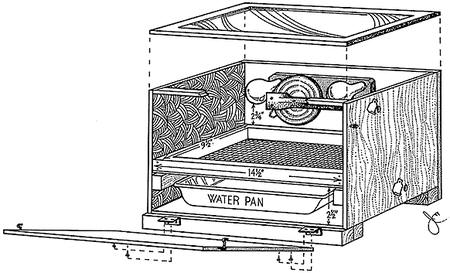
Figure 1: Exploded view of a plywood incubator. Note the tin vent covers for humidity
and temperature control. Glass viewing top is sealed on all sides with masking tape.
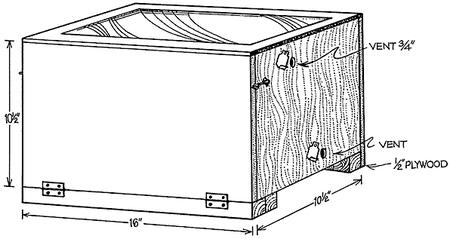
Figure 2: Side view of the plywood box incubator shown in Figure 1.
Source: Mississippi State University Extension Service Virginia Cooperative Extension - May 2004