


Investigating Hatchery Practice - Assessing Fertility
In the second article of this series, Dr Steve Tullett, consultant for Aviagen specialising in incubation and fertility, explains how to assess egg fertility. The article forms part of a recently published Ross Tech publication. 23 December 2009
 9 minute read
Breaking Out Fresh Unincubated Eggs
After fertilisation, the egg spends about a day travelling down the oviduct. During this time, the number of cells in the blastoderm increases to about 60,000. The characteristic organisation of these cells just under the yolk sac membrane makes it possible, with practice, to distinguish between an infertile blastodisc and a fertile blastoderm when breaking out fresh unincubated eggs.
The infertile blastodisc is a small dense white area about two millimetres across (Figure 2). The white area is usually of an irregular shape and is never perfectly round. It is surrounded by a clear, roughly circular area up to four millimetres in diameter, which appears to be filled with bubbles, which are in fact globules of yolk (Figure 3).
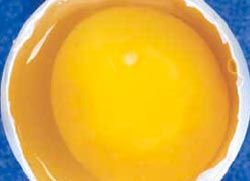

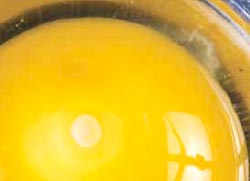
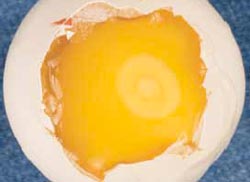
The fertile blastoderm, by contrast, is larger (4 to 5 mm diameter) than the dense white area of the infertile blastodisc and is always uniformly round (Figure 4). The usual form is that of a white ring or 'doughnut' with a clear centre (Figure 5). In some eggs, there may be a small white spot in the centre of the ring. Occasionally, eggs are seen that were laid with the blastoderm at an earlier stage of development, when it will appear as a solid white and perfectly round disc.

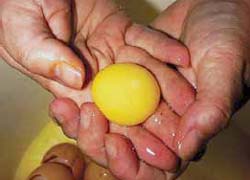
Natural variation in appearance occurs within each category and undue emphasis should not be given to small differences. It is important to practice recognising fertility in fresh eggs, initially by using eggs from flocks known to have a highly fertility status and infertile eggs from a commercial table egg laying flock. Eggs should be opened by removing the shell over the air cell and then gently peeling back the inner shell membrane in order to remove it from the surface of the albumen. If the dense bright white area characteristic of the infertile egg or the white 'doughnut' characteristic of the fertile egg cannot be clearly seen, the contents of the eggs should be tipped into one hand and the yolk gently rolled over until either the blastodisc or blastoderm is definitely observed (Figure 6).
At least one hundred eggs per flock should be examined. The technique is useful because it can give a rapid indication of true flock infertility levels in order to guide breeder management decisions. The technique requires the destruction of hatching eggs. Testing reject eggs is an alternative, but this tends to underestimate true fertility.
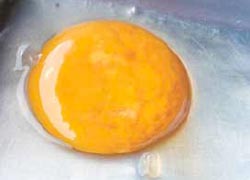
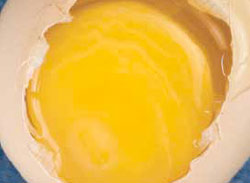
The internal examination of fresh unincubated eggs will also allow the identification of any abnormalities. For example, mottling of the egg yolk is a disturbance of the vitelline membrane usually caused by stress in the parent hens. Stressors include handling (e.g. for blood sampling), changes in routine and over-mating. Feed containing nicarbazin or mycotoxins can also result in high levels of mottling. Mottling of the yolk may cause elevated numbers of early dead embryos and appears to make the eggs more susceptible to bacterial contamination. Figure 7 shows a fresh egg affected by pronounced mottling.
Thin watery albumen, e.g. due to infectious bronchitis or prolonged egg storage, will also reduce hatchability.
Cotton and kapok seed meal as a contaminant of feed can cause the egg yolk to become thick and viscous (rubbery) and will also reduce hatchability.
An example form for recording the break-out of fresh unincubated eggs is given in Appendix 7 (Form 1).
Breaking Out Partially Incubated Eggs
The fertility test undertaken on partially incubated eggs requires the destruction of some hatching eggs, but is easier and requires considerably less practice than examining fertility in fresh unincubated eggs. Once again, a 100-egg sample per flock is the minimum requirement, although it is usually more practical to use one or more full setter trays. Eggs should have been incubated for three to five days prior to examination. Each egg should be opened very carefully from the top of the air cell to avoid any disruption to the egg contents, then the blastoderm or infertile disc will be on the upper surface of the yolk and very easy to see. Do not spend too much time trying to identify signs of membrane development – if it is not obvious, it has not happened.
A truly infertile egg will have the characteristic small dense white area described previously for fresh unincubated eggs.
Embryos dying in the first and second day of incubation will show development of extra-embryonic membrane growth over the top of the yolk. This is characterised by a cream-coloured disc much larger than the white doughnut in the fresh unincubated fertile egg.
After one day of incubation, the area occupied by the extra-embryonic membranes will be about one centimetre in diameter (Figure 8), whilst after two days, the membranes will occupy almost the entire upper surface of the yolk (Figure 9).
On days three and four of incubation, the inner shell membrane looks white when the shell above the air cell is removed. This is due to a drying process as water moves from the albumen into the yolk to form the sub-embryonic fluid. The sub-embryonic fluid is milky and sits on top of the yolk, giving the yolk a paler and more watery appearance than in the earlier stages of development or in the fresh egg.

From day five onwards, the characteristic feature of the embryo is the black pigmented eye (Figure 11). The term 'Black Eye' has been used to describe the embryo from day five to day 12 of incubation, after which time there is the obvious development of feathers.
An example form for recording the break-out of partially incubated eggs is given in Appendix 7 (Form 2).
| Normal early embryonic development |
|---|
|
The embryonic development that occurs whilst the egg is still inside the hen simplifies identification of infertility prior to incubation. An unfertilised germinal disc will show little evidence of any structure except for a condensed white spot of variable shape (Figures 2 and 3). A fertilised blastoderm has a pronounced ring or 'doughnut' appearance (Figures 4 and 5). The difference is visible to the naked eye even when unmagnified. |
Breaking Out Incubator 'Clears'
Incubator 'clears' are those eggs in which no obvious development is seen when a bright light is shone through the eggs in the process known as candling (Figure 12). The term is often, but incorrectly, used as being identical to infertile.
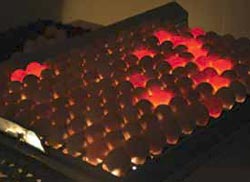
Depending on the quality of the candling lamp or table and the pigmentation of the shell, incubator 'clears' can be candled out from as early as four or five days of incubation. For the brown-shelled eggs of broiler breeders, candling the eggs at eight to 10 days of incubation is usually straight-forward and allows for single-stage incubators to be run sealed up until the time of this candling procedure.
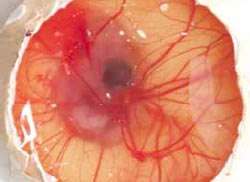
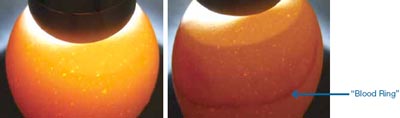
By candling eggs at eight to 10 days of incubation, the eggs which died at the 'Blood Ring' stage can also be identified easily during candling and can be counted at this stage without the need to open the eggs (Figure 13). However, it is usually more accurate and as quick to open all eggs to distinguish the truly infertile eggs from those in which early embryonic mortality has occurred. Accuracy of identification will be improved if the eggs are examined while they are still warm.
Opening eggs candled at eight to 10 days incubation (Figure 14) ensures that the cream- coloured extra-embryonic membranes characteristic of the first two days of development will still be relatively intact even if the embryo died at this stage. By candling the eggs at eight to 10 days of incubation, the extra-embryonic membranes can be easily recognised and differentiated from contamination and bacterial growth that cause deterioration in the membranes and egg contents if the eggs are left in the setter for a longer period.

Eggs are often candled at the time of transfer to the hatchers at around 18 days incubation. By this time, the egg contents can have deteriorated. This is due to the longer exposure to heat and/or development of contamination that often follows embryo death. This can make accurate differentiation of true infertility and very early embryo deaths extremely difficult. The differentiation is considerably easier and more accurate when breaking out the 'clears' from eggs candled at up to 10 days of incubation.
Form 2 in Appendix 7 would be suitable for recording the break-out of incubator 'clears' from eggs candled early in incubation. Forms 3 and 4 are for egg break-outs from the transfer candling.
The whole of this Ross Tech publication will be serialised on ThePoultrySite over the coming weeks.
Further Reading
| - | You can see other articles in this series Investigating Hatchery Practice by clicking here. |
December 2009