


Maximizing Yield Key to Higher Returns
Procedures to increase product yield, regardless of product mix or accounting procedures, are outlined by David Beaver, Technical Processing Specialist with Cobb-Vantress, Inc. in the company's latest 'Technical Focus'. 21 August 2012
 19 minute read
In all processing plants, the most important driver for reducing cost is yield.
Maximizing yield and yield value is the difference between average and
outstanding returns, and in some cases making a profit or losing money.
Product costs are driven by dollars and volume. Increased yield will drive
down the costs of salable product and increase volume without additional
costs for raw material, labour or overheads. Therefore, from a plant standpoint,
yield is the most important number that affects the bottom line.
Understanding and evaluating yield in today's operations can be complex
due to the many product mixes sold around the globe, as well as accounting
procedures, which could be completely different from one company to another.
If done properly, the procedures outlined here will increase product yield
regardless of product mix or accounting procedures.
Poultry plants today span a wide
range of automation levels. This is
driven by many factors such as labour
cost, customer demand, product mix
sophistication and the financial ability
to purchase technology. Regardless of
the level of automation and product
mix, there are three basic process
steps common to all operations. The
understanding and execution of these
steps is critical to maximizing yield,
and in turn the operation's profitability.
It is important to remember that a
great plant yield will always start
with a good live product from the farm.
All the activities - from breed selection,
hatchery, brooding, live
programs and farm
management – combine
to produce the quality,
uniformity and yield
aspects of the bird. Most
of the costs of the salable
product are already in the
birds at this point. The
plant's responsibility is to
convert the potential of
the live bird into high
quality products at the
lowest possible cost.
| Keys to maximum yield |
|---|
|
| Holding area loss prevention | |
|---|---|
|
 |
Yield is the major component that drives the level of success of this conversion. Presented here are the first three areas of a plant operation and some critical things that can impact that conversion.
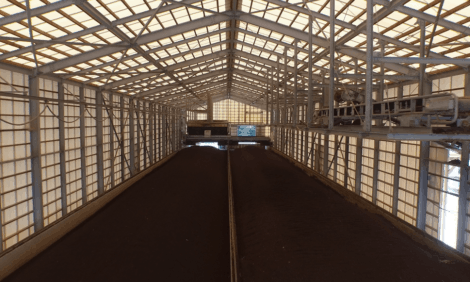
Holding Area
Need to avoid thermal stress
Minimizing holding times and
providing proper holding areas for live
birds waiting to be slaughtered are
necessary to reduce thermal stress and
provide proper bird welfare. This is
absolutely critical to reduce live shrink
and Dead On Arrival (DOA) - the two
factors normally used to measure our
performance in the holding area.
Holding times should be part of a
comprehensive plan that
considers feed and water
withdrawal, catch and
transport times as well as the
plant operation schedule. The
best results are those that
have the shortest holding
time at the plant. A good
program that maximizes
results usually has a goal of
holding times of two hours
or less at the plant.
Trials in the UK have
shown that 40 per cent of all DOA
are from thermal stress. This
includes the time during
transport as well as holding
period at the plant. This
number should be 0.25 per cent or
less.
Live shrink is the amount of body
weight that live birds will lose from the
time they arrive at the plant until they
are processed. This shrink process not
only is a loss of yield but, if excessive,
will cause problems in picking (feather
plucking) as the feathers will be harder
to remove.
* "Holding times should be part of a comprehensive plan....the best results are those that have the shortest holding time at the plant." |
Extreme stress at this stage can also
cause discoloration of the breast meat,
making it appear dark or reddish in colour. In many companies, the live
shrink number is measured on every
load. In some situations this is not
practical but trial measurements should
be run on individual loads to establish
benchmark values.
These trials should take place over a
period of time that will allow the
processing facility to establish a
correlation between holding time,
temperature and the amount of loss.
This number will be a good
management tool to help develop an
effective programme in each situation.
In an operation with proper feed and
water withdrawal, logistics and good
holding conditions, the shrink loss
should be less than 0.5 per cent.
The majority of the poultry
processing industry uses two main
types of holding concepts:
The lairage type holding areas (seen
below), typical of some European
operations, are very effective,
maintaining a controlled
temperature and good
ventilation. They also
provide the opportunity
to restrict light which
helps to keep the birds
calm. This is especially
important in countries
that require a minimum holding time.
The holding shed concept as pictured), the most widely used around the world, can also provide excellent
results. A well-designed shed has high-speed
fans located to blow through the
coops or cages to remove heat as well
as provide a wind chill cooling effect to
the birds. These fans should be turned
on anytime the temperature reaches
21°C (70°F).
The shed will also need a water
atomizer system for use when
temperatures reach 27°C (80°F). This
will further reduce the temperature in
the shed and keep the birds more
comfortable. The spray nozzles should
be of the type that would emit a fog
instead of a spray.
Another invaluable way to measure
performance in this area in real time is
a visual inspection of the birds being
held. If the birds are listless and there is
a lot of open-mouth breathing or
panting, this is a result, in most cases, of
thermal stress and is an indication that
there are problems with the
holding conditions. This visual
observation needs to be made as
part of the area supervisor's
normal routine and is critical in
hotter weather.
Remember the goal of this area
is to keep the birds comfortable. This is
the proper thing to do from a bird
welfare standpoint and will reduce
shrink and DOA, resulting in higher
yield.
Hanging Area
Consistent supply of birds critical
The unloading and hanging operation
sets the stage for the rest of the plant
operations. Not only does it dictate
the efficiency of the kill operation but
if not done properly, it will cause
problems and yield loss throughout the
operation.
No matter what unloading system is
used, it is critical to have a consistent
supply of birds to the hanging area to
keep the line full. Empty shackles
disrupt the stunning process and will
cause more birds to float through the
scalder resulting in poor picking. Birds
that are hung next to an empty shackle
will have a greater chance of riding
over the top of the picker discs, causing poor feather removal and
damage to the bird. If the
empty shackle on the kill line
results in empty shackles in
the evisceration line, it will be
more difficult to set the feed
timing on all the automated
equipment and this will
increase the number of
misfeeds.

If using a coop system, care
must be taken to load the
conveyor without dropping
or throwing the coops which
causes bruising. With the
cage and dumping systems, the
transition points and belt timing are
important aspects to monitor. The belts
should be set at speeds to keep a steady
supply of birds without dumping birds
on top of each other and also to prevent
birds from piling up and smothering at
the end of the hanging belt.
The hanging pen area must be
designed to help the hangers do a good
job. A proper hanging area has black- or
blue-coloured (not UV) lights and is a
darkened area to keep the birds calm.
The shackles must be at the right
height and distance in relation to the
belt and hangers. This will help prevent
improper hanging and one-leg hanging
of birds which will result in a disjointed bloody thigh as well as causing stun,
kill, and picker damage to the bird as it
drags through the machinery by one
leg.
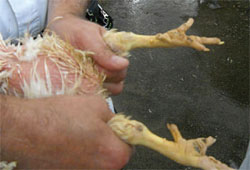
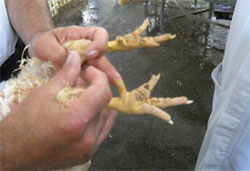
It is also very important to have the
right gauge (gap) of the shackle loops
that best match the bird size you are
running to prevent damage to the feet.
A plant has to check and repair shackle
gap as it is normal to have some
become bent over time.
A gap bent too open will
allow the foot to come out in
the feather picking machinery
causing one leg disjoints, or
possibly pulling the whole bird
out of the shackle and into the drain.
A gap too tight will result in the hanger
pulling down harder and breaking the
foot or not being able to get the foot all
the way down causing missed stun, kill
and pick issues.
| Hanging area | |
|---|---|
|
 |
A breast rub, shown above, is also essential in the hanging area to prevent the birds from climbing the back of the shackles and flapping their wings causing bruises and red wings. Another breast rub should start at the end of the hanging area and continue all the way to the stunner to keep the birds calm and prevent shackle climbing and wing-flapping. These breast rubs are usually made by the plant and can be constructed of scrap sheet metal, guide bar material, old belt material or metal tubing.
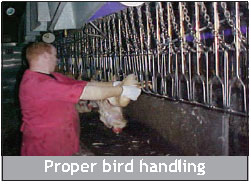
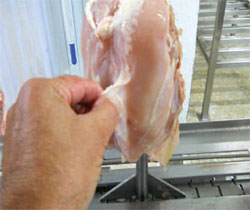
Another very important aspect is
training the personnel who hang the
birds. This must include the proper way to hold and handle the birds, as shown. Proper
technique will help prevent drum
bruises, and disjointed thighs
from one leg hanging.
Also, by handling the birds
incorrectly, the
hands are below the shackle and must
pull down on the drumstick portion of
the leg at a 180-degree angle. This will
not only result in drum bruises but will
also make hanging harder from the
friction of the foot coming down the
shackle as well as contributing to red
discolouration on the paws.
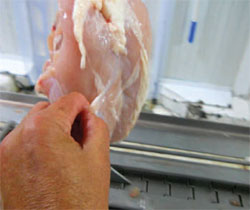
With the correct hanging method, the hands are presenting the
birds' legs at a 90-degree angle to the
shackle, which gives added leverage.
The shank will come down into the gap
without the foot dragging down the
shackle. This method is much better
from an animal welfare standpoint,
reduces yield loss and requires less
effort from the hangers.
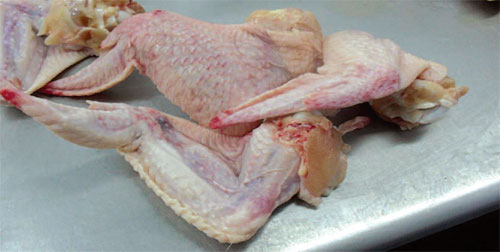
Killing and Bleeding
Challenge to avoid downgrades
The kill-and-bleed step in some form
is common to all operations. It is one
of the biggest areas of product loss and
downgrade in all plants if not done
properly.
Regardless of method - or government
or religious requirements for the
operation - the aim is to slaughter the
bird in a humane manner and remove
the blood from the carcass. Doing this
without damage or downgrade to the
bird is the challenge.
In plants that slaughter by hand
without stunning, the training of the
people doing the cut is critical. The
knife must be extremely sharp and the
cut, whether halal or side cut, must
be done with skill and precision so the
bird does not know it has been cut and
will lose consciousness prior to death
struggle.
Even with a perfect cut, there will be some wing and shoulder damage from
the death struggle in all operations
using this method. Some companies
have been allowed to use a post stunner
after the cut step to prevent death
struggle. This is a great option to
explore with government or religious
officials in this situation.
Due to the cost of ownership,
operation and flexibility, the most
common kill process worldwide is the system using electrical stunning and an
automatic kill machine. The electrical
stunning has been the source of
much debate from the animal welfare
standpoint. Most groups in the United
States and around the world believe
that it is the most humane way and the
most effective system that prepares the
bird for automated slaughter.
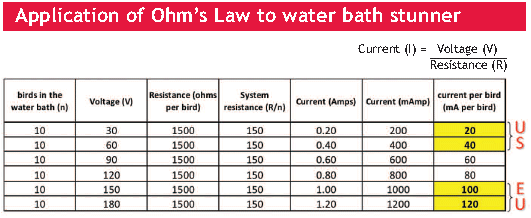
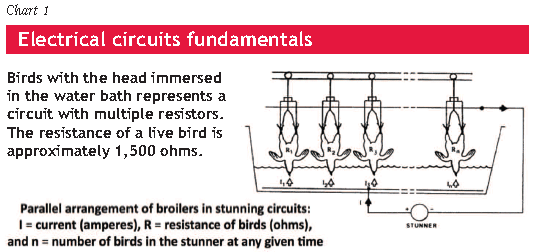
When using the electrical stunner
process there are two schools of thought.
The US model, based on industry
experience and validated by research of
many highly respected groups, is the
traditional method used in most plants
around the world. This model uses
voltage and frequency to produce 20 to
40 milliamps per bird. This has proven
to be animal welfare-friendly and does
minimal damage and downgrade to the
birds when operated properly.
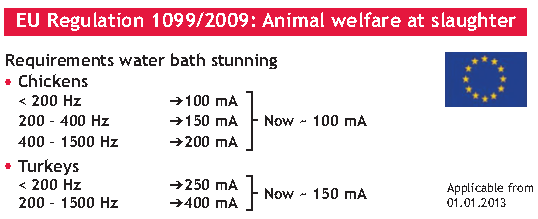
The second model, based on research
of other respected groups, is adopted
by European Union regulations. This
model uses a non-recoverable stun
approach to ensure animal welfare
guidelines. The regulations set
threshold limits for voltage and
frequency of current which requires a
much higher milliamp per bird (100 at
present) than what is used in the US
and elsewhere in the world. This
system, like the US model, is very
effective from an animal welfare
standpoint. However, the increase in
voltage has also increased the amount
of damage done to the bird.
The difference in stunner settings in
the two models translates into a huge
variance in product damage. This will
provide a different perspective on the
ways the two groups look at a new
technology alternative. However, the
animal welfare aspects of both systems
are deemed acceptable.
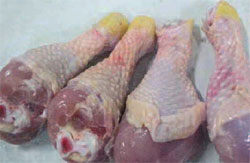
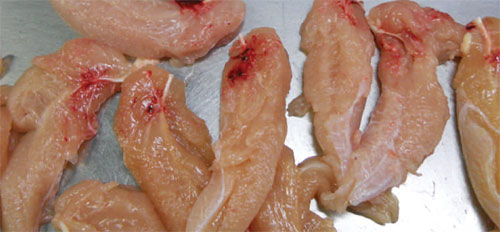
Regardless of requirements to be met,
there are common mistakes made in
plants and correcting these will help
minimize bird damage. These few
things, if done properly, will result in a
more consistent stun and allow the
processor to 'fine tune' the system and
reduce some of the stunner damage
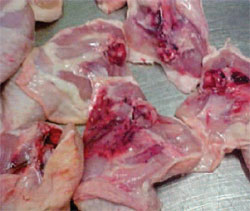
such as seen in pictures below.

The stunner should be set so only the head and part of the neck is in the water. This will prevent much of the wing damage and discoloration that could be caused by the stunner.
The water management of the stunner
is also critical. The most common
mistake in stunners is applying too
much water with solid streams of water
running to the floor. Not only is this a
huge waste of water but the floor will
act as a ground, which disrupts the
current.
Water running out of the entrance of
the stunner will also cause pre-shock,
which makes the birds jump up,
resulting in flapping and wing damage
and possibly completely missing the
stun effect. Added water should be just
enough to replace the water being
dragged out by the birds. Many plants
are using water sprays on the shackle
and foot when the birds enter the
stunner as part of the make-up. This not
only replaces part of the lost water but
helps the ground effect of the stun.
Another effective method to maximize
the electrical stun system and make it
more consistent is using salt to increase the conductivity of the water. Most
systems come with a place to add salt,
but this is seldom used. When the
stunner is operated with salt at a one per cent
solution, the stun becomes more
consistent and this allows the operator
to fine-tune the settings.
Another area that needs checking in
the electrical system is the ground bars.
It is extremely effective to have a
ground bar on both sides of the shackle
to prevent the circuit from being
broken when the bird jumps and pulls
the shackle away from the ground bar.
When the circuit is broken and then reestablished,
it has the same effect of the
birds being double stunned.
Controlled Atmosphere Stunning
Pros and cons
The other stunning option that is
available is Controlled Atmosphere
Stunning (CAS). This includes both the
chemical types that replace oxygen
using CO2 or other gases, or systems
that remove the oxygen from the birds
by mechanical means. These systems all
do a non-recoverable stun.
The CAS systems have some big
advantages. They achieve a uniform
stun of all birds in a flock, regardless of
size. The system provides a much better
environment and ergonomic work
situation for the live hangers. The birds
are non-recoverable, eliminating any
chance of a bird going into the scalder
alive if the killer misses it. The systems
that stun prior to dump also eliminate the bird welfare issues of live birds
being dumped and hung upside down
while awake.
The CAS systems also have some
big disadvantages. DOA identification
becomes very difficult. Automatic
killing machine settings are more
difficult as the wings are not tucked
and neck extended. Expect an increase
in wings cut by machines in these
systems.
Also, compared to electrical stun, the
CAS system is much more expensive
to buy and operate and does not have
the flexibility for line changes. With
the chemical systems there will be
increased handling and transport safety
concerns to consider as well as gas
availability.
The other issue apparent with any
type of stunning is the amount of
broken wings. This will have to be
addressed, not only from a product loss
standpoint but also the perception of
the animal welfare.
After the birds are stunned, the type
of kill cut should dictate the bleed time.
Not enough bleed time will result in
birds possibly entering the scalder alive,
excess blood left in the product and
reddish colour skin. Too much bleed time
will result in feathers being more
difficult to remove and yield loss.
Some countries set a minimum for
bleed time and these government
requirements supersede any other
factor. If there is no government
requirement, a good rule of thumb is
that a cut that severs both carotid
arteries and both jugular veins, as well
as the windpipe, will bleed out in 90
seconds. A cut to the side of the neck or
back of the head severing only one vein
and one artery will require 120 to 150
seconds to bleed out properly.
The visual confirmation of your bleed time is at the entrance of the scalder.
Before entering the scalder the birds
should have their wings and neck
relaxed and there should be no bird
movement. If this is not the case, the
bleed time is too short. If these bird
conditions exist much earlier in the
blood tunnel before the birds reach the
scalder, the bleed time is too long
causing picking issues and yield loss.
Scald and Pick
By far greatest potential for yield loss
The next area common to all
operations is scalding and picking -
the place with by far the greatest
potential for yield loss. This is truly
an area where success or failure is
measured by small increments and with
exacting detail. A half degree of scald
temperature can mean a huge loss or
gain in yield.
Adjustment of the pickers at every
flock change has to be done properly to
allow correct picker set-up that will not
break wings and mutilate birds or
leave too many feathers. All too often,
there are instances where the scalder
temperature is the quick fix and is
used to compensate for poor picking
adjustment and picker upkeep.
Regardless of the type of system in use, the upkeep is critical.
The scalder must maintain good
agitation to wet the feathers
completely. There must be enough
picking power and the proper picking finger selection for the current product
mix. There must also be a good
preventative maintenance and effective
finger replacement programme to pick in a
manner that will maximize the product
yield.
Another key fact in a scald/pick
operation that maximizes yield is that
100 per cent of the feathers will not be
removed by the equipment. If the
scalder temperature is set too hot to
ensure 100 per cent feather removal, it will
result in over scald of the breast. The tissue and
collagen layers underneath the skin are
also destroyed. Not only is the weight
of the tissue and collagen lost, but this
is also what binds the majority of the
retainable moisture picked up in the
chill process.
The pickers cannot be
adjusted to pick 100 per cent
of the feathers, but must
be set to the largest
birds in the flock being
run. If set to the smallest
or medium birds, the
largest birds will be
damaged because the
pickers are too tight.
Because of this, a small
percentage of the birds
will have a feather or
two left on them. These
feathers must be
removed manually by
people downstream in
the process.
It is also important to remember that
all scalder and picker systems are not
the same. Systems should be selected
based on the processing plant's product requirements. To minimize yield loss
and to scald and pick to the customer
expectations, there needs to be a system
which balances the scalder with the
number and type of pickers designed
for each particular product mix.
In plants that are producing a soft
scald, retaining cuticle on the product
is more successful with longer scalder
dwell times - up to three minutes at
lower scald temperatures. The best
systems utilize three-stage, multi-pass
scalders. The temperatures are usually
between 49°C and 53°C. This system
also needs more pickers on line to
target specific areas of the bird. They
will often use hock and straddle pickers.
In some cases it is also necessary to use
a hock steamer to remove the yellow
from the hock.
Plants that are producing white,
cuticle-off birds will usually use two
or three-stage, multi-pass scalders and
have less dwell time. They will trade
dwell time for temperature as they must
scald around 51°C to 55°C to denature
the cuticle for removal in the pickers.
Dwell time in this type system needs to
be 120 seconds.
There are still a lot of single-stage,
multi-pass systems in use and many are
doing a good job. A lot of these are
running shorter dwell times - as low as
90 seconds and temperatures up to
56°C to break down the cuticle. This
type of system must be constantly
monitored and is very sensitive to line
speed changes or agitation problems.
It is operating right on the limit of
short dwell time and higher scalder
temperature. With this type system small changes can translate into big
problems . There is no upward
temperature flexibility and any
temperature increases at all could cause
major yield loss.
There are many systems that run
single-stage very short dwell times and
compensate with higher temperatures.
Without exception, all of these plants
experience major yield loss from over
scalding the breast and destroying the
tissue and collagen layers underneath
the skin. Any system with a dwell
time of less than 90 seconds or a
temperature in the scalder above 56°C
should be avoided.
With dwell times above 90 seconds,
temperatures should be 55°C and below
for white birds and 53°C and below for
yellow birds. Remember - heat is the enemy of yield. Always scald
with as low an effective temperature as
possible to meet expectations of your
customer.
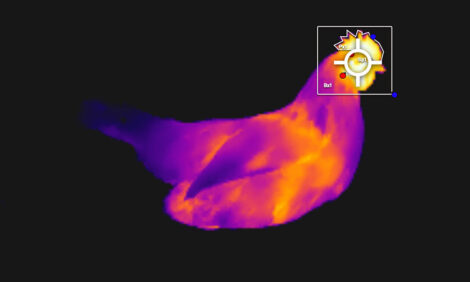
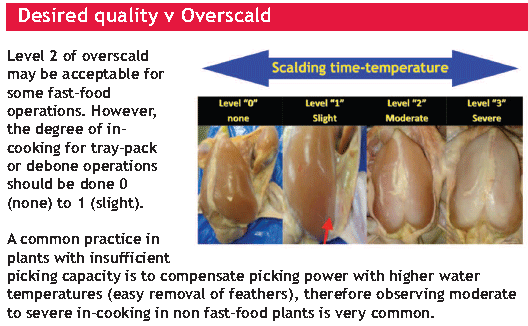
The chart from Meyn is a
great visual to gauge equipment
performance. The white over-cooked
areas of the breast indicate yield loss.
The scalder operation should be run to
reduce this as much as possible.
The three areas examined here are
only the foundation steps. Not only
must they be done properly but all
subsequent steps have to be performed
properly to maximize yield.
| Always remember the goals of our activities |
|---|
|
| = $$$$$ from improved shelf life and retainable yield |
August 2012