


Repairing Corroded Sidewall Metal
Metal sidewall issues can increase the cost of heating the house and adversely impact broiler performance. Dennis Brothers of the National Poultry Technology Center at Auburn University College of Agriculture explains how to maintain the building by repairing the corroded sidewalls. 23 November 2014
 7 minute read
 By:
By: As cooler weather approaches, it is time for poultry growers to turn their attention to issues that can increase heating costs and hurt bird performance by allowing cold air infiltration and heat leakage.
This newsletter addresses metal sidewall issues that can cause this kind of problem and reviews a new solution that the National Poultry Technology Center (NPTC) began testing in 2011 and has been proven to be effective through field trials.
Poultry house sidewalls have been undergoing a slow transformation over the last several years from having large curtains to being solid, fully sealed and insulated. This has greatly improved growers’ ability to control the in-house environment and save on heating fuel costs.
However, in many houses that have made this transformation or are in the process, we are seeing serious air leakage caused by corrosion of exterior metal along the lower sidewall at ground level. These air leaks not only make it much more difficult to keep birds comfortable at a reasonable fuel cost, they can provide entry points for rodents and other pests, and in the worst cases lead to sidewall post degradation and compromise the structural integrity of the house.
.PNG)
Construction techniques using concrete footers in recent years have all but eliminated this issue in newer houses. However, we are seeing many older style post-in-ground houses with rusted metal along the bottom of the sidewall after only a few short years.
The metal siding was initially installed below grade to obtain an air tight seal along the sidewall. A vapour barrier is usually installed behind the metal, and both covering either 2× or 1× lumber walls. The lumber walls of these houses are often uninsulated and exposed directly to litter and moisture from the inside of the poultry house. It is this litter and moisture exposure that eventually combines with the moisture from the outside that starts the metal corrosion. Once the metal starts to rust, it is not long before large air leaks have formed.
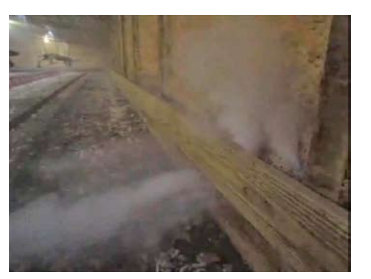
As the house is ventilated with negative pressure, cold air jets soon develop, bringing chilling air directly onto the floor of the house, causing condensation and chilling chicks in the process. Additional heating fuel must be burned to overcome this chilling effect. Many growers have recognized this problem and have taken steps to repair the lower sidewall area using the best option they had at the time – more metal siding. The obvious problem with this method is that the new metal siding will eventually suffer the same fate as the original.
Several years ago, plastic siding materials were introduced and tested as a remedy for this problem. They worked fairly well, at least for a time; however, solar radiation caused some detrimental effects to some of the products. Some products suffered excessive contraction and expansion when exposed to exterior temperature swings, causing loosening at the attachment points and consequent leakage once again. These earlier plastics were also fairly expensive and some required special fasteners, further increasing cost.
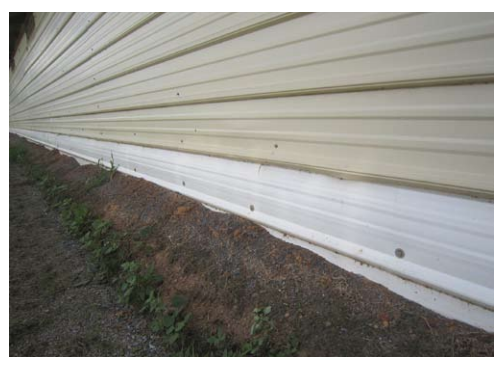
In the fall of 2011, the NPTC undertook a test of a new UV-stabilised PVC siding material to repair this common metal siding failure on older post-in-ground houses. The product used is called AG-TUF UV Corrugated PVC from Palram, Inc. This product was designed to be used as livestock roofing, so it is available in the same corrugations and width as normal metal panels commonly used for broiler house siding in the US. This made it easy to integrate the PVC panels into the existing metal siding of the houses tested.
This product was first tested using full sheet replacement of the bottom 36 inches (one metre) of an affected house. This method proved successful; however, the use of a full sheet was seen as unnecessary on most houses, since the corrosion is typically less than two feet above the deepest embedment of the wood siding. Instead, the PVC panel can be cut in half lengthwise, making one sheet go twice as far. Cutting the corroded metal off at a matching width, just below a rib, allows for the PVC panel’s matching rib to be installed underneath the existing metal.
Installation of these panels calls for pulling the dirt back-fill away from the wall and digging a ditch or trench along the wall to facilitate removal of the old metal and expose the lumber wall beneath. Any structural wood repairs should be done at this time. Once all lumber repairs are complete, the PVC panels can then be installed. Although the PVC panels are water impervious and therefore vapor barriers themselves, it is recommended that some form of sheet vapor barrier be installed behind the PVC, between it and the wooden sidewall, to improve the air sealing along this vital area.
.PNG)
If the old vapour barrier is damaged, a new section should be installed in its place and run up under the edge of the metal, under the old existing vapor barrier, and extended down below the backfill line, in order to adequately combat air infiltration. The initial test PVC panels were installed using common one-inch roofing screws without pre-drilling. This proved successful; however, it was decided that to improve the long-term success, following trials added common quarter-inch flat washers installed as additional backers to the screws, care being taken not to over-torque the screws into the plastic.
Just a gentle snug up is all that is needed so the neoprene washers that come with the screws are only slightly compressed. Screws should be installed in the flats as with normal metal siding at similar spacing of no more than two feet on centre. After installation, the dirt back-fill is replaced against the new siding. Using this method, the PVC panels have proven to hold up over time with minimal contraction and expansion in all weather conditions.
Air leakage along the lower sidewalls of the repaired houses has been virtually eliminated, yielding noticeably drier litter along the sidewalls and lowering the amount of fuel required for litter management. Brooding conditions immediately improved as well. The cost of the PVC panels typically mirrors the cost of painted 29 gauge metal per running foot. At present, the panels are only available in white and in 20-foot long sheets.
The Bottom Line
A corroded metal sidewall repair can be costly. The majority of the cost of a total house repair with this product is labour, which is highly variable, depending on the severity of the sidewall degradation, the lumber repairs required, and local labour costs.
It is estimated that in the Broiler Belt this cost could range from $1,500 to $2,500 for both sidewalls of a 500-foot-long house. However, a conservative estimate for fuel savings of eight per cent, combined with improved brooding conditions, make this an improvement that will pay for itself in less than five years on most farms spending an average per house of $4,000 for heating fuel per year, and even more quickly on the worst-case houses.
Disclaimer: Mention of brand names in this publication is for information and illustration purposes only and is not intended and should not be construed as a recommendation of one product over another that may be equally suitable for the purpose.
November 2014