


Cobb Breeder Management Guide: House preparation for transfer and production
Learn more about nesting systems 18 April 2024
 3 minute read
 By:
By: Part of Series:
Editor's note: This article is an excerpt from the Cobb Breeder Management Guide and additional articles will follow. The Guide was designed to highlight critical factors that are most likely to influence flock performance. The management recommendations discussed were developed specifically for Cobb products. The recommendations are intended as a reference and supplement to your own flock management skills so that you can apply your knowledge and judgement to obtain consistently good results with the Cobb family of products. To read or download the complete Guide or to view Cobb's other management guides, click here.
Housing and equipment requirements for community nesting systems
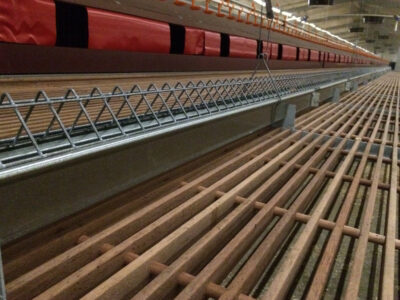
Slats
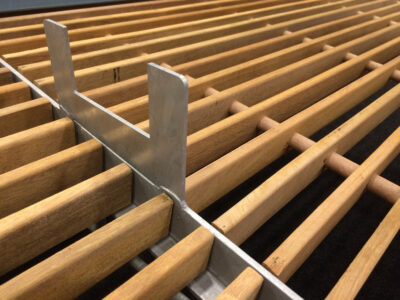
Well-designed slats are an integral part of preventing floor eggs. A ratio of 60 % floor area to 40 % slat area is normally used. With a 12 m (40 ft) wide houses, slats need to extend 2 m (6.5 ft) from the front of the nest on each side. With a 14 m (46 ft) wide houses, slats need to extend 2.7 m (8.8 ft) from the front of the nest on each side. Apply a slat slope of 7° with hardwood or plastic slats. Hardwood slats are preferred when starting with community nests because there tends to be very few slat eggs, females have improved grip to access the nests and are cleaner than plastic slats.
Hardwood slats are also easier for the caretakers to cross when checking the nests for mortality, cleanness and whether eggs are rolling correctly onto the belts. Do not use mini-slats of 1.2 m (4 ft) wide that have only enough space for a single drinker line. This system can cause floor eggs and have very inconsistent results.
Feeders
A minimum of a single line or loop of the female feeder lines should be on or suspended above the slats. For a 12 m (40 ft) wide house, place 1 feeder line on the slats. In a 14 m (46 ft) wide house, place 2 feeder lines on the slats. The distance from the slat step up to the first feeder should be a minimum of 50 cm (20 in).
Drinkers
The nipple drinker line in front of the nest must be 60 to 70 cm (23 1/2 to 27 1/2 in) from the nest entrance. The distance between the water line and first feeder loop should be around 60 cm (23 1/2 in). Do not put water lines in the scratch area for females. Drinkers should be installed at a rate of 8 to10 females per nipple or 1 bell drinker per 75 birds.
Lights
Lights should be placed just outside the slat area and just above the start of the litter (scratch) area, so that the slats do not cast a shadow over the scratch area. The scratch area should have uniform light distribution with high light intensity (minimum 50 to maximum 100 lux). The lights should be located to allow 2 to 4 lux to reach the back of the nest entrance. No extra lights inside or directly above the nest are needed.
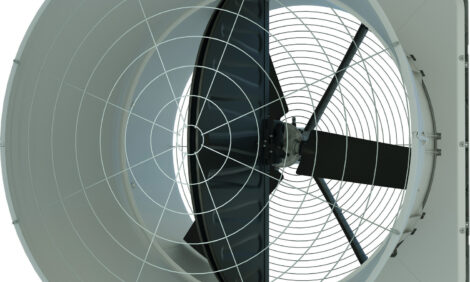
Ventilation
With respect to ventilation, no air should go through the nest and cause draft which can be important when using cross-ventilation. In tropical or hot climates, a good cooling system is needed to prevent excessively high temperatures in the house and thus nests. Overheating in the house and nests will cause females to lay the eggs on the slats or scratch area. Always use roof insulation with minimum R12 for tropical climates and R20 for cold climates.
Housing and equipment requirements for production systems
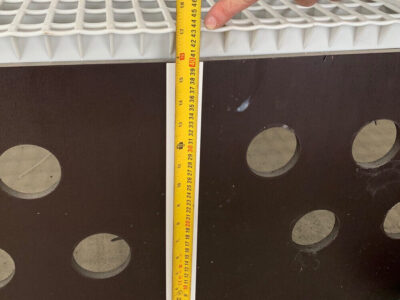
Slat height is very important for welfare of the flock and for optimal performance outcomes. The recommended slat height (measured from the top of the slats to the concrete floor) is 45 cm (18 in). The 45 cm height is recommended because droppings that fall through the slats will accumulate over time. If the slats are too low, the droppings may start to touch the bottom of the slats or come through the slats. If this happens, the slats, nests, hen’s feet, and eggs can become dirty and contaminated. For slats taller than 45 cm (not recommended) consider using steps, ramps or baskets placed along the slat edge to facilitate bird movement to and from the scratch area. Some slat designs have 2 height positions, one of 35 cm (14 in) used in the first part of the production period and then a second higher position of 45 cm used after 40 weeks of age. This concept is recommended for the Cobb females in community house setups (not US style house configuration that do not offer this feature).
During house preparation and before receiving birds in the house, conduct a detailed audit to ensure that slats are set up correctly to optimize welfare outcomes. For example:
- Are slats in good condition (no cracked, broken or missing slats), secure (attached to the braces underneath), and positioned correctly (spacing is appropriate to prevent leg or foot entrapment)?
- Are the front and back boards securely attached to the slats to prevent bird entrapment and entry underneath the slats?
- Are slats aligned correctly to prevent gaps and unevenness?
A process audit for welfare is a good tool to use during the transfer process to verify that management, handling, bird care and biosecurity protocols are achieved. Examples of items to audit include: house preparation and setup (lighting, drinker and feeder equipment, slat condition, ventilation, etc.), bird condition and welfare quality, handling during the unloading process, calibration of feeding equipment, maintenance of transfer equipment, and bird behavior and distribution after transfer.
Nesting systems
Manual nest systems
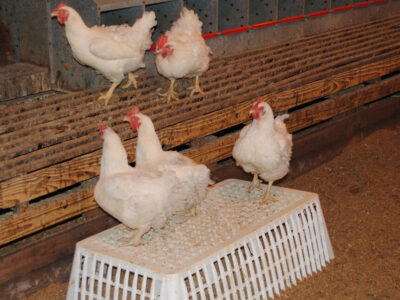
Manual nesting systems are still popular in regions of the world with lower labor costs. These systems should provide 1 nest for 4 hens. The nest boxes must have solid bottoms and be well-maintained so it is the most attractive place in the house for the birds to lay eggs. The nest should be bird friendly, have clean and dry bedding and provide environmental comfort for the hen. The ideal nest size is 25 cm (9 7/8 in) long, 30 cm (11 7/8 in) high and 25 cm (9 7/8 in) deep, so females feel protected. In addition, the instep should be at least a 15 cm (6 in) high. Fill the nests with material that is a minimum 1/2 to a maximum 2/3 of the instep height for the hen to make a concave nest. Overfilling the nests will make them less attractive and hens will kick out the expensive nest material. The maximum height to jump to the perches to get into the nest should be around 45 cm (18 in). Egg collection should be done frequently to prevent having more than 3 eggs per nest because this can induce pre-incubation and broken eggs.
Mechanical nest or automated egg collection
There is a strong movement to mechanize egg gathering worldwide. The egg collection in the house can be automated with individual or community nests.
Individual mechanical nest systems
- Very popular in the USA house setup with 2/3 slats and 1/3 scratch area in the center of the house.
- 1 line of mechanical nests on each of the slats or 2 lines of nests per house.
- The advantage of this design is a low percentage of floor or slat eggs.
- All the equipment is over the slats (feeders, drinkers and nest system).
- Female density is limited to a maximum of 5.5 females per m2 (1.96 ft2 per bird). At this maximum density, a shortage of feeder space can affect peak production and production persistency.
Community nest systems
- The industry worldwide is adopting the European community nest system.
- 1 line of automatic nests placed in the central part of the house with slats extending out from either side of the nests.
- Female stocking densities: 6 to 7 females per m2 (1.54 to 1.80 ft2 per bird).
- Higher female stocking densities significantly reduce hatching egg costs and pay for the higher investment costs due to higher financial return per square meter.
- If the house design and equipment configuration is correct the community nest system is highly efficient with a low percentage of floor and slat eggs.
- For a system to be successful, the nests must be very attractive to the females to prevent slat and floor eggs.
Community Nest Design
With community nest systems, there are generally 2 nest sizes (40 or 45 cm deep, by 240 cm long) with each nest unit having 4 entrance holes, (2 on each side). Use the recommendations on birds per nest hole from the manufacturer or use the guidelines to the right. Install a nest system that gives the lowest percentage of floor or slat eggs. Always use the larger nest dimensions when houses are 14 m or wider.
Most nest types in the market do not exceed 200 females per nest unit (nest unit of 2.4 m length with 83 hens per linear meter of house). This calculation is conservative and can be used when beginning an operation with community nests. There is always the possibility to increase the female density when the operation runs well and enough of experience has been obtained.
Example guidelines of hens per nest hole for Jansen and Van Gent nests*
40 cm deep nest - calculate maximum 230 females per nest unit (4 holes)
* or 58 females per hole
* or 96 females per linear meter of house length (48 females on each side of the nest per linear meter of house length)
45 cm deep nest - calculate maximum 260 females per nest unit (4 holes)
* or 65 females per hole
* or 108 females per linear meter of house length (54 females on each side of the nest per linear meter of house length)
*Manufacturers named here are for guideline purposes and should not be considered as an endorsement.
Female density in production
In a 12 m wide house install 3 chain feeder loops. This provides:
1200 cm of feeder space per meter house length ÷15 cm feeder space/hen = 80 hens per linear meter house length
80 hens per linear meter house length ÷ 12 m wide house = 6.7 hens/m2
For nest systems going from the front to the back of the house with only a cross over at both ends and one half-way in the house, the nesting space is adequate for 80 hens per linear meter.
In a 14 m wide house install 4 chain feeder loops, 2 on the slats and 2 in the litter area. This provides:
1600 cm of feeder space per linear meter house ÷ 15 cm feeder space per hen = 107 hens per linear meter house
107 hens per linear meter house ÷ 14 m wide house = 7.6 hens /m2.
Normally density is limited to 7 hens / m2 with good environmental conditions. When using only 3 feeder loops the density will become:
1200 cm of feeder space per linear m house ÷ 15 cm feeder space per hen = 80 hens per linear meter house
80 hens per linear meter house ÷ 14 m wide house = 5.7 hens /m2.
Because density is low, it is better to install the 4th chain loop to have some flexibility with feeder space. Another option is to start out with 3 loops and 5.7 hens /m2 and, later, expand to 7 hens /m2. In this case, always install the first 2 feeder lines on the slats as it is easier to install an additional feeder loop in the scratch area when increasing from 3 to 4 feeder loops.
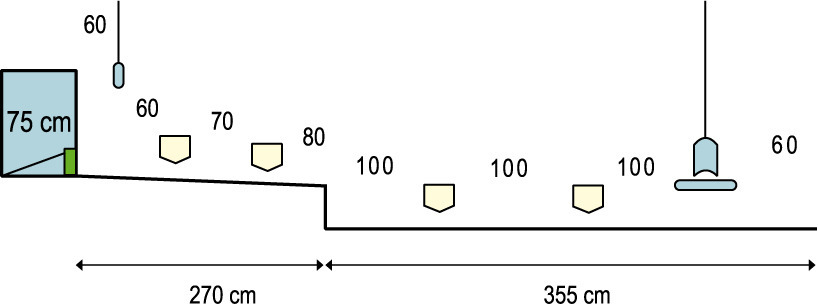
Increasing hen density can be very beneficial in terms of cost (see table to below). This is the most cost-effective way to increase the financial income per m2 of house area and the cost of producing a hatching egg and chick.
When increasing the female density, equipment will also need to increase (feeder, drinker and nesting space). As mentioned earlier, a good tunnel ventilation system with pad cooling is very important to have the correct ambient temperatures and humidity to keep the birds comfortable and the litter or shavings in good conditions.
Community nesting systems designs
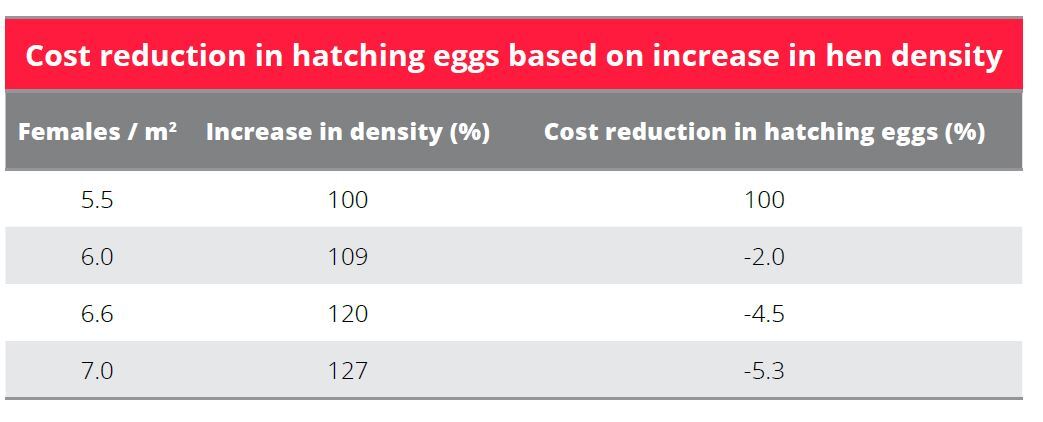
Half of a 12 m wide house
Slats should be 45 cm high (adjustable between 35 and 45 cm). For a 12m wide house, the configuration has only 1 feeder line on the slats. There are 3 loops of chain feeders or 6 lines giving the potential density of 6.7 females per m2 with 15 cm of feeder space per bird. Nipples are spaced 20 cm apart.
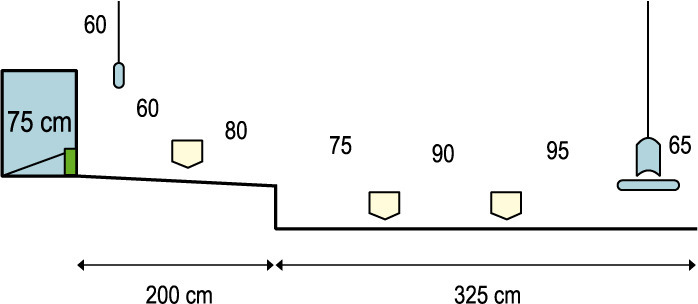
Half of a 14 m wide house with 3 feeder loops
Slats should be 45 cm high (adjustable between 35 and 45 cm). Slat slope of 7 to 8 degrees. This configuration with 3 chain loops gives space for 5.7 females per m2 with 15 cm of feeder space. With 2 chain loops on the slats, there is a lot of space in the litter area where there is only 1 chain loop. This keeps the litter in better condition than setups with 2 loops in the litter and provides more space for mating.
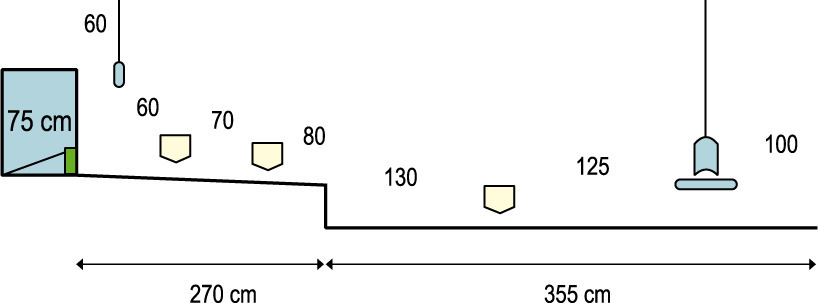
Half of a 14 m wide house with 4 feeder loops
Slats should be 45 cm high (adjustable between 35 and 45 cm). With 4 feeder loops, there is feeder space for 7.6 females/m2 with 15 cm of feeder space per female. However, in most climates, the maximum of 7 females per m2is used. Higher densities are only recommended in cooler (temperate) climates and/or with good environmental controlled conditions(pad cooling and tunnel ventilation). With 4 chain loops, there is 16.3 cm of feeder space per female.